Change files permissions on Linux

Managing file permissions is one of those Linux skills you need early. Get it wrong and you’re either locked out of your own files or, worse, you’ve created a security hole. Let me walk through how chmod and chown work in practice.
I see a lot of developers struggle with permissions, especially when deploying web applications. Hopefully this clears up the confusion.
Understanding Linux Permissions
Every file on Linux has three sets of permissions: owner, group, and everyone else. Each set can read, write, or execute.
Check permissions with ls -l:
ls -lha /usr/bin/curl
 How to list file permission on Linux
The output tells you:
- Owner: root owns this file
- Permissions: root can read, write, execute
- Group: root group can read and execute
- Others: everyone can read and execute
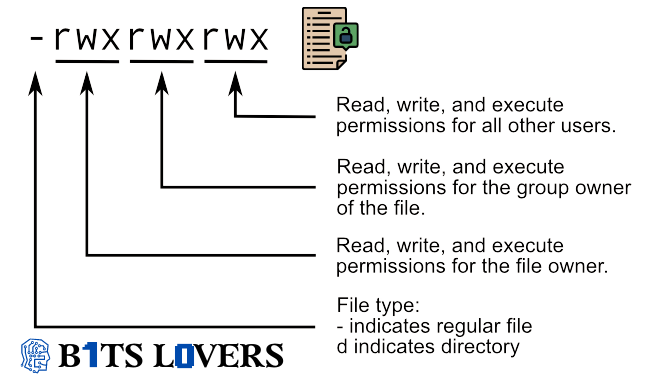
That first column -rwxr-xr-x breaks down as:
- Position 1: file type (
-= regular file,d= directory,l= symlink) - Positions 2-4: owner permissions (rwx)
- Positions 5-7: group permissions (r-x)
- Positions 8-10: others permissions (r-x)
 How the Permission Works on Linux
Using chmod to Change Permissions
The chmod command changes permissions. You can use either symbolic mode (letters) or numeric mode (octal).
Numeric Mode (Octal)
Each permission has a value:
- Read = 4
- Write = 2
- Execute = 1
Add them up for the combined permission:
- 7 = rwx (read + write + execute)
- 6 = rw- (read + write)
- 5 = r-x (read + execute)
- 4 = r– (read only)
- 0 = — (no permission)
The three numbers represent owner, group, others.
Common patterns:
chmod 755 file.sh    # Owner: rwx, Group/others: r-x
chmod 644 file.txt    # Owner: rw-, Group/others: r--
chmod 600 secret.key  # Only owner can read/write
chmod 777 shared.txt  # Everyone can do everything (rarely needed)
Symbolic Mode
I prefer symbolic mode when I’m making targeted changes:
chmod u+x script.sh     # Add execute for owner
chmod g-w file.txt      # Remove write for group
chmod o=r file.txt      # Set others to read-only
chmod a+x script.sh     # Add execute for all (same as ugo+x)
The operators:
+add permission-remove permission=set exact permission
The targets:
uuser/ownerggroupoothersaall (ugo)
Making Scripts Executable
This is one I use constantly:
chmod +x ~/deploy.sh
That adds execute permission for all users. The +x without a target defaults to a+x.
Directory Permissions
Directories work differently than files:
- r (read) - list contents (if
xis also set) - w (write) - create/delete files (if
xis also set) - x (execute) - enter the directory (cd into it)
Common directory permissions:
- 700 (rwx——) - Only owner has full access. Good for
.sshdirectories. - 755 (rwxr-xr-x) - Owner full access, others can enter and list. Standard for web directories.
- 777 (rwxrwxrwx) - Everyone can do everything. Avoid this unless absolutely necessary.
Recursive Permission Changes
Be careful with recursive changes. They’re powerful but dangerous:
chmod -R 755 /var/www/html
That sets 755 on everything in /var/www/html - files and directories.
I prefer being more selective. Use find to target just files or just directories:
# Files only - 644
find /var/www/html -type f -exec chmod 644 {} \;

# Directories only - 755
find /var/www/html -type d -exec chmod 755 {} \;
The find command locates items and passes them to chmod one at a time. The {} gets replaced with each file/directory name.
Preserving Permissions When Copying
When you copy files as root, permissions default to root:root. Fix that:
cp -rp /source /destination
The -p flag preserves ownership, permissions, and timestamps. The -r flag copies recursively.
For remote copies:
scp -rp local_file.txt user@remote:/path/
That -p works with scp too.
Symbolic Links
Symbolic links always show as 777, but that’s misleading:
chmod 755 symlink
This actually changes the target file’s permissions, not the link itself.
Most modern Linux distributions protect symlinks via /proc/sys/fs/protected_symlinks. You’ll get “permission denied” if you try to modify a symlink target across user boundaries. Don’t disable this protection - it’s there for security.
Changing Ownership with chown
Chown changes the file owner:
sudo chown user:group file.txt
Examples:
sudo chown john file.txt           # Change owner to john
sudo chown john:developers file.txt # Change owner and group
sudo chown :developers file.txt     # Change only group
sudo chown -R john:www /var/www    # Recursive ownership change
You can also use chgrp to change just the group:
chgrp developers file.txt
Though honestly, chown user:group does the same thing and it’s what I actually use.
Finding Files by Permission
Audit your system for overly permissive files:
find /var/www -perm 777
That finds all files with 777 permissions - useful for security reviews.
You can also find files writable by the group:
find /var/www -perm -020
And files writable by others:
find /var/www -perm -002
Real-World Example: Web Server Setup
Here’s how I typically set up a web directory:
# Set ownership to web server user
sudo chown -R www-data:www-data /var/www/html

# Directories: 755 (owner full, others read/execute)
find /var/www/html -type d -exec chmod 755 {} \;

# Files: 644 (owner read/write, others read)
find /var/www/html -type f -exec chmod 644 {} \;
For upload directories, you might need group write:
chmod 775 /var/www/html/uploads
chown www-data:www-data /var/www/html/uploads
That lets the web server write, and anyone in the www-data group can manage files.
A Note on 777
Developers love chmod 777 because it “just works.” It’s also a terrible idea.
777 means anyone on the system can read, modify, or execute your files. On a shared system, that’s asking for trouble. Even on a single-user system, it’s sloppy.
I’ve seen production databases, SSH keys, and configuration files set to 777. Don’t do that. Use the minimum permission necessary.
If you must use 777 to debug something, fix the underlying issue and revert it. Document why you needed it. Make it part of your deployment checklist.
Access Control Lists (ACLs)
Sometimes standard permissions aren’t enough. ACLs let you grant permissions to specific users beyond the owner/group:
# Set ACL for a specific user
setfacl -m u:john:rw file.txt

# Check ACLs
getfacl file.txt

# Remove ACL
setfacl -x u:john file.txt
Not all filesystems support ACLs, and they add complexity. Use standard permissions unless you have a specific need.
Common Mistakes I See
-
Forgetting execute on directories - You need
xtocdinto a directory. A directory withr--but noxis frustrating to debug. -
Setting 777 everywhere - This is the “sledgehammer” approach. It works but creates security issues.
-
Running apps as root - Don’t. Set up proper users and groups instead.
-
Ignoring umask - Your default file permissions are controlled by umask (typically 022 or 002). Check yours with
umask. -
Mixing up recursive and single-file operations - I’ve seen people accidentally
chmod -Rtheir home directory to 000. Be careful with that recursive flag.
Wrap Up
File permissions seem straightforward until they’re not. The basics are simple:
- Use
chmodto change permissions - Use
chownto change ownership - Prefer minimal permissions over maximum access
- Think before using recursive commands
- Test in a non-production environment first
If you’re deploying web applications, set up your permissions during development, not after production breaks. Document your permission scheme. Test your deployment process.
For reference, the chmod man page has all the details.
Questions about specific scenarios? Drop a comment and I’ll help you work through it.
Explore more like this
Dirty Frag and Fragnesia: Linux LPE Response Plan for Cloud Fleets
On May 7, 2026, the Dirty Frag disclosure put Linux local privilege escalation back on the priority board. On May 13, Fragnesia followed. That one-week rhythm is enough to change...
Copy Fail CVE-2026-31431: Patch Linux, Kubernetes Nodes, and CI Runners First
CVE-2026-31431 is not the kind of Linux bug you leave for the next maintenance window. CERT-EU says Copy Fail was publicly disclosed on April 29, 2026, has a CVSS 3.1...

Comments