Amazon Security Lake: Centralized Security Analytics Architecture Guide
Security teams are basically drowning in logs at this point. CloudTrail events pouring in from 47 AWS accounts, VPC Flow Logs from hundreds of subnets, GuardDuty findings stacked up across every region, WAF logs from a dozen distributions, DNS query logs from Route 53 Resolver – and we haven’t even touched the third-party stuff like CrowdStrike EDR, Palo Alto firewalls, and Okta auth events. Every single source speaks its own language: its own schema, its own timestamp format, its own way of saying “IP address.” Meanwhile, your SIEM license charges by ingest volume, so someone signed off on a 30% budget increase last quarter and the team still has to filter out half the data just to stay under the cap.
That’s exactly the mess Amazon Security Lake was designed to clean up. But here’s the key distinction – it’s not trying to be another SIEM. Instead, it’s the central data lake that your SIEM, your custom analytics, and your AI-powered detection tools all pull from. It normalizes every log source into one schema (OCSF), stores everything in Apache Iceberg tables on S3, and then you can query it with Athena, pipe it into your existing SIEM, or feed it straight to Bedrock for automated threat analysis.
We’re going to cover the full architecture here: what Security Lake actually does under the hood, how OCSF normalization works, setting it up across multi-account and multi-region environments, ingesting custom log sources, querying the data, and – maybe most importantly – how the cost stacks up against a traditional SIEM.
The Security Data Problem
No matter how big your organization gets, three headaches show up in every security operations team running infrastructure at scale.
Log sprawl. Take a mid-size AWS deployment – you’ve got CloudTrail management events, CloudTrail data events (S3 object-level logging), VPC Flow Logs, Route 53 Resolver logs, GuardDuty findings, Security Hub findings, WAF logs, ELB access logs, RDS audit logs… the list goes on. Each service dumps to its own S3 bucket with its own partitioning scheme and its own JSON structure. Try tracking down every event tied to a compromised IAM role and you’re querying CloudTrail for API calls, VPC Flow Logs for network activity, and GuardDuty for detections – then somehow correlating across three different timestamp formats and three completely different ways of representing the same IP address.
SIEM cost pressure. Traditional SIEMs bill by ingest volume – usually somewhere between $1 and $3 per GB per day for the cloud-native options. Picture a single AWS account cranking out 50 GB/day of CloudTrail plus VPC Flow Logs plus GuardDuty. That’s $1,500-4,500/month just for SIEM ingestion alone. Now multiply that across 20 accounts and suddenly you’re staring at $30,000-90,000/month before you’ve even written a single detection rule. Teams cope by filtering aggressively – dropping VPC Flow Logs for “non-critical” VPCs, sampling DNS logs, or just flat-out disabling CloudTrail data events. Here’s the kicker: the data you filter out is precisely what attackers are counting on you to miss.
Inconsistent schemas. This one’s a real joy. CloudTrail calls an IP address sourceIpAddress. VPC Flow Logs splits it into srcAddr and dstAddr. GuardDuty goes with action.networkConnectionAction.remoteIpDetails.ipAddressV4. WAF uses httpRequest.clientIp. Every integration, every correlation rule, every dashboard needs its own custom parsing logic for each source. And when a vendor silently changes their log format – which they do, without warning – your parsing breaks and you might not notice for days.
Security Lake tackles all three problems at once: one place to store everything, one normalized schema to rule them all, and a cost model based on what you actually query rather than what you ingest.
What is Amazon Security Lake
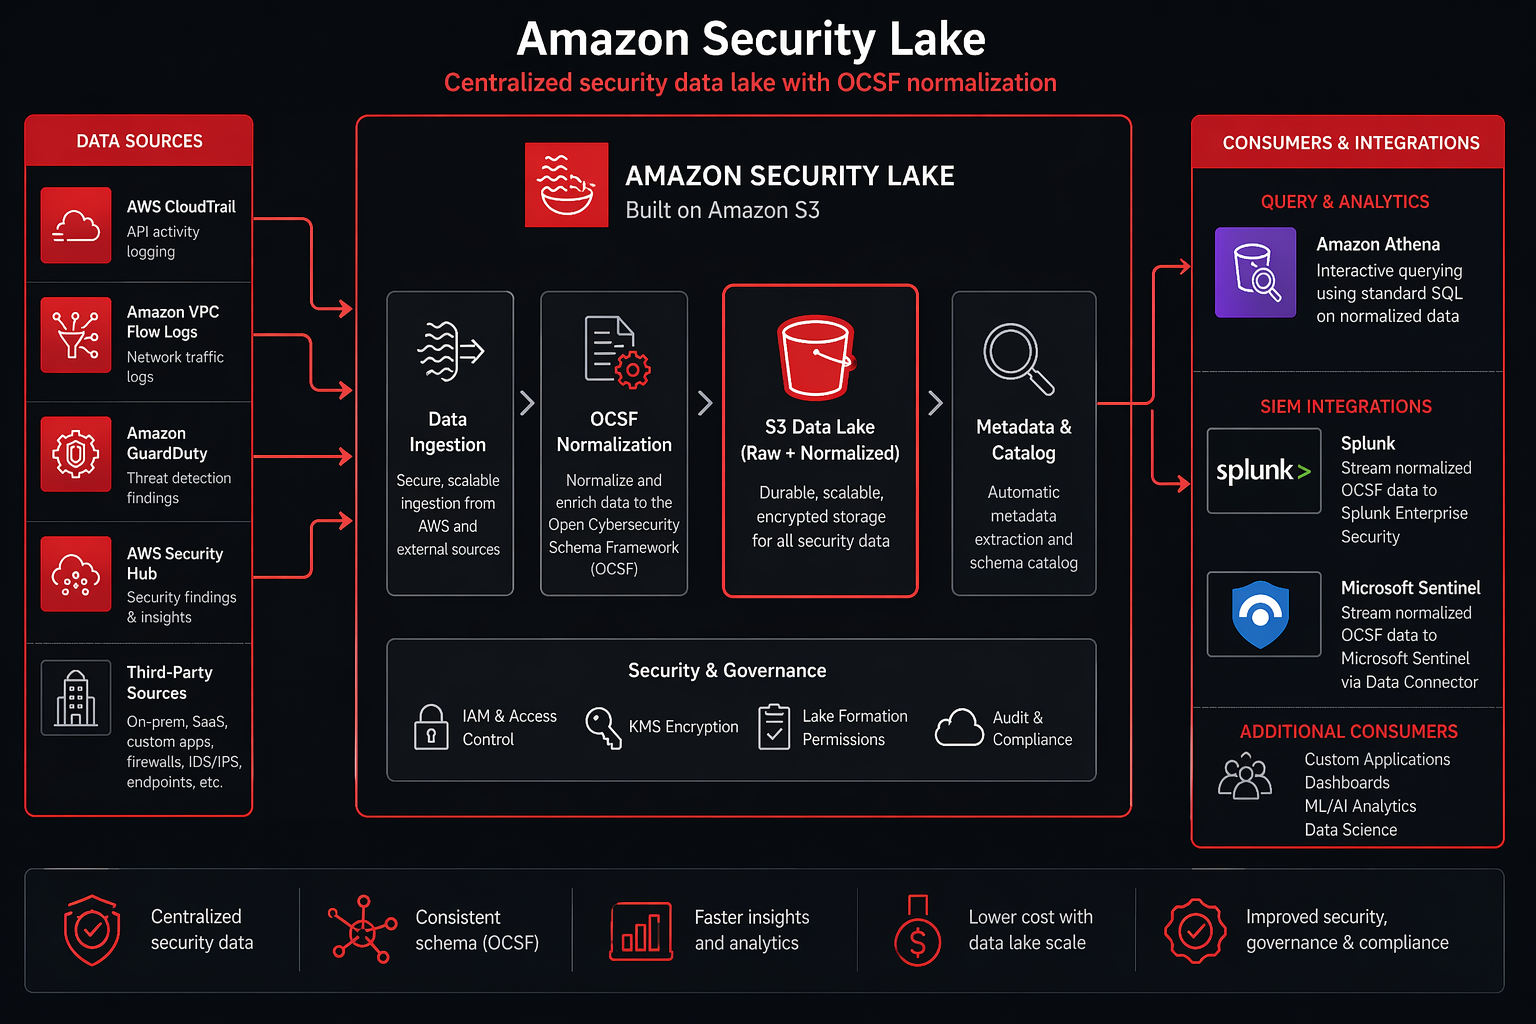
Amazon Security Lake is a fully managed security data lake that takes your security logs and events – from AWS services and third-party sources alike – and automatically normalizes them into the Open Cybersecurity Schema Framework (OCSF) format. Everything lands in Apache Iceberg tables on S3, with integration points for querying, SIEM ingestion, and programmatic access baked right in.
Strip away the marketing language and three design decisions are what actually matter:
OCSF normalization. Every event that lands in Security Lake gets mapped to an OCSF event class – think of it as a universal schema with consistent field names, data types, and meanings across every log source. An Okta login and an AWS IAM login both end up as the same OCSF Authentication event with identical fields: actor.user, src_endpoint.ip, time, status. That means your detection rules work across all sources without any source-specific parsing gymnastics.
Apache Iceberg storage. Normalized events get written to Apache Iceberg tables sitting on S3. Why does that matter? Iceberg brings ACID transactions, schema evolution, time travel queries, and partition pruning to the party – the kind of features that make querying petabytes of security data actually feasible. Athena queries against Iceberg blow past raw JSON performance because Iceberg keeps metadata about which files contain which data, so the query engine can just skip entire partitions it doesn’t need.
S3-based with open formats. The data lives in your S3 bucket, in open formats (Parquet files in Iceberg tables), with no proprietary lock-in. You own the data. You can query it with Athena, read it with Spark, feed it to Splunk, or point any tool that understands Iceberg at it. If you stop using Security Lake tomorrow, the data stays in S3 and remains queryable.
The service handles the infrastructure: S3 bucket provisioning, Iceberg table management, partitioning, compaction, and data lifecycle. You configure which sources to ingest and how long to retain data. Security Lake handles everything else.
Architecture Overview
Security Lake’s architecture has four layers:
Ingestion layer. AWS native sources (CloudTrail, VPC Flow Logs, GuardDuty, Security Hub, Route 53 Resolver) are ingested automatically through service integrations – no Lambda functions, no Kinesis streams, no custom code. Third-party sources flow through either direct integrations (CrowdStrike, Palo Alto, Okta have pre-built connectors) or custom S3-based ingestion pipelines.
Normalization layer. Raw events pass through Security Lake’s normalization engine, which maps each source’s native schema to the appropriate OCSF event class. The normalization handles field mapping, timestamp normalization (everything becomes epoch milliseconds in UTC), enrichment (adding geolocation data for IP addresses, resolving IAM ARNs), and deduplication.
Storage layer. Normalized events are written to Apache Iceberg tables partitioned by event class, region, and date. The default partition layout is event_day=<date>/event_class=<class>/region=<region>/. Iceberg metadata files track which Parquet data files contain which partitions, enabling efficient query planning.
Access layer. Consumers access the data through several mechanisms: Athena for SQL-based querying (covered in detail later), direct S3 access for custom processing, SIEM integrations via S3 notifications or direct Iceberg reads, and EventBridge for real-time alerting on high-severity findings.
AWS Native Sources          Third-Party Sources
     |                            |
CloudTrail                   CrowdStrike
VPC Flow Logs                Palo Alto
GuardDuty                    Okta
Security Hub                 SentinelOne
Route 53 Resolver            Custom Sources
WAF                          Cisco ASA
     |                            |
     +-------------+-------------+
                   |
          Normalization Engine
          (OCSF Mapping + Enrichment)
                   |
          Apache Iceberg Tables on S3
                   |
     +------+------+------+------+
     |      |      |      |      |
   Athena  Splunk Elastic  Custom  Bedrock
   Queries        Sentinel  Apps    AI
OCSF (Open Cybersecurity Schema Framework) Deep Dive
OCSF is the core of what makes Security Lake useful. Without OCSF, you’d have a data lake full of security events in different formats – valuable, but still requiring source-specific parsing. With OCSF, every event follows the same structural template regardless of origin.
OCSF defines a taxonomy of event classes. Each class specifies a fixed set of fields with defined data types and semantics. When Security Lake normalizes a CloudTrail ConsoleLogin event, it maps to the OCSF Authentication class. When it normalizes an Okta user.session.start event, it also maps to Authentication. The field names, types, and meanings are identical.
Core OCSF Event Classes
| Event Class | Category | Description | Example AWS Source |
|---|---|---|---|
| Authentication | IAM | Login/logout events, MFA challenges | CloudTrail ConsoleLogin, Okta auth |
| Network Activity | Network | Connection attempts, traffic flows | VPC Flow Logs, CloudTrail |
| DNS Activity | Network | DNS queries and responses | Route 53 Resolver Logs |
| Security Finding | Findings | Detection findings, vulnerability results | GuardDuty, Security Hub |
| File Access | System | File read/write/delete operations | CloudTrail S3 data events |
| Process Activity | System | Process creation, termination | CrowdStrike EDR |
| Account Change | IAM | User/role creation, modification, deletion | CloudTrail IAM events |
| Network Firewall | Network | Firewall allow/deny decisions | WAF, Palo Alto, AWS NACL |
| API Activity | Application | API calls, request/response pairs | CloudTrail management events |
| Incident | Findings | Grouped related security findings | Security Hub, custom |
OCSF Field Hierarchy
OCSF uses a nested object model. The top-level fields common to all event classes include:
| Field | Type | Description |
|---|---|---|
class_uid |
Integer | Numeric identifier for the event class |
class_name |
String | Human-readable event class name |
category_uid |
Integer | Category the event class belongs to |
activity_id |
Integer | Specific activity within the class |
severity |
String | Informational through Critical |
time |
Long | Epoch milliseconds in UTC |
metadata |
Object | Schema version, log provider, profiles |
actor |
Object | Who or what performed the action |
src_endpoint |
Object | Source IP, port, hostname |
dst_endpoint |
Object | Destination IP, port, hostname |
device |
Object | Host, OS, network interface info |
enrichment |
Array | Geolocation, threat intel, custom data |
The nesting means a single OCSF event can be rich. A GuardDuty finding mapped to the Security Finding class includes the finding details, the affected resource, the actor, the network context, and any enrichment data – all in a structured, typed format.
Normalization Example
A CloudTrail ConsoleLogin event in its native format:
{
  "eventVersion": "1.8",
  "userIdentity": {
    "type": "IAMUser",
    "principalId": "AIDACKCEVSQ6C2EXAMPLE",
    "arn": "arn:aws:iam::123456789012:user/admin",
    "accountId": "123456789012",
    "userName": "admin"
  },
  "eventTime": "2026-04-22T14:32:18Z",
  "eventSource": "signin.amazonaws.com",
  "eventName": "ConsoleLogin",
  "sourceIPAddress": "203.0.113.42",
  "userAgent": "Mozilla/5.0",
  "responseElements": {
    "ConsoleLogin": "Success"
  }
}
The same event after Security Lake normalizes it to OCSF:
{
  "class_uid": 3002,
  "class_name": "Authentication",
  "category_uid": 3,
  "activity_id": 1,
  "severity": "Informational",
  "time": 1745937138000,
  "status": "Success",
  "auth_type": "Console",
  "actor": {
    "user": {
      "uid": "AIDACKCEVSQ6C2EXAMPLE",
      "name": "admin",
      "type": "IAMUser",
      "account_uid": "123456789012"
    },
    "session": {}
  },
  "src_endpoint": {
    "ip": "203.0.113.42",
    "port": 0
  },
  "device": {},
  "metadata": {
    "log_provider": "AWS CloudTrail",
    "log_version": "1.8",
    "product": {
      "name": "Security Lake",
      "vendor_name": "AWS"
    },
    "profiles": ["cloud"]
  }
}
The actor.user.name, src_endpoint.ip, and status fields are the same whether this event came from CloudTrail, Okta, or Azure AD. That consistency is the entire point.
Setting Up Security Lake
Setting up Security Lake involves enabling the service, designating an S3 bucket (or letting Security Lake create one), configuring which AWS sources to ingest, and setting retention policies. If you use AWS Organizations, you can delegate a central account as the Security Lake administrator.
Step 1: Enable Security Lake via AWS CLI
# Create a Security Lake instance in us-east-1
aws securitylake create-datalake \
  --regions us-east-1 \
  --meta-store-manager-role-arn arn:aws:iam::123456789012:role/AmazonSecurityLakeMetaStoreManager \
  --enable \
  --tags Key=Environment,Value=Production Key=Team,Value=Security
Step 2: Enable Using CloudFormation
For infrastructure-as-code deployments, use this CloudFormation template:
AWSTemplateFormatVersion: '2010-09-09'
Description: 'Amazon Security Lake - Centralized Security Analytics'

Parameters:
  RetentionDays:
    Type: Number
    Default: 365
    Description: Number of days to retain security data
    AllowedValues: [30, 90, 180, 365]

  Regions:
    Type: CommaDelimitedList
    Default: us-east-1,us-west-2,eu-west-1
    Description: Regions to enable Security Lake

Resources:
  SecurityLakeMetaStoreRole:
    Type: AWS::IAM::Role
    Properties:
      RoleName: AmazonSecurityLakeMetaStoreManager
      AssumeRolePolicyDocument:
        Version: '2012-10-17'
        Statement:
          - Effect: Allow
            Principal:
              Service: securitylake.amazonaws.com
            Action: sts:AssumeRole
      ManagedPolicyArns:
        - arn:aws:iam::aws:policy/AmazonSecurityLakeMetaStoreManager
      Tags:
        - Key: Purpose
          Value: SecurityLake

  SecurityLakeS3Bucket:
    Type: AWS::S3::Bucket
    Properties:
      BucketName: !Sub 'security-lake-${AWS::AccountId}-${AWS::Region}'
      BucketEncryption:
        ServerSideEncryptionConfiguration:
          - ServerSideEncryptionByDefault:
              SSEAlgorithm: aws:kms
              KMSMasterKeyID: !Ref SecurityLakeKMSKey
      PublicAccessBlockConfiguration:
        BlockPublicAcls: true
        BlockPublicPolicy: true
        IgnorePublicAcls: true
        RestrictPublicBuckets: true
      VersioningConfiguration:
        Status: Enabled
      LifecycleConfiguration:
        Rules:
          - Id: TransitionToGlacier
            Status: Enabled
            Transitions:
              - TransitionInDays: !Ref RetentionDays
                StorageClass: GLACIER
      Tags:
        - Key: Purpose
          Value: SecurityLake

  SecurityLakeKMSKey:
    Type: AWS::KMS::Key
    Properties:
      Description: KMS key for Security Lake encryption
      KeyPolicy:
        Version: '2012-10-17'
        Statement:
          - Effect: Allow
            Principal:
              AWS: !Sub 'arn:aws:iam::${AWS::AccountId}:root'
            Action: 'kms:*'
            Resource: '*'
          - Effect: Allow
            Principal:
              Service: securitylake.amazonaws.com
            Action:
              - kms:Decrypt
              - kms:GenerateDataKey
            Resource: '*'

Outputs:
  SecurityLakeBucket:
    Description: S3 Bucket for Security Lake
    Value: !Ref SecurityLakeS3Bucket
  KMSKeyArn:
    Description: KMS Key ARN for encryption
    Value: !GetAtt SecurityLakeKMSKey.Arn
Step 3: Configure AWS Sources
# Enable all native AWS sources
aws securitylake create-aws-log-source \
  --source cloud-trail-management,cloud-trail-data,lflow,vpc-flow,route-53,guard-duty,security-hub \
  --regions us-east-1,us-west-2

# Verify source configuration
aws securitylake get-aws-log-source \
  --regions us-east-1
Step 4: Configure Retention
# Set retention to 365 days
aws securitylake update-data-lake \
  --regions us-east-1 \
  --retention-settings retentionDays=365
Step 5: Verify Data Ingestion
After enabling sources, verify data is flowing:
# Check the AWS Glue database created by Security Lake
aws glue get-databases

# List tables in the Security Lake database
aws glue get-tables \
  --database-name amazon_security_lake_glue_db_us_east_1

# Query a sample via Athena
aws athena start-query-execution \
  --query-string "SELECT COUNT(*) AS event_count, class_name FROM amazon_security_lake_glue_db_us_east_1.security_events WHERE event_day >= '2026-04-20' GROUP BY class_name ORDER BY event_count DESC LIMIT 20" \
  --query-execution-context Database=amazon_security_lake_glue_db_us_east_1 \
  --result-configuration OutputLocation=s3://security-lake-query-results/
Native AWS Source Integration
Security Lake supports direct ingestion from several AWS services without any custom code. Each source maps to one or more OCSF event classes.
| AWS Source | OCSF Event Class(es) | Typical Volume | Notes |
|---|---|---|---|
| CloudTrail Management | API Activity, Authentication, Account Change | 5-50 GB/day per account | All management API calls |
| CloudTrail Data Events (S3) | File Access | 20-500 GB/day per account | Object-level S3 operations |
| VPC Flow Logs | Network Activity | 10-200 GB/day per VPC | All accepted/rejected traffic |
| GuardDuty | Security Finding | 0.1-5 GB/day per account | Detection findings only |
| Security Hub | Security Finding, Incident | 0.5-10 GB/day | Aggregated findings |
| Route 53 Resolver | DNS Activity | 5-100 GB/day per VPC | DNS queries and responses |
| AWS WAF | Network Firewall | 1-50 GB/day per WebACL | Allowed and blocked requests |
| Amazon Inspector | Security Finding | 0.1-2 GB/day | Vulnerability scan results |
| AWS Firewall Manager | Security Finding | <1 GB/day | Policy compliance findings |
CloudTrail Integration
CloudTrail is the highest-value source in Security Lake. Management events capture every API call made in your AWS account, and Security Lake normalizes them into OCSF event classes based on the API call type. If you’re already running CloudTrail with management events enabled (and you should be – see the CloudTrail deep dive for setup details), Security Lake picks up those events automatically.
The normalization maps are straightforward:
ConsoleLoginbecomesAuthentication(activity: Logon)CreateUser,DeleteUser,AttachUserPolicybecomeAccount ChangeGetObject,PutObjectbecomeFile Access(when data events are enabled)- All other management events become
API Activity
GuardDuty Integration
GuardDuty findings map to the Security Finding OCSF class with the full finding detail preserved in the finding object. Severity mapping follows OCSF conventions: GuardDuty Low becomes Informational, Medium becomes Medium, High becomes High, and Critical stays Critical.
For a comprehensive understanding of GuardDuty’s detection capabilities before you feed its findings into Security Lake, the GuardDuty preview guide covers every detector type and tuning strategy.
Security Hub Integration
Security Hub findings also map to Security Finding, but they get additional enrichment because Security Hub aggregates findings from multiple sources (GuardDuty, Inspector, Firewall Manager, and custom compliance checks). The Security Lake normalization preserves the finding provider in the metadata.product field so you can filter by source.
The Security Hub overview covers setting up automated responses and integrating with other AWS security services that feed into Security Lake.
VPC Flow Logs Integration
VPC Flow Logs are the highest-volume source in most deployments. Security Lake ingests VPC Flow Logs and normalizes them to the Network Activity OCSF class. Each flow log entry becomes an OCSF event with src_endpoint, dst_endpoint, traffic.bytes, traffic.packets, and the VPC/subnet metadata.
The key consideration is volume. A busy VPC with hundreds of EC2 instances can generate 100+ GB/day of flow logs. At Security Lake’s storage pricing (covered in the cost section), that’s manageable – but you should understand your volume before enabling VPC Flow Logs for every VPC in every region.
Custom Log Ingestion
Not every security-relevant log comes from an AWS service. EDR telemetry from CrowdStrike, firewall logs from Palo Alto, authentication events from Okta, and VPN logs from Cisco AnyConnect all contain critical security data that belongs in the same data lake as your AWS-native logs.
Third-Party Sources with Pre-Built Integrations
Security Lake supports several third-party sources through pre-built integrations available in the AWS Console:
| Vendor | Product | Event Class(es) | Ingestion Method |
|---|---|---|---|
| CrowdStrike | Falcon EDR | Process Activity, File Access, Security Finding | S3-based push |
| Palo Alto Networks | Cortex XSIAM | Network Firewall, Network Activity | S3-based push |
| Okta | Identity | Authentication, Account Change | S3-based push |
| SentinelOne | Singularity | Process Activity, File Access | S3-based push |
| Cisco | Duo Security | Authentication | S3-based push |
| Vectra | AI NDR | Network Activity, Security Finding | S3-based push |
| Rapid7 | InsightIDR | Security Finding, Authentication | S3-based push |
| Tanium | Threat Response | Process Activity, Security Finding | S3-based push |
Custom Log Ingestion with Lambda
For sources without pre-built integrations, you can build custom ingestion pipelines using Lambda functions that transform raw logs into OCSF format and write them to Security Lake’s S3 bucket. Here is a complete Python Lambda function that ingests generic JSON logs:
import json
import boto3
import os
import uuid
from datetime import datetime, timezone

s3_client = boto3.client('s3')
SECURITY_LAKE_BUCKET = os.environ['SECURITY_LAKE_BUCKET']
REGION = os.environ['AWS_REGION']
ACCOUNT_ID = os.environ['AWS_ACCOUNT_ID']

# OCSF class UIDs for common event types
OCSF_CLASS_MAP = {
    'authentication': 3002,
    'network_activity': 4001,
    'security_finding': 2001,
    'dns_activity': 4003,
    'file_access': 5001,
    'process_activity': 5003,
    'account_change': 3001,
    'api_activity': 3005,
}

def normalize_to_ocsf(raw_event, source_type):
    """
    Transform a raw security event into OCSF format.
    Customize the field mapping based on your source schema.
    """
    timestamp = raw_event.get('timestamp', raw_event.get('event_time', ''))
    if isinstance(timestamp, str):
        dt = datetime.fromisoformat(timestamp.replace('Z', '+00:00'))
        epoch_ms = int(dt.timestamp() * 1000)
    else:
        epoch_ms = timestamp

    class_name = map_event_class(raw_event, source_type)
    class_uid = OCSF_CLASS_MAP.get(class_name, 9999)

    ocsf_event = {
        "class_uid": class_uid,
        "class_name": class_name.replace('_', ' ').title(),
        "category_uid": class_uid // 1000,
        "activity_id": map_activity(raw_event, source_type),
        "severity": map_severity(raw_event.get('severity', 'Informational')),
        "time": epoch_ms,
        "message": raw_event.get('message', raw_event.get('description', '')),
        "status": raw_event.get('status', 'Unknown'),
        "actor": {
            "user": {
                "name": raw_event.get('user_name', raw_event.get('username', '')),
                "uid": raw_event.get('user_id', raw_event.get('user_uid', '')),
                "type": raw_event.get('user_type', 'Unknown'),
                "account_uid": raw_event.get('account_id', ACCOUNT_ID),
            }
        },
        "src_endpoint": {
            "ip": raw_event.get('src_ip', raw_event.get('source_ip', '')),
            "port": raw_event.get('src_port', 0),
            "hostname": raw_event.get('src_hostname', ''),
        },
        "dst_endpoint": {
            "ip": raw_event.get('dst_ip', raw_event.get('destination_ip', '')),
            "port": raw_event.get('dst_port', 0),
            "hostname": raw_event.get('dst_hostname', ''),
        },
        "metadata": {
            "log_provider": source_type,
            "log_version": "1.0",
            "product": {
                "name": raw_event.get('product_name', source_type),
                "vendor_name": raw_event.get('vendor_name', 'Custom'),
            },
            "uid": str(uuid.uuid4()),
            "profiles": ["cloud"],
        },
        "unmapped": raw_event,  # Preserve original event
    }

    return ocsf_event

def map_event_class(raw_event, source_type):
    """Determine OCSF event class from raw event fields."""
    event_type = raw_event.get('event_type', '').lower()
    if 'auth' in event_type or 'login' in event_type:
        return 'authentication'
    elif 'dns' in event_type or 'query' in event_type:
        return 'dns_activity'
    elif 'finding' in event_type or 'alert' in event_type:
        return 'security_finding'
    elif 'connect' in event_type or 'flow' in event_type:
        return 'network_activity'
    elif 'file' in event_type or 'access' in event_type:
        return 'file_access'
    elif 'process' in event_type:
        return 'process_activity'
    else:
        return 'api_activity'

def map_activity(raw_event, source_type):
    """Map activity ID based on event characteristics."""
    action = raw_event.get('action', '').lower()
    if action in ('login', 'start', 'open', 'allow', 'create'):
        return 1  # Open/Start
    elif action in ('logout', 'end', 'close', 'deny', 'delete'):
        return 2  # Close/End
    elif action in ('update', 'modify', 'change'):
        return 3  # Update
    return 0  # Unknown

def map_severity(severity):
    """Normalize severity strings to OCSF values."""
    severity_map = {
        'critical': 'Critical',
        'high': 'High',
        'medium': 'Medium',
        'low': 'Low',
        'info': 'Informational',
        'informational': 'Informational',
    }
    return severity_map.get(str(severity).lower(), 'Informational')

def lambda_handler(event, context):
    """Lambda handler for custom log ingestion into Security Lake."""
    processed_count = 0
    error_count = 0

    for record in event.get('Records', []):
        try:
            # Decode the incoming log record
            payload = json.loads(record.get('body', record.get('data', '{}')))

            # Handle batch events
            events = payload if isinstance(payload, list) else [payload]

            ocsf_events = []
            for raw_event in events:
                source_type = raw_event.get('source_type', 'custom')
                ocsf_event = normalize_to_ocsf(raw_event, source_type)
                ocsf_events.append(ocsf_event)

            # Write to Security Lake S3 bucket with Iceberg-compatible partitioning
            event_day = datetime.now(timezone.utc).strftime('%Y-%m-%d')
            class_name = ocsf_events[0]['class_name'].lower().replace(' ', '_')

            s3_key = (
                f"ext/{class_name}/region={REGION}/"
                f"event_day={event_day}/{uuid.uuid4()}.parquet"
            )

            # Write as newline-delimited JSON (Security Lake handles Parquet conversion)
            ndjson = '\n'.join(json.dumps(e) for e in ocsf_events)

            s3_client.put_object(
                Bucket=SECURITY_LAKE_BUCKET,
                Key=s3_key,
                Body=ndjson.encode('utf-8'),
                ContentType='application/json',
                Metadata={
                    'source': 'custom-ingestion',
                    'event-class': class_name,
                    'event-day': event_day,
                }
            )

            processed_count += len(ocsf_events)

        except Exception as e:
            print(f"Error processing record: {str(e)}")
            error_count += 1

    return {
        'statusCode': 200,
        'body': json.dumps({
            'processed': processed_count,
            'errors': error_count,
        })
    }
EventBridge Rule for Custom Source Ingestion
To automate the pipeline, create an EventBridge rule that triggers the Lambda function when new log files arrive in a staging S3 bucket:
import boto3
import json

events = boto3.client('events')
lambda_client = boto3.client('lambda')

LAMBDA_ARN = 'arn:aws:lambda:us-east-1:123456789012:function:SecurityLakeCustomIngestion'
RULE_NAME = 'SecurityLakeCustomLogTrigger'
STAGING_BUCKET = 'security-logs-staging'

# Create the EventBridge rule
events.put_rule(
    Name=RULE_NAME,
    EventPattern=json.dumps({
        "source": ["aws.s3"],
        "detail-type": ["AWS API Call via CloudTrail"],
        "detail": {
            "eventSource": ["s3.amazonaws.com"],
            "eventName": ["PutObject", "CompleteMultipartUpload"],
            "requestParameters": {
                "bucketName": [STAGING_BUCKET]
            }
        }
    }),
    State='ENABLED',
    Description='Trigger custom log ingestion when new logs arrive in staging bucket'
)

# Add Lambda permission and target
lambda_client.add_permission(
    FunctionName='SecurityLakeCustomIngestion',
    StatementId='AllowEventBridgeInvoke',
    Action='lambda:InvokeFunction',
    Principal='events.amazonaws.com',
    SourceArn=f'arn:aws:events:us-east-1:123456789012:rule/{RULE_NAME}'
)

events.put_targets(
    Rule=RULE_NAME,
    Targets=[{
        'Id': '1',
        'Arn': LAMBDA_ARN,
        'InputTransformer': {
            'InputPathsMap': {
                'bucket': '$.detail.requestParameters.bucketName',
                'key': '$.detail.requestParameters.key'
            },
            'InputTemplate': '{"bucket": <bucket>, "key": <key>}'
        }
    }]
)
Querying Security Data with Athena
Once your data is flowing into Security Lake, Athena becomes your primary query engine for ad-hoc investigation, threat hunting, and anomaly detection. Security Lake automatically creates Glue databases and tables for each region and event class, so you can start querying immediately.
Threat Hunting: Failed Logins Across All Sources
-- Find all failed authentication attempts across every source
-- in the last 7 days, grouped by actor and source IP
SELECT
    actor.user.name AS user_name,
    actor.user.account_uid AS account_id,
    src_endpoint.ip AS source_ip,
    metadata.product.name AS source_product,
    COUNT(*) AS failed_attempts,
    MIN(time) AS first_attempt,
    MAX(time) AS last_attempt
FROM amazon_security_lake_glue_db_us_east_1.security_events
WHERE class_name = 'Authentication'
  AND status != 'Success'
  AND time >= CURRENT_TIMESTAMP - INTERVAL '7' DAY
GROUP BY
    actor.user.name,
    actor.user.account_uid,
    src_endpoint.ip,
    metadata.product.name
HAVING COUNT(*) > 5
ORDER BY failed_attempts DESC
LIMIT 50;
Anomaly Detection: Unusual API Call Patterns
-- Detect IAM principals making API calls from multiple regions
-- within a short time window (potential credential compromise)
WITH regional_sessions AS (
    SELECT
        actor.user.uid AS user_uid,
        actor.user.name AS user_name,
        region,
        DATE_TRUNC('hour', FROM_UNIXTIME(time / 1000)) AS session_hour,
        COUNT(*) AS api_call_count,
        COUNT(DISTINCT src_endpoint.ip) AS distinct_ips,
        COLLECT_SET(DISTINCT src_endpoint.ip) AS source_ips
    FROM amazon_security_lake_glue_db_us_east_1.security_events
    WHERE class_name = 'API Activity'
      AND time >= CURRENT_TIMESTAMP - INTERVAL '24' HOUR
      AND actor.user.name != ''
    GROUP BY
        actor.user.uid,
        actor.user.name,
        region,
        DATE_TRUNC('hour', FROM_UNIXTIME(time / 1000))
),
multi_region_users AS (
    SELECT
        user_uid,
        user_name,
        session_hour,
        COUNT(DISTINCT region) AS region_count,
        SUM(api_call_count) AS total_api_calls,
        COUNT(DISTINCT distinct_ips) AS total_ips
    FROM regional_sessions
    GROUP BY
        user_uid,
        user_name,
        session_hour
)
SELECT
    user_name,
    session_hour,
    region_count,
    total_api_calls,
    total_ips
FROM multi_region_users
WHERE region_count >= 3
ORDER BY region_count DESC, total_api_calls DESC;
Network Threat Hunting: Beaconing Detection
-- Detect potential C2 beaconing by finding consistent
-- outbound connection intervals to the same destination
WITH connection_intervals AS (
    SELECT
        src_endpoint.ip AS src_ip,
        dst_endpoint.ip AS dst_ip,
        dst_endpoint.port AS dst_port,
        time AS event_time,
        LAG(time) OVER (
            PARTITION BY src_endpoint.ip, dst_endpoint.ip, dst_endpoint.port
            ORDER BY time
        ) AS prev_event_time
    FROM amazon_security_lake_glue_db_us_east_1.security_events
    WHERE class_name = 'Network Activity'
      AND time >= CURRENT_TIMESTAMP - INTERVAL '24' HOUR
      AND dst_endpoint.ip NOT IN ('10.0.0.0/8', '172.16.0.0/12', '192.168.0.0/16')
),
interval_stats AS (
    SELECT
        src_ip,
        dst_ip,
        dst_port,
        AVG(event_time - prev_event_time) AS avg_interval_ms,
        STDDEV(event_time - prev_event_time) AS stddev_interval_ms,
        COUNT(*) AS connection_count,
        MIN(event_time) AS first_seen,
        MAX(event_time) AS last_seen
    FROM connection_intervals
    WHERE prev_event_time IS NOT NULL
    GROUP BY src_ip, dst_ip, dst_port
    HAVING COUNT(*) >= 10
)
SELECT
    src_ip,
    dst_ip,
    dst_port,
    ROUND(avg_interval_ms / 1000.0, 2) AS avg_interval_seconds,
    ROUND(stddev_interval_ms / 1000.0, 2) AS stddev_interval_seconds,
    connection_count,
    ROUND(stddev_interval_ms / NULLIF(avg_interval_ms, 0), 4) AS coefficient_of_variation,
    first_seen,
    last_seen
FROM interval_stats
WHERE stddev_interval_ms / NULLIF(avg_interval_ms, 0) < 0.3
  AND avg_interval_ms BETWEEN 30000 AND 3600000
ORDER BY connection_count DESC
LIMIT 100;
DNS Exfiltration Detection
-- Identify potential DNS data exfiltration by finding
-- unusually long subdomain queries to the same domain
SELECT
    src_endpoint.ip AS source_ip,
    REGEXP_EXTRACT(dns_query, '\\.([a-zA-Z0-9-]+\\.[a-zA-Z]{2,})$', 1) AS base_domain,
    COUNT(*) AS query_count,
    AVG(LENGTH(dns_query)) AS avg_query_length,
    MAX(LENGTH(dns_query)) AS max_query_length,
    COUNT(DISTINCT dns_query) AS unique_queries,
    COLLECT_SET(DISTINCT dns_query) AS sample_queries
FROM amazon_security_lake_glue_db_us_east_1.security_events
WHERE class_name = 'DNS Activity'
  AND time >= CURRENT_TIMESTAMP - INTERVAL '1' HOUR
GROUP BY
    src_endpoint.ip,
    REGEXP_EXTRACT(dns_query, '\\.([a-zA-Z0-9-]+\\.[a-zA-Z]{2,})$', 1)
HAVING AVG(LENGTH(dns_query)) > 50
   AND COUNT(DISTINCT dns_query) > 20
ORDER BY unique_queries DESC
LIMIT 50;
Cross-Source Correlation Query
-- Correlate GuardDuty findings with CloudTrail and VPC Flow Logs
-- for the same IAM principal within a 30-minute window
WITH guardduty_alerts AS (
    SELECT
        finding.title AS finding_title,
        finding.severity AS severity,
        actor.user.name AS user_name,
        actor.user.account_uid AS account_id,
        src_endpoint.ip AS src_ip,
        time AS alert_time
    FROM amazon_security_lake_glue_db_us_east_1.security_events
    WHERE class_name = 'Security Finding'
      AND metadata.product.name = 'GuardDuty'
      AND time >= CURRENT_TIMESTAMP - INTERVAL '24' HOUR
),
related_api_calls AS (
    SELECT
        actor.user.name AS user_name,
        api.operation AS operation,
        api.service.name AS service,
        src_endpoint.ip AS src_ip,
        time AS call_time
    FROM amazon_security_lake_glue_db_us_east_1.security_events
    WHERE class_name = 'API Activity'
      AND time >= CURRENT_TIMESTAMP - INTERVAL '24' HOUR
)
SELECT
    g.finding_title,
    g.severity,
    g.user_name,
    g.src_ip AS alert_source_ip,
    g.alert_time,
    c.operation,
    c.service,
    c.src_ip AS api_source_ip,
    c.call_time
FROM guardduty_alerts g
JOIN related_api_calls c
    ON g.user_name = c.user_name
    AND c.call_time BETWEEN g.alert_time - INTERVAL '30' MINUTE
                         AND g.alert_time + INTERVAL '30' MINUTE
ORDER BY g.alert_time DESC, g.severity DESC
LIMIT 100;
Integration with SIEM Tools
Security Lake does not replace your SIEM – it augments it. The typical architecture is Security Lake as the long-term, low-cost data store with your SIEM connecting to it for correlation, alerting, and incident management.
Splunk Integration
Splunk connects to Security Lake through the S3 input (using the Splunk Add-on for Amazon S3) or through direct Iceberg table reads with the Splunk DB Connect app. The recommended approach is the S3 input configured to read from Security Lake’s S3 bucket:
# Splunk inputs.conf for Security Lake integration
# /opt/splunk/etc/apps/SplunkTA_aws/local/inputs.conf

[aws_s3://security_lake_cloudtrail]
aws_account = security-lake-ro
bucket_name = aws-securitylake-us-east-1-123456789012
key_name = aws/CloudTrail/
sourcetype = ocsf:authentication
interval = 300
max_items = 10000
character_set = UTF-8
json_truncate_length = 0
s3_file_decoder = OCSFDecoder

[aws_s3://security_lake_vpc_flow]
aws_account = security-lake-ro
bucket_name = aws-securitylake-us-east-1-123456789012
key_name = aws/VPCFlow/
sourcetype = ocsf:network_activity
interval = 300
max_items = 10000
character_set = UTF-8

[aws_s3://security_lake_guardduty]
aws_account = security-lake-ro
bucket_name = aws-securitylake-us-east-1-123456789012
key_name = aws/GuardDuty/
sourcetype = ocsf:security_finding
interval = 300
max_items = 5000
The key advantage over traditional Splunk ingestion: you only pay Splunk licensing for the data you actually search and alert on. Historical data sits in Security Lake’s S3 storage at a fraction of the cost, queryable through Athena when needed.
Microsoft Sentinel Integration
Sentinel connects to Security Lake through the AWS S3 data connector. Configure the connector to read from Security Lake’s S3 bucket:
# Azure CLI command to create the Sentinel AWS S3 connector
az sentinel data-connector create \
  --resource-group sentinel-rg \
  --workspace-name sentinel-workspace \
  --name AWS-SecurityLake \
  --kind AmazonWebServicesS3 \
  --aws-role-arn arn:aws:iam::123456789012:role/SentinelSecurityLakeReader \
  --s3-bucket aws-securitylake-us-east-1-123456789012 \
  --s3-prefix "aws/" \
  --log-analytics-table OCSFEvents_CL \
  --polling-interval PT5M
Elastic Integration
Elastic integrates with Security Lake through the AWS S3 input in Logstash or through the Elastic Agent’s AWS integration. The OCSF-formatted data maps cleanly to Elastic Common Schema (ECS):
# Logstash pipeline for Security Lake ingestion
input {
  s3 {
    bucket => "aws-securitylake-us-east-1-123456789012"
    region => "us-east-1"
    prefix => "aws/"
    codec => "json"
    interval => 60
    role_arn => "arn:aws:iam::123456789012:role/ElasticSecurityLakeReader"
  }
}

filter {
  # OCSF to ECS field mapping
  mutate {
    rename => {
      "[actor][user][name]" => "user.name"
      "[actor][user][uid]" => "user.id"
      "[src_endpoint][ip]" => "source.ip"
      "[src_endpoint][port]" => "source.port"
      "[dst_endpoint][ip]" => "destination.ip"
      "[dst_endpoint][port]" => "destination.port"
      "[class_name]" => "event.category"
      "[severity]" => "event.severity"
    }
  }

  # Convert epoch milliseconds to ISO8601
  date {
    match => ["time", "UNIX_MS"]
    target => "@timestamp"
  }

  # Map OCSF class names to ECS event types
  translate {
    field => "class_name"
    destination => "event.type"
    dictionary => {
      "Authentication" => "authentication"
      "Network Activity" => "connection"
      "Security Finding" => "alert"
      "DNS Activity" => "dns"
      "File Access" => "file"
      "API Activity" => "api"
    }
    fallback => "info"
  }
}

output {
  elasticsearch {
    hosts => ["https://elasticsearch:9200"]
    index => "security-lake-%{+YYYY.MM.dd}"
  }
}
Multi-Account and Multi-Region Architecture
For organizations using AWS Organizations, Security Lake supports a delegated administrator model where a single security account manages Security Lake configuration across all member accounts.
Setting Up Delegated Administration
# Step 1: Register the delegated administrator account
aws securitylake register-account \
  --account-id 123456789012

# Step 2: Enable Organizations integration
aws securitylake create-datalake-organization-configuration \
  --auto-enable-new-accounts \
  --regions us-east-1,us-west-2,eu-west-1,ap-southeast-1

# Step 3: Enable specific member accounts
aws securitylake create-member \
  --account-id 111111111111,222222222222,333333333333 \
  --regions us-east-1

# Step 4: Verify member account status
aws securitylake get-member \
  --account-id 111111111111 \
  --regions us-east-1
CloudFormation for Multi-Account Setup
AWSTemplateFormatVersion: '2010-09-09'
Description: 'Security Lake multi-account organization setup'

Resources:
  SecurityLakeDelegatedAdmin:
    Type: AWS::SecurityLake::DataLake
    Properties:
      Regions:
        - us-east-1
        - us-west-2
        - eu-west-1
      RetentionSettings:
        - RetentionDays: 365
      MetaStoreManagerRoleArn: !Sub 'arn:aws:iam::${AWS::AccountId}:role/AmazonSecurityLakeMetaStoreManager'

  SecurityLakeOrgConfig:
    Type: AWS::SecurityLake::OrganizationConfiguration
    Properties:
      AutoEnableNewAccount: true
      Regions:
        - us-east-1
        - us-west-2
        - eu-west-1

  SecurityLakeAWSSource:
    Type: AWS::SecurityLake::AWSLogSource
    Properties:
      Source:
        - CloudTrailManagement
        - CloudTrailData
        - VPCFlow
        - Route53Resolver
        - GuardDuty
        - SecurityHub
        - WAF
      Regions:
        - us-east-1
        - us-west-2
        - eu-west-1

  # Cross-account role for member accounts
  SecurityLakeMemberRole:
    Type: AWS::IAM::Role
    Properties:
      RoleName: SecurityLakeMemberRole
      AssumeRolePolicyDocument:
        Version: '2012-10-17'
        Statement:
          - Effect: Allow
            Principal:
              AWS: !Sub 'arn:aws:iam::${AWS::AccountId}:root'
            Action: sts:AssumeRole
      ManagedPolicyArns:
        - arn:aws:iam::aws:policy/AmazonSecurityLakeCrossAccountManager

Outputs:
  DataLakeArn:
    Value: !Ref SecurityLakeDelegatedAdmin
  OrgConfigStatus:
    Value: !Ref SecurityLakeOrgConfig
Supported Regions
Security Lake is available in the following AWS regions. Data stays in the region where it is generated – Security Lake does not cross-region replicate security data by default.
| Region | Code | Status |
|---|---|---|
| US East (N. Virginia) | us-east-1 | GA |
| US East (Ohio) | us-east-2 | GA |
| US West (Oregon) | us-west-2 | GA |
| Asia Pacific (Tokyo) | ap-northeast-1 | GA |
| Asia Pacific (Sydney) | ap-southeast-2 | GA |
| Asia Pacific (Singapore) | ap-southeast-1 | GA |
| Europe (Ireland) | eu-west-1 | GA |
| Europe (Frankfurt) | eu-central-1 | GA |
| Europe (London) | eu-west-2 | GA |
| Europe (Stockholm) | eu-north-1 | GA |
| Canada (Central) | ca-central-1 | GA |
| South America (Sao Paulo) | sa-east-1 | GA |
| Asia Pacific (Mumbai) | ap-south-1 | GA |
| Asia Pacific (Seoul) | ap-northeast-2 | GA |
Security Lake + Bedrock for AI-Powered Threat Detection
Combining Security Lake’s normalized OCSF data with Amazon Bedrock enables AI-powered security analysis that would be impractical with raw, unnormalized logs. The consistent schema means your AI models and prompts work uniformly across all log sources.
Automated Threat Analysis with Bedrock
import boto3
import json
from datetime import datetime, timezone, timedelta

athena = boto3.client('athena')
bedrock = boto3.client('bedrock-runtime')

DATABASE = 'amazon_security_lake_glue_db_us_east_1'
OUTPUT_BUCKET = 's3://security-lake-query-results/'
MODEL_ID = 'anthropic.claude-3-5-sonnet-20241022-v2:0'

def query_security_events(sql):
    """Execute an Athena query and return results."""
    response = athena.start_query_execution(
        QueryString=sql,
        QueryExecutionContext={'Database': DATABASE},
        ResultConfiguration={'OutputLocation': OUTPUT_BUCKET}
    )
    query_id = response['QueryExecutionId']

    # Wait for query to complete
    while True:
        status = athena.get_query_execution(QueryExecutionId=query_id)
        state = status['QueryExecution']['Status']['State']
        if state in ('SUCCEEDED', 'FAILED', 'CANCELLED'):
            break

    if state != 'SUCCEEDED':
        raise Exception(f"Query failed: {status['QueryExecution']['Status']}")

    # Fetch results
    results = athena.get_query_results(QueryExecutionId=query_id)
    rows = []
    columns = [col['Name'] for col in results['ResultSet']['Rows'][0]['Data']]

    for row in results['ResultSet']['Rows'][1:]:
        values = [cell.get('VarCharValue', '') for cell in row['Data']]
        rows.append(dict(zip(columns, values)))

    return rows

def analyze_threat_with_bedrock(events, context_description):
    """Send security events to Bedrock for AI-powered analysis."""
    prompt = f"""You are a senior security analyst. Analyze the following security events
and provide a threat assessment. Focus on:
1. Whether these events indicate a genuine security incident
2. The likely attack technique (MITRE ATT&CK framework)
3. Recommended immediate actions
4. Additional data sources to investigate

Context: {context_description}

Security Events (OCSF format):
{json.dumps(events[:50], indent=2)}

Provide your analysis in structured JSON format with fields:
- threat_level: Critical/High/Medium/Low/Informational
- confidence: 0.0-1.0
- attack_technique: MITRE ATT&CK technique ID and name
- summary: Brief description of what's happening
- recommended_actions: List of immediate actions
- investigation_suggestions: Additional queries to run
"""

    response = bedrock.invoke_model(
        modelId=MODEL_ID,
        body=json.dumps({
            "anthropic_version": "bedrock-2023-05-31",
            "max_tokens": 2000,
            "messages": [{
                "role": "user",
                "content": prompt
            }]
        })
    )

    result = json.loads(response['body'].read())
    return result['content'][0]['text']

def automated_incident_analysis():
    """Main workflow: detect anomalies and analyze with AI."""
    # Step 1: Query for high-severity findings from the last hour
    one_hour_ago = int((datetime.now(timezone.utc) - timedelta(hours=1)).timestamp() * 1000)

    sql = f"""
    SELECT
        class_name, severity, status, time,
        actor.user.name AS user_name,
        src_endpoint.ip AS source_ip,
        dst_endpoint.ip AS dest_ip,
        finding.title AS finding_title,
        metadata.product.name AS source_product,
        message
    FROM {DATABASE}.security_events
    WHERE severity IN ('Critical', 'High')
      AND time >= {one_hour_ago}
    ORDER BY time DESC
    LIMIT 100
    """

    events = query_security_events(sql)

    if not events:
        return {"status": "no_critical_events"}

    # Step 2: AI analysis of the events
    analysis = analyze_threat_with_bedrock(
        events,
        "High-severity security findings from the last hour across all AWS accounts"
    )

    return {
        "timestamp": datetime.now(timezone.utc).isoformat(),
        "event_count": len(events),
        "ai_analysis": analysis,
        "raw_events": events[:10]  # Include top 10 for reference
    }
This pattern – query Security Lake, analyze with Bedrock, take automated action – enables security teams to scale threat detection without proportionally scaling headcount.
For teams exploring AI-powered infrastructure automation more broadly, the patterns in the S3 POSIX filesystem and AI agents guide show how AI agents can interact with AWS storage at scale.
Cost Analysis
Security Lake pricing has three components: storage, data ingestion (normalization), and query (via Athena).
Security Lake Pricing Breakdown
| Component | Price | Notes |
|---|---|---|
| Security Lake Storage | $0.024/GB-month | S3 Standard, includes Iceberg overhead |
| Data Ingestion (Normalization) | $0.30/GB | Per GB of raw logs processed |
| Athena Query | $5.00/TB scanned | Standard Athena pricing on Iceberg |
| S3 Request Costs | Standard S3 rates | PUT/GET/LIST operations |
| Cross-Region Replication | $0.02/GB | If configured (optional) |
Cost Scenario: 20-Account Deployment
Consider a realistic 20-account AWS deployment:
| Data Source | Volume (GB/day) | Monthly Storage (GB) | Monthly Storage Cost | Monthly Ingest Cost |
|---|---|---|---|---|
| CloudTrail Management | 40 | 1,200 | $28.80 | $360.00 |
| CloudTrail Data Events | 200 | 6,000 | $144.00 | $1,800.00 |
| VPC Flow Logs | 150 | 4,500 | $108.00 | $1,350.00 |
| GuardDuty Findings | 2 | 60 | $1.44 | $18.00 |
| Security Hub | 5 | 150 | $3.60 | $45.00 |
| Route 53 Resolver | 30 | 900 | $21.60 | $270.00 |
| WAF Logs | 15 | 450 | $10.80 | $135.00 |
| Total | 442 | 13,260 | $318.24 | $3,978.00 |
Monthly Athena estimate (assuming 5 TB queried/month): $25.00
Total Security Lake cost: ~$4,321/month
Comparison with Traditional SIEM Pricing
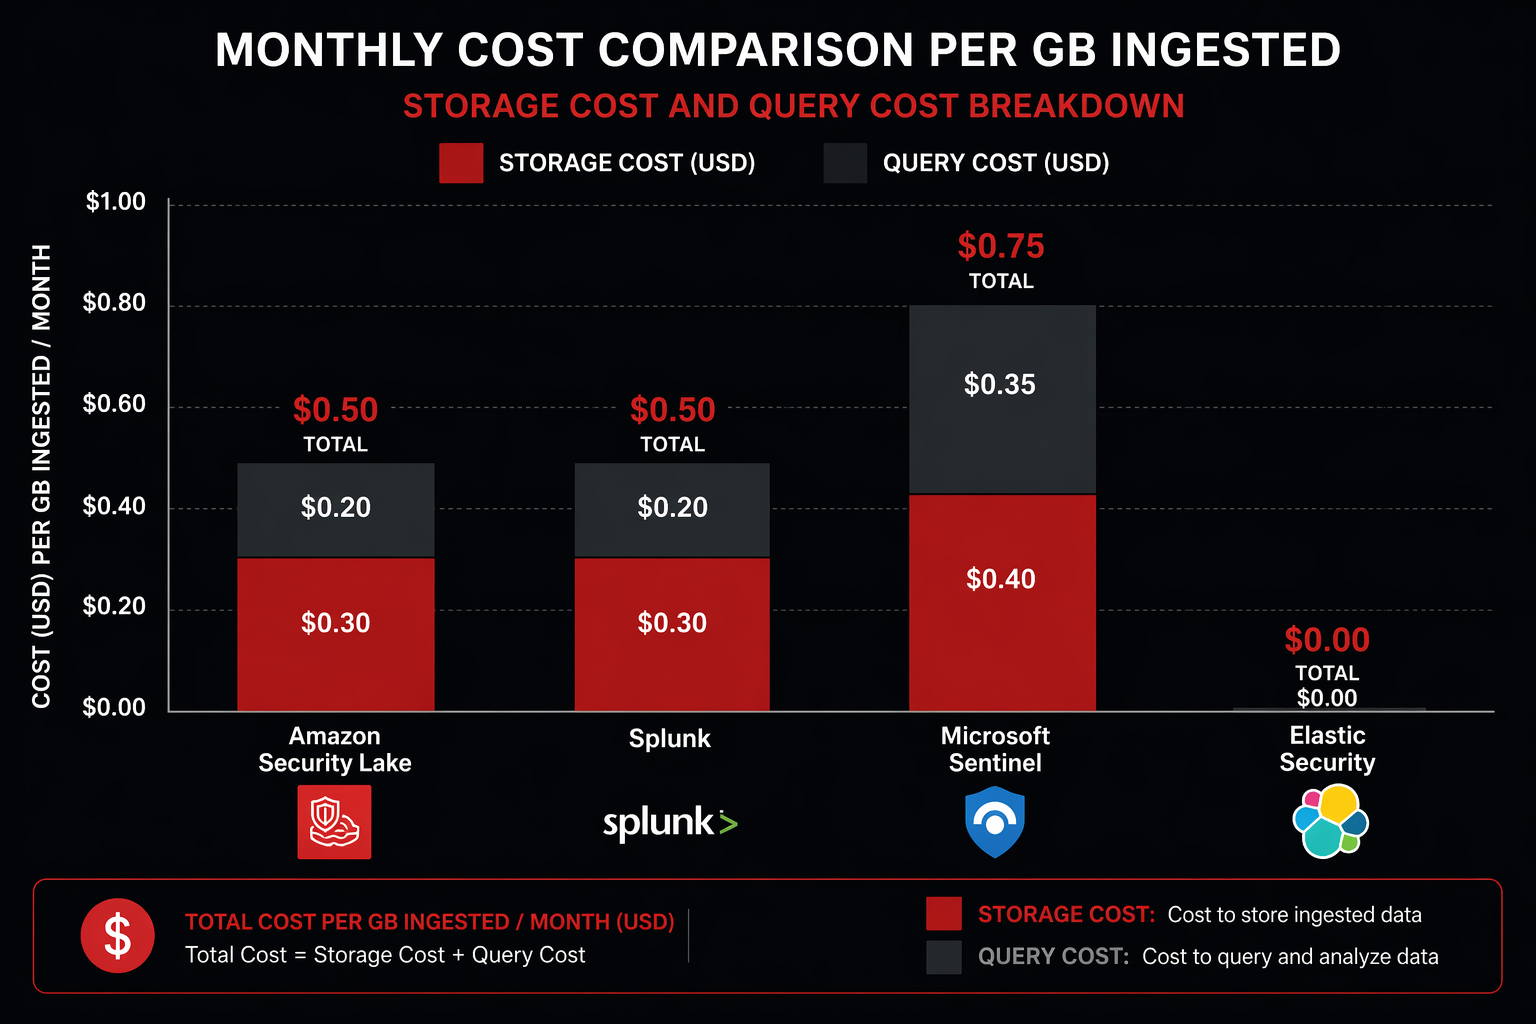
| Solution | Cost Model | Monthly Cost (442 GB/day) | 1-Year TCO | Notes |
|---|---|---|---|---|
| Amazon Security Lake | Storage + Query | $4,321 | $51,852 | Includes Athena queries |
| Splunk Cloud | Ingest-based | $66,300 | $795,600 | $5/GB/day ingest rate |
| Microsoft Sentinel | Ingest-based | $33,150 | $397,800 | $2.50/GB/day ingest rate |
| Elastic Cloud | Resource-based | $18,500 | $222,000 | 3-node cluster + storage |
| IBM QRadar Cloud | Ingest-based | $39,780 | $477,360 | $3/GB/day ingest rate |
Security Lake costs roughly 7-15x less than traditional SIEM solutions at this scale. The gap widens as volume increases because Security Lake’s cost scales linearly with storage (which is cheap), while SIEM costs scale linearly with ingest volume (which is expensive).
The tradeoff is functionality. Security Lake is a data platform, not a SIEM. It does not include built-in alerting, case management, playbook automation, or dashboards. You pair it with a SIEM for those capabilities or build them yourself. The most cost-effective architecture for many teams is Security Lake for long-term storage and historical analysis, with a SIEM ingesting only high-priority events for real-time alerting.
Comparison: Security Lake vs Splunk vs Microsoft Sentinel vs Elastic
| Feature | Security Lake | Splunk Cloud | Microsoft Sentinel | Elastic Security |
|---|---|---|---|---|
| Data Model | OCSF (open standard) | Splunk CIM | ASIM | ECS |
| Storage Format | Apache Iceberg / Parquet | Proprietary | Azure Blob / Tables | Elasticsearch indices |
| Query Engine | Athena (SQL) | SPL | KQL | KQL / Lucene |
| Data Ownership | Your S3 bucket | Splunk-managed | Azure-managed | Self or Elastic Cloud |
| Real-time Alerting | Via EventBridge | Native | Native | Native |
| Case Management | None | Native | Native (incidents) | Basic |
| SOAR Playbooks | None | Splunk SOAR | Logic Apps | Elastic Automate |
| AI/ML Detection | Via Bedrock integration | MLTK, ESSES | UEBA, ML analytics | ML jobs |
| Multi-cloud | AWS native + custom sources | Any source | Azure native + connectors | Any source |
| Retention Cost | $0.024/GB-month | Included in ingest | $0.10/GB-month (Analytics) | Storage tier costs |
| Vendor Lock-in | Minimal (open formats) | High (SPL, proprietary) | Medium (KQL, Azure) | Medium (ECS, Elasticsearch) |
| Cold Storage | S3 Glacier lifecycle | SmartStore | Archive tier | Frozen tier |
| Compliance | SOC, PCI, ISO | SOC, PCI, ISO, FedRAMP | SOC, PCI, ISO, FedRAMP | SOC, PCI, ISO |
The key differentiator for Security Lake is data ownership and cost at scale. Your data stays in your S3 bucket in open formats. If you decide to switch SIEM tools, the data doesn’t move – you point the new tool at the same S3 bucket. Try doing that with Splunk Cloud.
The key disadvantage is maturity. Security Lake does not include the detection rules, response playbooks, and dashboards that come out of the box with established SIEM platforms. You build those yourself or rely on your SIEM for them.
Best Practices
Data Lifecycle Management
Configure retention policies based on the value of each data source over time:
# Set different retention for different data classes
# High-value findings: 3 years
aws securitylake update-data-lake \
  --regions us-east-1 \
  --retention-settings retentionDays=1095 \
  --filter 'class_name="Security Finding"'

# Network activity: 1 year
aws securitylake update-data-lake \
  --regions us-east-1 \
  --retention-settings retentionDays=365 \
  --filter 'class_name="Network Activity"'
Implement S3 lifecycle policies to transition older data to cheaper storage classes:
import boto3

s3 = boto3.client('s3')
BUCKET = 'aws-securitylake-us-east-1-123456789012'

s3.put_bucket_lifecycle_configuration(
    Bucket=BUCKET,
    LifecycleConfiguration={
        'Rules': [
            {
                'ID': 'TransitionToIA-90days',
                'Status': 'Enabled',
                'Filter': {'Prefix': 'aws/'},
                'Transitions': [
                    {
                        'Days': 90,
                        'StorageClass': 'STANDARD_IA'
                    },
                    {
                        'Days': 180,
                        'StorageClass': 'GLACIER'
                    },
                    {
                        'Days': 365,
                        'StorageClass': 'DEEP_ARCHIVE'
                    }
                ]
            }
        ]
    }
)
Partition Pruning for Query Performance
Always include partition columns in your WHERE clauses. Security Lake partitions data by event_day, class_name, and region. Queries that filter on these columns allow Athena to skip entire partitions:
-- GOOD: Partition pruning (fast, cheap)
SELECT actor.user.name, COUNT(*) AS event_count
FROM amazon_security_lake_glue_db_us_east_1.security_events
WHERE event_day BETWEEN '2026-04-20' AND '2026-04-22'
  AND class_name = 'Authentication'
  AND region = 'us-east-1'
GROUP BY actor.user.name
ORDER BY event_count DESC;

-- BAD: Full table scan (slow, expensive)
SELECT actor.user.name, COUNT(*) AS event_count
FROM amazon_security_lake_glue_db_us_east_1.security_events
GROUP BY actor.user.name
ORDER BY event_count DESC;
The first query scans only the Parquet files for the specified date range, event class, and region. The second scans every file in the table. On a 10 TB dataset, the difference is scanning 50 GB versus 10 TB – 200x less data and proportionally lower cost.
IAM Least Privilege for Security Lake Access
{
  "Version": "2012-10-17",
  "Statement": [
    {
      "Sid": "SecurityLakeReadAccess",
      "Effect": "Allow",
      "Action": [
        "securitylake:GetDataLake",
        "securitylake:GetDataLakeSources",
        "securitylake:GetSubscriber"
      ],
      "Resource": "*"
    },
    {
      "Sid": "AthenaQueryAccess",
      "Effect": "Allow",
      "Action": [
        "athena:StartQueryExecution",
        "athena:GetQueryExecution",
        "athena:GetQueryResults",
        "athena:StopQueryExecution"
      ],
      "Resource": [
        "arn:aws:athena:us-east-1:123456789012:workgroup/primary"
      ]
    },
    {
      "Sid": "GlueCatalogReadAccess",
      "Effect": "Allow",
      "Action": [
        "glue:GetDatabase",
        "glue:GetDatabases",
        "glue:GetTable",
        "glue:GetTables",
        "glue:GetPartition",
        "glue:GetPartitions"
      ],
      "Resource": [
        "arn:aws:glue:us-east-1:123456789012:catalog",
        "arn:aws:glue:us-east-1:123456789012:database/amazon_security_lake_glue_db_*",
        "arn:aws:glue:us-east-1:123456789012:table/amazon_security_lake_glue_db_*/*"
      ]
    },
    {
      "Sid": "S3DataAccess",
      "Effect": "Allow",
      "Action": [
        "s3:GetObject",
        "s3:ListBucket"
      ],
      "Resource": [
        "arn:aws:s3:::aws-securitylake-us-east-1-123456789012",
        "arn:aws:s3:::aws-securitylake-us-east-1-123456789012/*",
        "arn:aws:s3:::security-lake-query-results",
        "arn:aws:s3:::security-lake-query-results/*"
      ]
    },
    {
      "Sid": "KMSDecryptAccess",
      "Effect": "Allow",
      "Action": [
        "kms:Decrypt",
        "kms:GenerateDataKey"
      ],
      "Resource": "arn:aws:kms:us-east-1:123456789012:key/your-key-id"
    }
  ]
}
Monitoring Security Lake Itself
Security Lake is a security tool, but it also needs to be monitored. Enable CloudTrail data events on the Security Lake S3 bucket to track who is querying what data. Set up CloudWatch alarms for:
- Unexpected increases in Athena query volume (potential data exfiltration through the security tool)
- Changes to Security Lake configuration (who added or removed sources)
- IAM role assumptions for the Security Lake administrator role
# CloudWatch alarm for abnormal Athena query volume
aws cloudwatch put-metric-alarm \
  --alarm-name SecurityLakeAthenaAnomaly \
  --alarm-description "Alert when Athena query volume on Security Lake exceeds normal baseline" \
  --metric-name QueryExecutionTime \
  --namespace AWS/Athena \
  --statistic Sum \
  --period 3600 \
  --threshold 100 \
  --comparison-operator GreaterThanThreshold \
  --evaluation-periods 2 \
  --treat-missing-data notBreaching \
  --dimensions Name=WorkGroup,Value=primary \
  --alarm-actions arn:aws:sns:us-east-1:123456789012:security-alerts
Regular Compaction and Optimization
Security Lake handles Iceberg compaction automatically, but for high-volume deployments, verify the compaction is keeping up:
-- Check for excessive small files (indicates compaction lag)
SELECT
    "$path" AS file_path,
    "$file_size_in_bytes" AS file_size,
    "$record_count" AS record_count
FROM amazon_security_lake_glue_db_us_east_1.security_events
WHERE event_day = DATE_FORMAT(CURRENT_TIMESTAMP - INTERVAL '1' DAY, '%Y-%m-%d')
GROUP BY "$path", "$file_size_in_bytes", "$record_count"
HAVING "$file_size_in_bytes" < 1048576  -- Files smaller than 1MB
ORDER BY "$file_size_in_bytes"
LIMIT 50;
If you see many small files, contact AWS support to adjust the compaction frequency for your Security Lake instance.
Conclusion
Amazon Security Lake solves a specific problem extremely well: centralizing security log data in a normalized, open, cost-effective format. The OCSF normalization eliminates the schema chaos that makes cross-source correlation painful. Apache Iceberg on S3 gives you fast analytical queries without proprietary lock-in. And the pricing model – pay for storage and queries, not ingest volume – makes it feasible to retain full-fidelity security data for months or years instead of filtering aggressively to stay under a SIEM budget.
Security Lake is not a SIEM replacement. It is a data platform that your SIEM, your custom analytics, and your AI tools all consume from. The most effective deployments use Security Lake as the central data store, a lightweight SIEM (or the SIEM they already have) for real-time alerting and case management, and Athena or Bedrock for deep historical analysis and AI-powered threat detection.
The setup is straightforward for AWS-native sources – enable the service, select your sources, and data starts flowing within hours. Custom sources require more work, but the Python transformation pattern covered in this guide gives you a reusable framework for normalizing any log source into OCSF format.
For teams already running GuardDuty and Security Hub, enabling Security Lake is a low-risk, high-value step. You get normalized, queryable access to the security data you’re already generating, without writing a single custom parser. For the WAF rules feeding into that security pipeline, the WAF rules deep dive covers the configurations that produce the most useful Security Lake data.
The security data problem is not going away. Logs are growing exponentially, attack surfaces are expanding, and SIEM costs are scaling linearly with both. Security Lake offers a different scaling model: centralized, normalized, open-format data at storage pricing instead of ingest pricing. For any organization running more than a handful of AWS accounts, that difference compounds quickly.
Explore more like this
Aurora Serverless v2 + Bedrock: AI Database Queries in 2026
I connected Bedrock to our Aurora cluster last month. The first thing I asked it was “show me all customers who churned in Q1 but came back in Q2” —...
AWS WAF Rules Deep Dive: Rate-Based, Geo, and Custom Rules
WAF is one of those services where the default managed rules get you 80% of the way there. The last 20% is where it gets interesting.

Comments