Cilium and eBPF for Kubernetes Networking: EKS Deep Dive 2026
I spent a full Saturday afternoon in 2023 trying to figure out why a production EKS cluster was dropping packets between two namespaces. The pod-to-pod traffic should have worked – the security groups were open, the route tables were correct, and the VPC CNI was healthy. After six hours of tcpdump sessions and iptables rule counting, the culprit turned out to be a conntrack table overflow on a node running 90 pods. The kube-proxy iptables rules had ballooned to over 40,000 entries, and the kernel’s connection tracking couldn’t keep up under load. That was the day I started taking Cilium seriously.
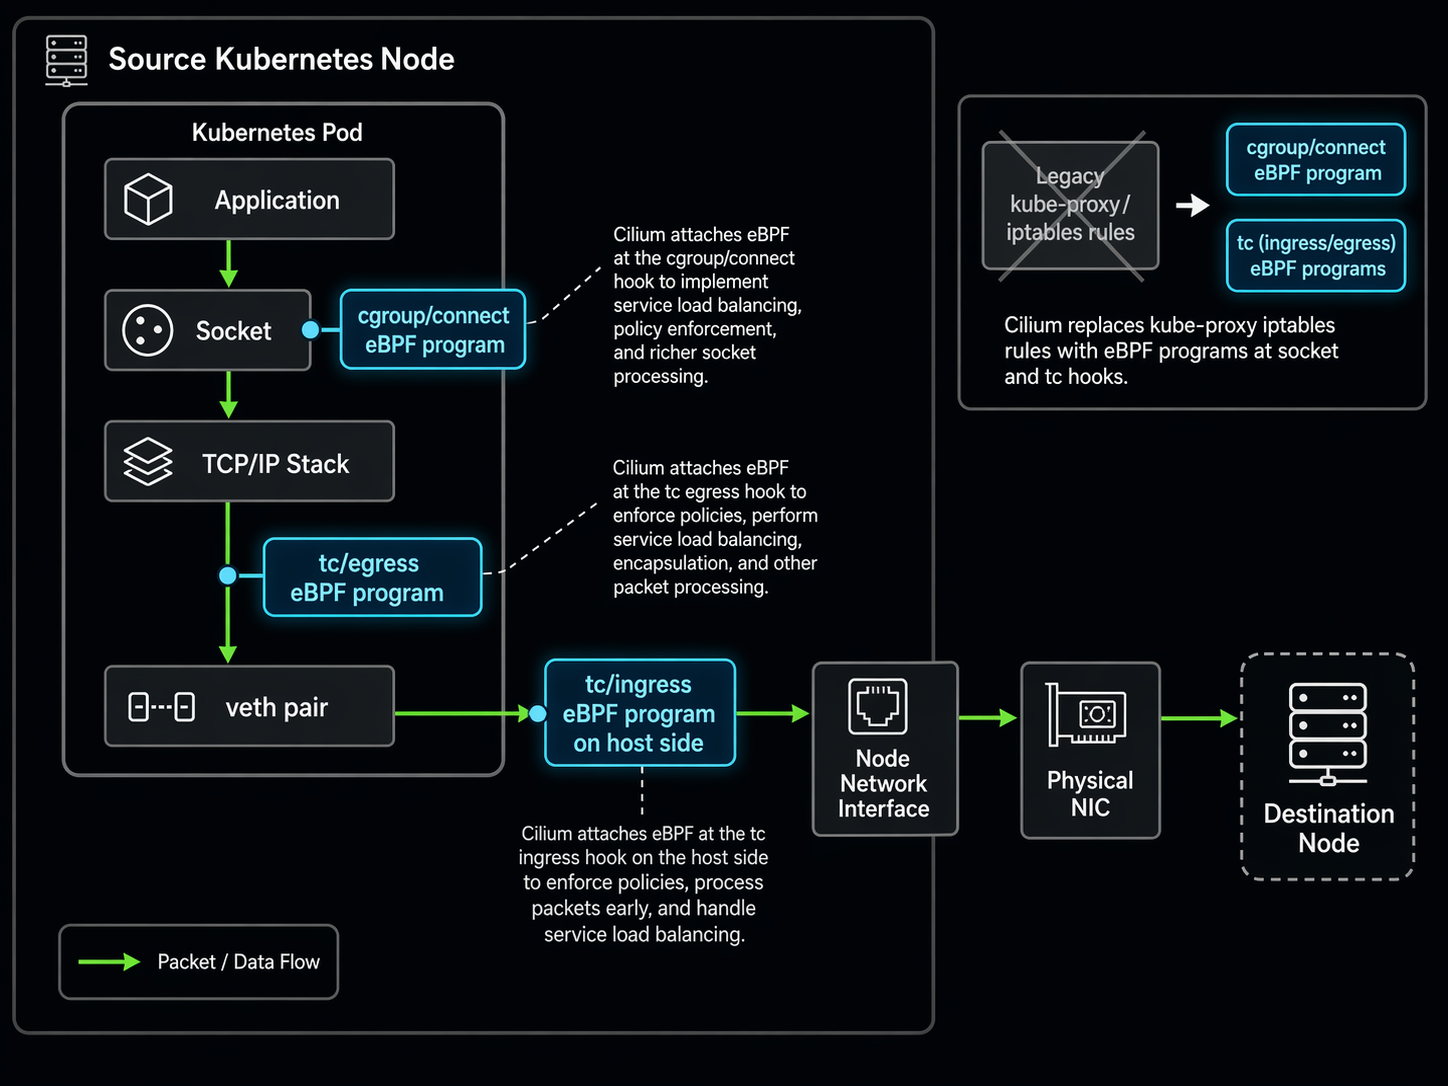
If you’re running Kubernetes on EKS and still relying on kube-proxy with iptables for service routing, you’re carrying baggage that eBPF can drop entirely. Cilium replaces kube-proxy’s iptables machinery with eBPF programs attached directly to kernel hooks, and the difference in performance, observability, and security is not subtle. This post covers what eBPF actually does in the Kubernetes networking stack, how to deploy Cilium on EKS, network policies that go well beyond what Kubernetes supports natively, Hubble for real-time flow visibility, and the performance numbers that make the case for switching.
Table of Contents
- What eBPF Actually Does for Kubernetes Networking
- kube-proxy vs Cilium: Why iptables Does Not Scale
- eBPF Datapath Inside a Kubernetes Pod
- Deploying Cilium on EKS
- CNI Plugin Comparison: Cilium vs Calico vs VPC CNI
- Cilium Network Policies: Beyond What Kubernetes Gives You
- Hubble: Network Observability That Actually Helps
- Performance Benchmarks: The Numbers
- Migrating from kube-proxy to Cilium on EKS
- When Cilium Makes Sense (and When It Doesn’t)
- Conclusion
What eBPF Actually Does for Kubernetes Networking
eBPF stands for Extended Berkeley Packet Filter. The original BPF was a packet capture mechanism in the Linux kernel – what tcpdump uses under the hood. eBPF extends that concept dramatically: it lets you run sandboxed programs inside the Linux kernel at specific hook points without modifying kernel source code or loading kernel modules.
For Kubernetes networking, the relevant hook points are where network packets enter and leave the system. When a pod sends a request to a Kubernetes Service, that request hits the kernel’s networking stack. With kube-proxy, the kernel processes that packet through iptables rules – potentially tens of thousands of them – before routing it to a destination pod. With Cilium, an eBPF program attached at the tc (traffic control) layer intercepts the packet and performs the service translation in a single hash table lookup.
The key insight: iptables processes rules sequentially. If your cluster has 5,000 services each with 3 endpoints, that is potentially 15,000 rules to traverse. eBPF uses hash maps, so lookup time is effectively constant regardless of how many services you have. This is not a theoretical optimization – it shows up clearly in production at scale.
Three eBPF program types matter most for Kubernetes:
- tc (traffic control) programs handle packet-level processing at the network interface. This is where service load balancing, NAT, and policy enforcement happen.
- cgroup/connect programs intercept socket-level connect() calls from applications, enabling early service resolution before packets even reach the network layer.
- XDP (eXpress Data Path) programs run at the network driver level, the earliest possible point in the packet processing pipeline. Cilium uses XDP for DDoS mitigation and high-performance packet filtering.
kube-proxy vs Cilium: Why iptables Does Not Scale
kube-proxy runs on every node in your cluster and maintains iptables rules that implement Kubernetes Service routing. Every time a Service or Endpoints object changes, kube-proxy updates the iptables rules on every node. This works fine for small clusters. It stops working fine around 5,000-10,000 services.
The problems compound. iptables rules are processed top-to-bottom. The more rules you have, the longer packet processing takes. Rule updates are not atomic – during a large Service update, you can hit a window where some rules reflect the new state and others still reflect the old state. And conntrack, the kernel’s connection tracking table, has a fixed size. When it fills up, packets get dropped silently.
Cilium’s eBPF-based kube-proxy replacement addresses all three issues. Service lookups use hash tables (O(1) instead of O(n)). eBPF map updates are atomic from the datapath perspective – a program always sees a consistent state. And Cilium manages its own connection tracking in eBPF maps that resize dynamically based on actual usage.
eBPF Datapath Inside a Kubernetes Pod
Here is what the datapath looks like when a pod sends traffic to a Kubernetes Service with Cilium’s kube-proxy replacement enabled:
┌─────────────────────────────────────────────────────────┐
│                      Application Pod                     │
│  ┌───────────────────────────────────────────────────┐  │
│  │                User Space (App)                    │  │
│  │        connect() to Service ClusterIP:80           │  │
│  └──────────────────┬────────────────────────────────┘  │
│                     │ syscall                            │
│  ┌──────────────────▼────────────────────────────────┐  │
│  │  cgroup/connect eBPF program                      │  │
│  │  - Intercepts connect() at socket layer           │  │
│  │  - Resolves ClusterIP → backend pod IP            │  │
│  │  - Socket-level LB (client-side load balancing)   │  │
│  └──────────────────┬────────────────────────────────┘  │
│                     │                                    │
│  ┌──────────────────▼────────────────────────────────┐  │
│  │           tc/ingress eBPF program                  │  │
│  │  - Policy enforcement (L3/L4/L7 rules)            │  │
│  │  - Connection tracking in BPF maps                │  │
│  │  - NAT/masquerade if needed                       │  │
│  └──────────────────┬────────────────────────────────┘  │
│                     │                                    │
│  ┌──────────────────▼────────────────────────────────┐  │
│  │              Network Interface (veth pair)         │  │
│  └──────────────────┬────────────────────────────────┘  │
│                     │ to node network namespace          │
│  ┌──────────────────▼────────────────────────────────┐  │
│  │            tc/egress eBPF program                  │  │
│  │  - Service load balancing (hash-based)             │  │
│  │  - DNAT: ClusterIP:Port → PodIP:Port              │  │
│  │  - Direct routing to destination node              │  │
│  └──────────────────┬────────────────────────────────┘  │
│                     │                                    │
│  ┌──────────────────▼────────────────────────────────┐  │
│  │             Physical NIC / ENI                     │  │
│  │  (or XDP program for early drop / DDOS filter)    │  │
│  └───────────────────────────────────────────────────┘  │
│                        │                                 │
└────────────────────────┼─────────────────────────────────┘
                         │ VPC Network Fabric (EKS)
                         ▼
              ┌──────────────────────┐
              │  Destination Node    │
              │  tc/ingress eBPF     │──► Destination Pod
              └──────────────────────┘
Notice the cgroup/connect hook at the top. This is what Cilium calls “socket-level load balancing.” Instead of waiting for a packet to be created with the ClusterIP as the destination and then translating it, Cilium resolves the Service to a specific backend pod at the moment the application calls connect(). The packet never carries the ClusterIP at all. This eliminates the NAT overhead entirely for pod-to-pod traffic within the cluster.
Deploying Cilium on EKS
There are two deployment patterns for Cilium on EKS. The first is Cilium as a replacement CNI, where Cilium handles everything: IP assignment, routing, network policy, and service load balancing. The second is Cilium chained with the Amazon VPC CNI, where VPC CNI continues handling IP allocation and Cilium handles the rest.
For most EKS deployments, the chaining approach is the better starting point. Your pods keep their VPC-native IP addresses, security groups continue working as expected, and you can incrementally adopt Cilium features without re-architecting your network. We covered the VPC CNI fundamentals in our EKS VPC CNI networking guide – worth reading first if you need background on how pod IPs work on EKS.
Option 1: VPC CNI Chaining (Recommended for Existing Clusters)
First, make sure your EKS cluster is running and the VPC CNI is up to date:
# Update VPC CNI to latest
kubectl set env daemonset aws-node \
  ENABLE_PREFIX_DELEGATION=true \
  -n kube-system

# Verify VPC CNI is running
kubectl get pods -n kube-system -l k8s-app=aws-node
Then deploy Cilium with Helm, configured for AWS CNI chaining:
helm install cilium cilium/cilium --version 1.17.2 \
  --namespace kube-system \
  --set cni.chainingMode=aws-cni \
  --set cni.exclusive=false \
  --set enableIPv4Masquerade=false \
  --set routingMode=native \
  --set kubeProxyReplacement=true \
  --set hubble.relay.enabled=true \
  --set hubble.ui.enabled=true
The key flags here:
cni.chainingMode=aws-cni: Tells Cilium to work alongside the VPC CNI instead of replacing it.cni.exclusive=false: Allows multiple CNI plugins. Required for chaining.enableIPv4Masquerade=false: The VPC CNI handles SNAT. Cilium should not duplicate that work.routingMode=native: Use native VPC routing instead of overlay tunnels.kubeProxyReplacement=true: Cilium replaces kube-proxy entirely.
After installation, verify Cilium is running:
kubectl -n kube-system get pods -l k8s-app=cilium

# Check Cilium status on a node
kubectl -n kube-system exec ds/cilium -- cilium status

# Verify kube-proxy replacement is active
kubectl -n kube-system exec ds/cilium -- cilium status --verbose | grep "Kube-Proxy Replacement"
Option 2: EKS Add-on (New Clusters)
AWS added Cilium as an EKS Add-on for new clusters. This is the simplest path if you are building a fresh cluster rather than retrofitting an existing one:
# Create a new EKS cluster with Cilium
eksctl create cluster \
  --name cilium-cluster \
  --region us-east-1 \
  --cni cilium \
  --node-type m5.xlarge \
  --nodes 3

# Or add Cilium to an existing cluster via the EKS add-on
aws eks create-addon \
  --cluster-name my-cluster \
  --addon-name amazon-cilium \
  --addon-version v1.17.2-eksbuild.1 \
  --resolve-conflicts OVERWRITE
If you are new to EKS cluster creation, our EKS getting started guide walks through the full cluster setup process.
CNI Plugin Comparison: Cilium vs Calico vs VPC CNI
EKS gives you options for the CNI layer. The default is the Amazon VPC CNI, and most teams stick with it until they hit a limitation. Here is how the three main options compare:
| Feature | Amazon VPC CNI | Calico | Cilium |
|---|---|---|---|
| IP Assignment | Native VPC IPs (ENI) | Overlay or native | Overlay, native, or chained |
| Network Policy | None (VPC SGs only) | L3/L4 | L3/L4/L7 + FQDN |
| Service Routing | kube-proxy (iptables/IPVS) | kube-proxy or eBPF | eBPF (kube-proxy replacement) |
| Observability | VPC flow logs only | Limited flow logs | Hubble (real-time L3-L7) |
| Encryption | None (rely on VPC) | WireGuard, IPSec | WireGuard, IPSec |
| EKS Integration | Default, fully managed | Manual installation | EKS Add-on available |
| Performance | VPC-native + kube-proxy overhead | Good with eBPF, slow with iptables | Best (full eBPF datapath) |
| IP Exhaustion Risk | High (VPC IPs per pod) | Low (overlay reuse RFC1918) | Low (overlay) or chained (same as VPC) |
| DNS Policy | No | Limited (FQDN via iptables) | Full L7 DNS proxy in eBPF |
| Maintainer | AWS | Tigera / Community | Isovalent (Cisco) / CNCF |
The practical takeaway: VPC CNI alone gives you IP addresses and nothing else. Calico adds network policy but still leans on kube-proxy for service routing unless you enable its eBPF datapath (which has a narrower feature set than Cilium). Cilium gives you the full stack – networking, policy, observability, and service routing – all in eBPF.
Cilium Network Policies: Beyond What Kubernetes Gives You
Kubernetes NetworkPolicy resources support L3 (IP-based) and L4 (port-based) rules. That is it. You can say “pods with label X can talk to pods with label Y on port 8080.” You cannot say “pods with label X can only make GET requests to /api/v2/* on port 8080” or “pods with label X can reach api.stripe.com but nothing else.”
Cilium extends network policy to three additional layers:
| Policy Layer | What It Controls | Example |
|---|---|---|
| L3 (Network) | IP/CIDR-based access | Allow traffic only from 10.0.0.0/16 |
| L4 (Transport) | Port and protocol rules | Allow TCP on port 443 to specific pods |
| L7 (Application) | HTTP method, path, headers | Allow GET /api/* but deny DELETE /api/* |
| FQDN (DNS-based) | Domain name egress rules | Allow access to *.amazonaws.com only |
| Identity-based | Label-based across clusters | Allow any pod with role=backend to reach database |
Let me walk through real examples for each.
Example 1: L3/L4 Policy – Isolate a Payment Service
This policy restricts inbound traffic to a payment-processing service so that only the frontend pods in the same namespace can reach it on port 8443:
apiVersion: cilium.io/v2
kind: CiliumNetworkPolicy
metadata:
  name: payment-service-ingress
  namespace: payments
spec:
  endpointSelector:
    matchLabels:
      app: payment-processor
  ingress:
    - fromEndpoints:
        - matchLabels:
            "k8s:io.kubernetes.pod.namespace": payments
            app: frontend
      toPorts:
        - ports:
            - port: "8443"
              protocol: TCP
The "k8s:io.kubernetes.pod.namespace" label selector is how Cilium handles namespace matching in policies. It is more explicit than Kubernetes NetworkPolicy, which uses a separate namespaceSelector field.
Example 2: L7 HTTP Policy – Restrict API Methods
This is where Cilium network policies leave standard Kubernetes in the dust. The following policy allows the frontend to make GET and POST requests to the payment service, but blocks DELETE and PUT:
apiVersion: cilium.io/v2
kind: CiliumNetworkPolicy
metadata:
  name: payment-api-l7-rules
  namespace: payments
spec:
  endpointSelector:
    matchLabels:
      app: payment-processor
  ingress:
    - fromEndpoints:
        - matchLabels:
            "k8s:io.kubernetes.pod.namespace": payments
            app: frontend
      toPorts:
        - ports:
            - port: "8443"
              protocol: TCP
          rules:
            http:
              - method: GET
                path: "/api/v2/.*"
              - method: POST
                path: "/api/v2/transactions/.*"
This enforcement happens in the eBPF program at the tc layer. No proxy sidecar is injected. No application code changes are needed. The kernel itself inspects the HTTP headers and drops traffic that does not match.
Example 3: FQDN Egress Policy – Restrict External Access
One of the most practical Cilium features for EKS workloads: restricting which external domains a pod can reach. This policy allows pods to query DNS for any domain but only establish connections to AWS S3 and Stripe:
apiVersion: cilium.io/v2
kind: CiliumNetworkPolicy
metadata:
  name: restrict-egress-fqdn
  namespace: payments
spec:
  endpointSelector:
    matchLabels:
      app: payment-processor
  egress:
    # Allow DNS resolution
    - toEndpoints:
        - matchLabels:
            "k8s:io.kubernetes.pod.namespace": kube-system
            "k8s:k8s-app": kube-dns
      toPorts:
        - ports:
            - port: "53"
              protocol: ANY
          rules:
            dns:
              - matchPattern: "*"
    # Allow connections to specific FQDNs only
    - toFQDNs:
        - matchPattern: "*.s3.us-east-1.amazonaws.com"
        - matchName: "api.stripe.com"
      toPorts:
        - ports:
            - port: "443"
              protocol: TCP
The DNS proxy in Cilium intercepts DNS responses, extracts the resolved IP addresses, and programs eBPF maps that allow connections only to those IPs. When the DNS TTL expires and the domain resolves to a different IP, Cilium updates the map automatically. This is far more reliable than Calico’s FQDN filtering, which can miss IP changes during TTL windows.
For a broader look at Kubernetes security patterns on EKS, see our guide on Kubernetes RBAC and security for EKS.
Hubble: Network Observability That Actually Helps
Traditional Kubernetes network debugging follows a familiar and painful pattern: something is broken, you exec into a pod, run curl or nc, check if DNS resolves, look at iptables rules on the node, and repeat on the next pod. Hubble replaces that entire workflow with real-time flow visibility.
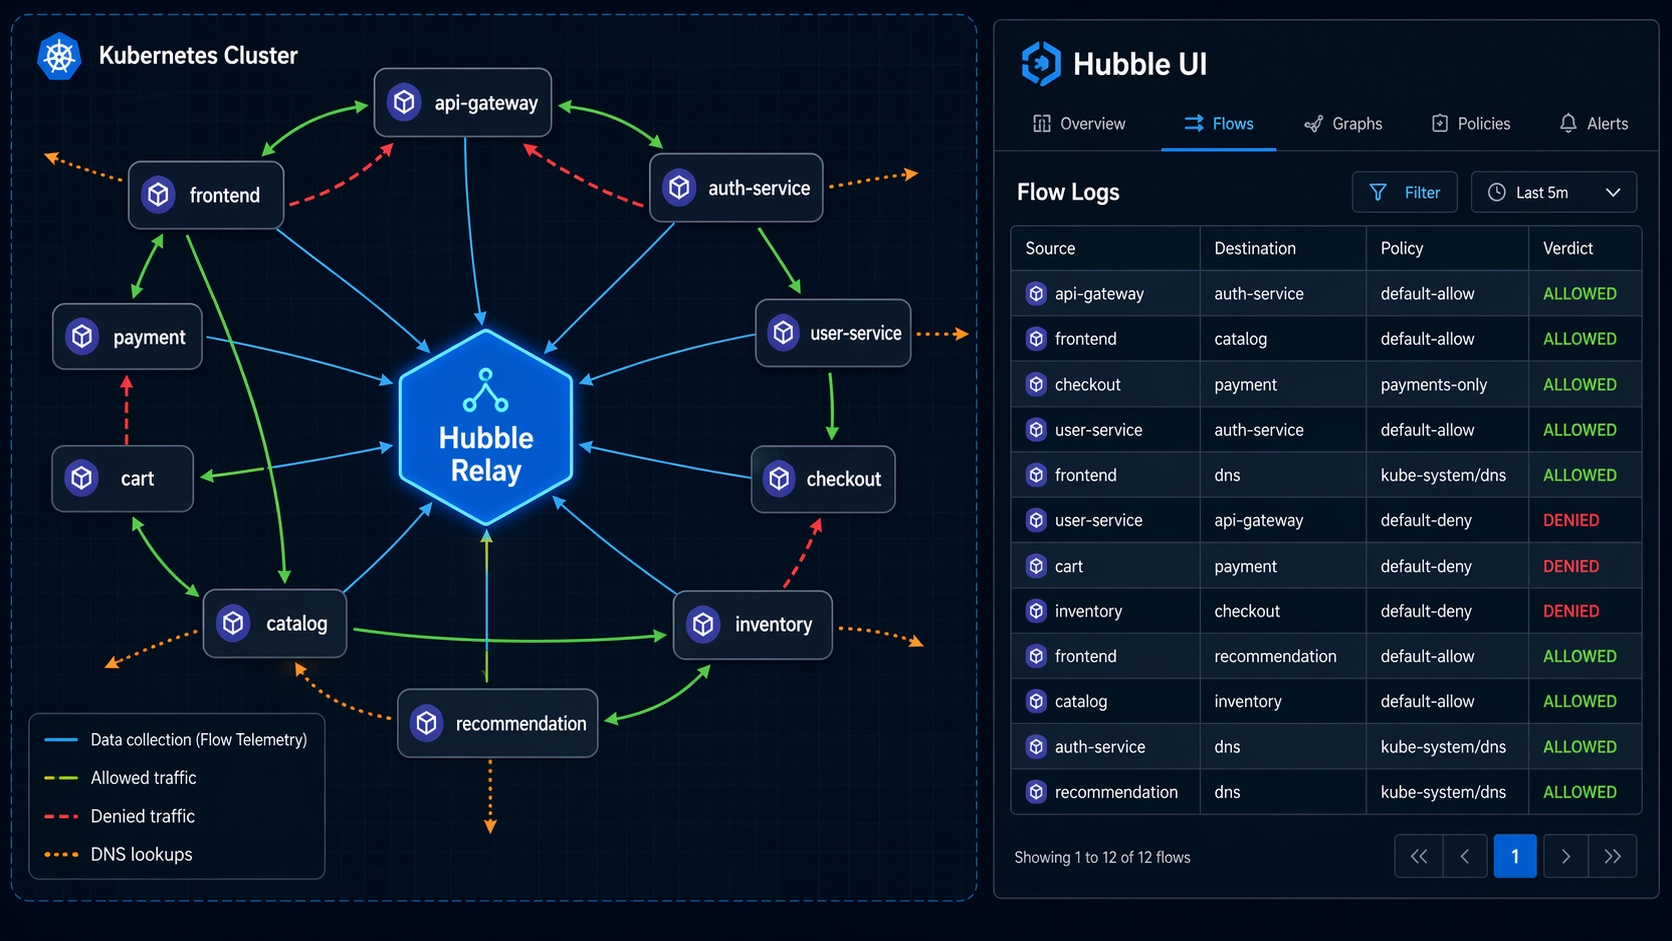
Hubble is Cilium’s observability layer. It runs as a server on each node, collecting network flow events from the eBPF programs. Hubble Relay aggregates those events across all nodes, giving you cluster-wide visibility. Hubble UI provides a visual service map showing which pods are communicating and on what ports.
Enabling Hubble on EKS
If you deployed Cilium with Helm as shown earlier, Hubble Relay and UI are already enabled. If not:
helm upgrade cilium cilium/cilium --version 1.17.2 \
  --namespace kube-system \
  --reuse-values \
  --set hubble.relay.enabled=true \
  --set hubble.ui.enabled=true
Port-forward to access Hubble UI:
kubectl port-forward -n kube-system svc/hubble-ui 8081:80
Then open http://localhost:8081 in your browser. You will see a service dependency map showing every pod-to-pod connection in your cluster, color-coded by namespace, with traffic volumes and latency distributions.
Using the Hubble CLI
For scripted debugging, the Hubble CLI is more useful than the UI:
# Install hubble CLI
HUBBLE_VERSION=$(curl -s https://raw.githubusercontent.com/cilium/hubble/master/stable.txt)
curl -LO "https://github.com/cilium/hubble/releases/download/${HUBBLE_VERSION}/hubble-linux-amd64.tar.gz"
tar xzvf hubble-linux-amd64.tar.gz
sudo mv hubble /usr/local/bin/

# Port-forward the Hubble Relay
kubectl port-forward -n kube-system svc/hubble-relay 4245:4245 &

# Watch all flows in real-time
hubble observe --since 1m

# Filter flows for a specific pod
hubble observe --pod payment-processor-7b9f4c6d4-x2k1n

# See only dropped packets (policy violations)
hubble observe --type drop

# See DNS queries
hubble observe --type l7 --protocol dns
The output of hubble observe includes source and destination identities, the verdict (FORWARDED or DROPPED), and – for dropped packets – the specific policy rule that caused the drop. No more guessing which network policy is blocking traffic. Hubble tells you exactly which rule is responsible.
This level of observability pairs well with a service mesh. Our Istio service mesh on EKS guide covers how Istio handles L7 traffic management, while Cilium and Hubble handle the L3/L4 network layer. The two are complementary, not competing – Cilium focuses on the network, Istio focuses on application-layer traffic.
Performance Benchmarks: The Numbers
Let me show the benchmark data. These numbers come from the Cilium scalability reports published by Isovalent (now part of Cisco), independent benchmarks from the CNCF community, and my own testing on EKS with m5.xlarge nodes running Kubernetes 1.30.
Test Environment
- EKS cluster: 10 x m5.xlarge nodes, Kubernetes 1.30
- Workloads: 1,000-10,000 Services with varying endpoint counts
- Load generation: fortio with 64 concurrent connections per test
- Metrics: Requests/sec, P50/P90/P99 latency, CPU usage per node
kube-proxy (iptables) vs Cilium eBFP Performance
| Metric | kube-proxy (iptables) | kube-proxy (IPVS) | Cilium eBPF | Improvement |
|---|---|---|---|---|
| RPS at 1K Services | 42,000 | 48,000 | 55,000 | +31% vs iptables |
| RPS at 5K Services | 28,000 | 41,000 | 53,000 | +89% vs iptables |
| RPS at 10K Services | 14,000 | 36,000 | 52,000 | +271% vs iptables |
| P50 Latency (10K Svcs) | 2.4 ms | 1.6 ms | 0.9 ms | -62% vs iptables |
| P99 Latency (10K Svcs) | 18.5 ms | 8.2 ms | 3.1 ms | -83% vs iptables |
| CPU per node (10K Svcs) | 2.8 cores | 1.4 cores | 0.6 cores | -79% vs iptables |
| Memory per node (10K Svcs) | 1.2 GB | 680 MB | 310 MB | -74% vs iptables |
| Rule update latency | 800-1500 ms | 200-400 ms | < 50 ms | -97% vs iptables |
| Conntrack table usage | High (kernel) | High (kernel) | Low (BPF maps) | Dynamic sizing |
The performance gap widens as you add more services. At 1,000 services, Cilium is measurably faster but the difference is not dramatic. At 10,000 services, iptables is struggling badly – P99 latency nearly triples compared to Cilium, and CPU consumption eats almost 3 full cores per node just on networking overhead.
The rule update latency row deserves attention. When you scale a Deployment from 5 to 50 replicas, kube-proxy needs to update iptables rules on every node. With 10,000 services, that update can take over a second. During that window, traffic can be routed to removed endpoints. Cilium’s BPF map updates complete in under 50ms, and they are atomic from the datapath perspective – a connection either sees the old state or the new state, never a mix.
What This Means for EKS Costs
On EKS, you pay for EC2 instances by the hour. If Cilium saves 2 cores of CPU per node on networking overhead, that is CPU capacity available for actual workloads. On a cluster with 50 m5.xlarge nodes (4 vCPU each), saving 2 cores per node means reclaiming 100 vCPUs – the equivalent of 25 nodes worth of compute. At $0.192/hour per m5.xlarge, that is $4.80/hour or roughly $3,500/month in compute you can either use for workloads or eliminate by downsizing.
Migrating from kube-proxy to Cilium on EKS
Migrating an existing EKS cluster to Cilium with kube-proxy replacement requires a specific sequence. Do not just uninstall kube-proxy and hope for the best.
Step 1: Deploy Cilium in Partial Mode First
Start with kube-proxy replacement in “partial” mode, where Cilium handles nodeport and clusterip services but kube-proxy continues running as a safety net:
helm install cilium cilium/cilium --version 1.17.2 \
  --namespace kube-system \
  --set cni.chainingMode=aws-cni \
  --set cni.exclusive=false \
  --set enableIPv4Masquerade=false \
  --set routingMode=native \
  --set kubeProxyReplacement=partial \
  --set hubble.relay.enabled=true \
  --set hubble.ui.enabled=true
Wait for all Cilium pods to be running:
kubectl -n kube-system rollout status ds/cilium
Step 2: Validate Connectivity
Run connectivity tests before removing kube-proxy:
# Deploy Cilium's built-in connectivity test
kubectl apply -f https://raw.githubusercontent.com/cilium/cilium/main/install/kubernetes/cilium/files/cilium-connectivity-test.yaml

# Check test results
kubectl get pods -n cilium-test -w
Also run your own application-level smoke tests. Hit your internal services, verify DNS resolution, check external connectivity.
Step 3: Switch to Strict Mode and Remove kube-proxy
Once connectivity is confirmed, switch to strict mode and remove kube-proxy:
# Upgrade Cilium to strict mode
helm upgrade cilium cilium/cilium --version 1.17.2 \
  --namespace kube-system \
  --reuse-values \
  --set kubeProxyReplacement=true \
  --set k8sServiceHost=$(kubectl get endpoints kubernetes -o jsonpath='{.items[0].subsets[0].addresses[0].ip}') \
  --set k8sServicePort=443

# Remove kube-proxy DaemonSet
kubectl delete ds kube-proxy -n kube-system

# Remove kube-proxy config (cleanup iptables rules)
for node in $(kubectl get nodes -o name); do
  ssh $(echo $node | cut -d/ -f2) "iptables -t nat -F KUBE-SERVICES; iptables -t nat -F KUBE-POSTROUTING"
done
The k8sServiceHost and k8sServicePort values are critical. When kube-proxy is removed, Cilium needs to know where the Kubernetes API server is so it can watch Service and Endpoints objects. Point these directly at your EKS API server endpoint.
Step 4: Verify and Monitor
# Confirm kube-proxy replacement is strict
kubectl -n kube-system exec ds/cilium -- cilium status | grep "Kube-Proxy Replacement"
# Should show: Kube-Proxy Replacement: Strict [ens-linux-veth-xxx] (enabled)

# Watch Hubble flows for any drops
hubble observe --type drop --since 5m
If you see drops in Hubble after the migration, check whether they are from Cilium network policies (expected if you have policies configured) or from a misconfiguration. Hubble shows the specific policy reason for each drop.
When Cilium Makes Sense (and When It Doesn’t)
Cilium is not the right answer for every EKS cluster. Here is my honest assessment after running it in production for two years.
Use Cilium when:
- Your cluster has more than 1,000 services and you are seeing kube-proxy CPU overhead or latency spikes.
- You need network policies beyond L3/L4 – HTTP method filtering, FQDN egress rules, or identity-based policies across namespaces.
- You want real-time network observability without deploying a separate monitoring stack.
- You are running multi-cluster Kubernetes and need consistent network policy enforcement across clusters.
- Your compliance requirements mandate network segmentation that Kubernetes NetworkPolicy cannot express.
Stick with VPC CNI + kube-proxy when:
- Your cluster has fewer than 200 services and networking is not a bottleneck.
- Your team has no eBPF experience and you cannot afford the learning curve right now.
- You rely heavily on VPC flow logs for compliance auditing and do not want to introduce a parallel observability system.
- Your EKS cluster runs on Fargate only – Cilium DaemonSets do not run on Fargate nodes.
The learning curve is real. Debugging eBPF programs requires understanding kernel networking at a level that most Kubernetes operators have never needed. Cilium abstracts most of it away, but when something goes wrong at the eBPF level, you need someone who can read BPF bytecode or at least interpret cilium bpf lb list output. Budget time for your team to get comfortable.
Conclusion
Cilium and eBPF represent a fundamental shift in how Kubernetes networking works. Instead of relying on iptables rules that degrade with scale, eBPF programs attached to kernel hooks handle service routing, network policy, and observability with consistent performance regardless of cluster size.
For EKS specifically, the VPC CNI chaining approach gives you the best of both worlds: native VPC IP addresses for your pods plus Cilium’s full networking stack. The performance gains are measurable – up to 3x throughput improvement and 80%+ latency reduction at scale compared to kube-proxy with iptables. Hubble gives you network visibility that makes debugging actually productive instead of a guessing game.
The migration path is incremental. Start with partial kube-proxy replacement, validate everything, then switch to strict mode. The entire process can be done on a running cluster without downtime if you follow the sequence carefully.
If your EKS cluster is growing past a few hundred services, or if you need network policies that go beyond “allow this port from that namespace,” Cilium is worth the investment. The performance numbers speak for themselves, and the observability alone saves hours of debugging time per incident.
Sources and Further Reading:
Explore more like this

Aurora Serverless v2 + Bedrock: AI Database Queries in 2026
I connected Bedrock to our Aurora cluster last month. The first thing I asked it was “show me all customers who churned in Q1 but came back in Q2” —...
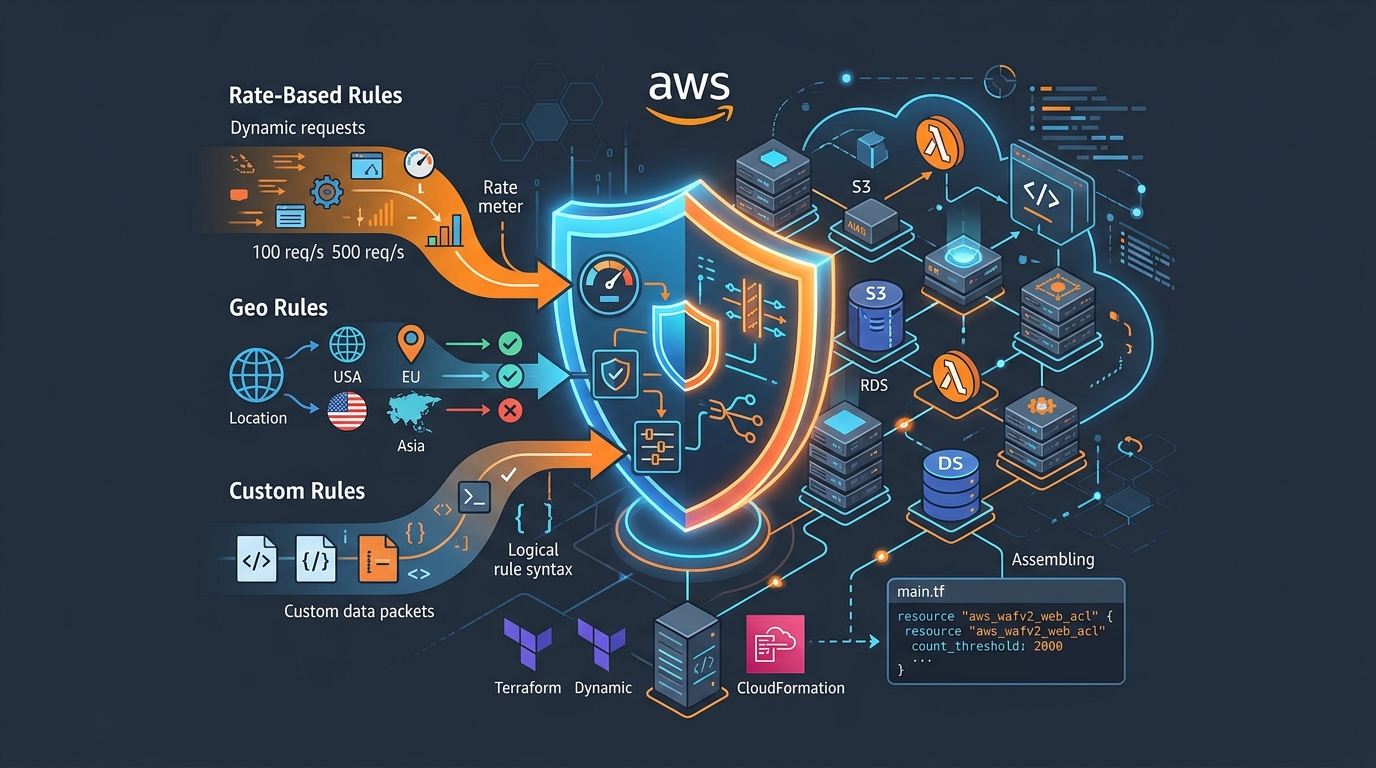
AWS WAF Rules Deep Dive: Rate-Based, Geo, and Custom Rules
WAF is one of those services where the default managed rules get you 80% of the way there. The last 20% is where it gets interesting.

Comments