GitLab Advanced Security: SAST, DAST, and Secret Detection in CI/CD
Think of security scanning that runs after deployment like an autopsy. You figure out what went wrong, but the damage is done. The vulnerabilities were already live in production. Somebody probably exploited them. That log entry confirming the breach? It’s timestamped three weeks ago.
DevSecOps flips that approach on its head. It pushes security “left” – right into the pipeline where code gets written, tested, and merged. It’s not a gate at the end of the process. It’s not a quarterly audit. It’s a continuous loop that catches problems before they ever touch production.
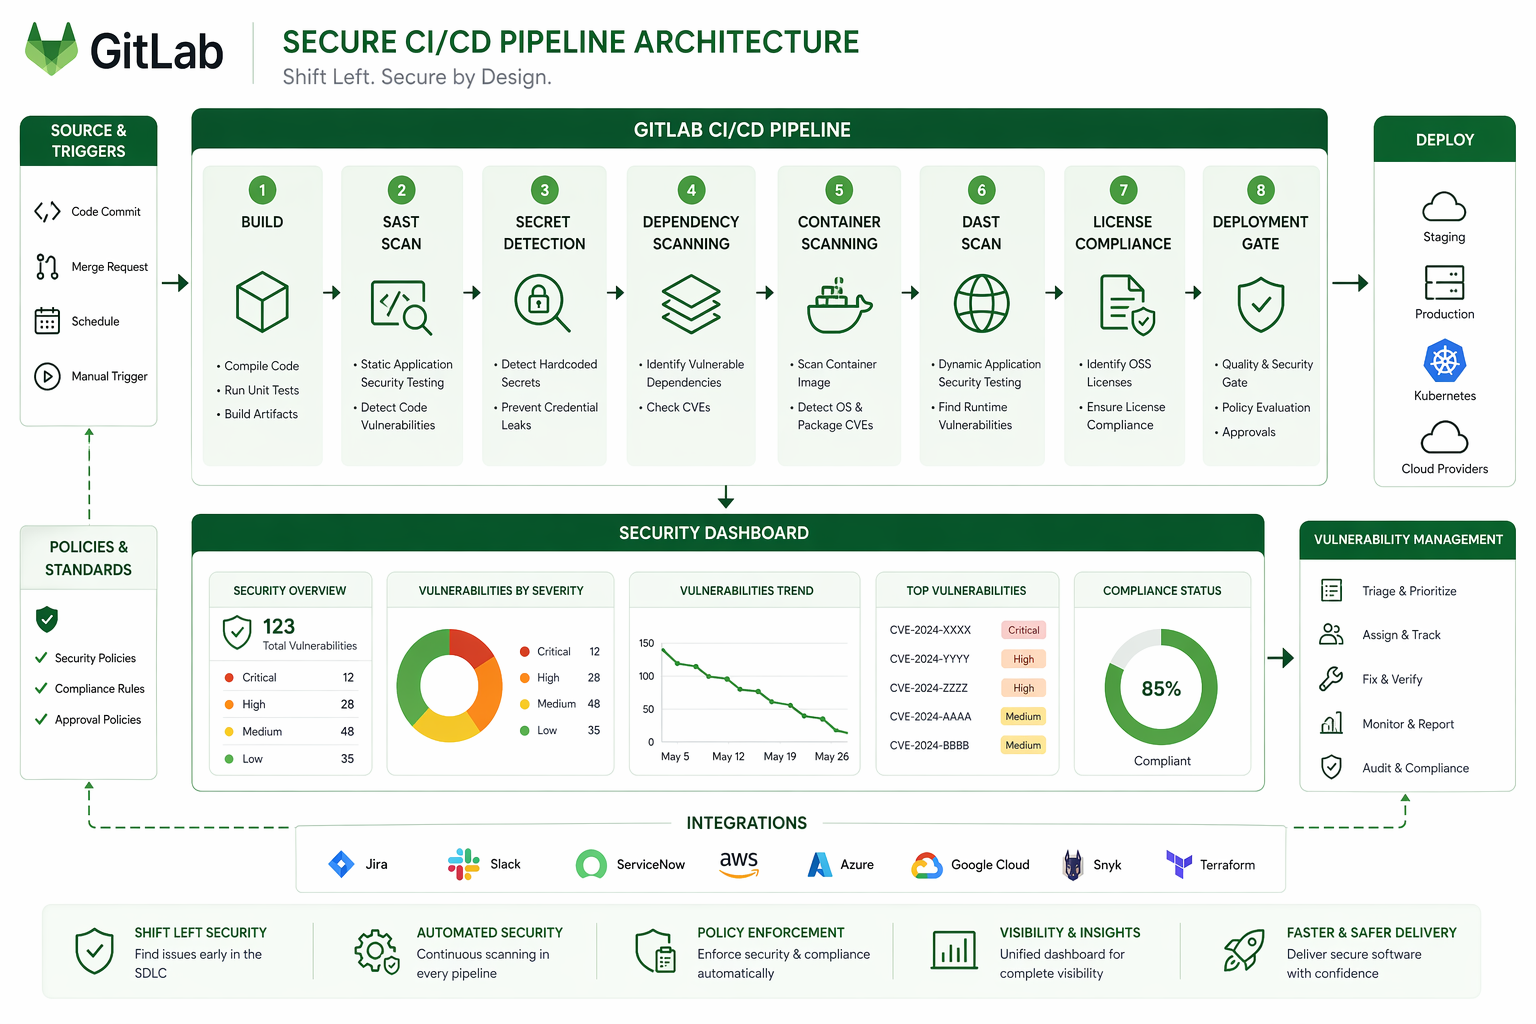
GitLab went ahead and built an entire security platform right inside its CI/CD runner. SAST scans your source code. DAST goes after running applications. Secret Detection hunts down credentials that got committed to repositories. Container Scanning inspects images before they ever deploy. Dependency Scanning keeps an eye on your supply chain. License Compliance flags legal risks. And IaC Scanning catches misconfigurations in Terraform and CloudFormation.
The beauty of it? All of these scanners run on the same runners you’re already using for builds. They all report to the same dashboard, produce findings in the same format, use the same severity scale, and track everything across merges and branches.
In this post, we’ll walk through every scanner in GitLab’s security suite, configure each one, and put together a complete production pipeline that ties them all together. I’ve run these scanners in production environments handling financial data, so the configurations you’ll see here reflect what actually works – not just what the documentation claims should work.
DevSecOps in 2026
The security landscape has shifted quite a bit over the past couple of years. Supply chain attacks essentially made dependency scanning mandatory. Log4Shell was a wake-up call that taught everyone transitive dependencies matter more than the ones you directly import. And the xz/liblzma backdoor showed that even well-maintained open source projects aren’t immune to compromise.
On top of that, regulatory pressure has ramped up. SOC 2 now expects automated security testing built into CI/CD. FedRAMP requires SAST and DAST as part of the authorization boundary. HIPAA auditors are asking about container scanning. And PCI DSS 4.0, which became mandatory in March 2025, explicitly calls for automated vulnerability scanning in deployment pipelines.
| Requirement | Standard | Scanner Type | Frequency |
|---|---|---|---|
| Static analysis | PCI DSS 4.0 6.2.4 | SAST | Every commit |
| Dynamic testing | PCI DSS 4.0 6.2.5 | DAST | Every deployment |
| Dependency review | SOC 2 CC6.1 | Dependency Scanning | Every build |
| Container scanning | FedRAMP SI-2 | Container Scanning | Every image build |
| Secret detection | HIPAA 164.312(a)(1) | Secret Detection | Every push |
| License compliance | Internal policy | License Compliance | Every dependency change |
| Infrastructure scanning | SOC 2 CC6.6 | IaC Scanning | Every IaC commit |
The tooling has matured as well. GitLab moved most security features out of the Ultimate-only tier and into Premium. Custom rulesets became a first-class feature. Vulnerability tracking across merges got better. The Security Dashboard evolved from a dumping ground for false positives into something you can actually triage and act on.
GitLab Security Tiers and Feature Availability
GitLab splits its security features across pricing tiers, and what you get at each level shapes how you’ll configure things. If you’re on Premium, for instance, some scanners need manual setup that Ultimate just handles on its own.
| Feature | Free | Premium | Ultimate |
|---|---|---|---|
| SAST | Basic (community analyzers) | Full + custom rulesets | Full + auto-remediation |
| Secret Detection | Community rules | Full + custom patterns | Full + validity checks |
| DAST | Not available | Full scan + API scan | Full + API + browser-based |
| Container Scanning | Not available | Available | Available + remediation |
| Dependency Scanning | Not available | Available | Available + remediation |
| License Compliance | Not available | Basic | Full with policies |
| IaC Scanning | Not available | Available | Available |
| Security Dashboard | Basic | Group-level | Project + Group + Instance |
| Vulnerability Tracking | Not available | Available | Full with auto-dismissal |
| On-demand DAST scans | Not available | Not available | Available |
Premium covers most needs. Ultimate adds auto-remediation, which automatically creates merge requests that fix vulnerabilities for you. For teams with mature security practices, auto-remediation saves time but it does introduce some risk – having a machine apply patches without a human reviewing them can break things in non-obvious ways. Personally, I lean toward the Premium approach: detect, triage, and fix manually. Slower, sure, but more reliable.
Static Application Security Testing (SAST)
SAST analyzes your source code without actually executing it. It catches SQL injection, cross-site scripting, buffer overflows, hardcoded credentials, insecure deserialization, and dozens of other vulnerability classes. Because it doesn’t need a built application, it can run early in the pipeline – it’s essentially just scanning text files.
Under the hood, GitLab’s SAST uses multiple analyzers, each targeting specific languages. Semgrep handles most modern languages. Bandit covers Python. ESLint security plugins take care of JavaScript and TypeScript. SpotBugs handles Java. The nice thing is that analyzer selection happens automatically based on the files in your repository.
Basic SAST Configuration
The simplest configuration uses the GitLab-managed template:
include:
  - template: Jobs/SAST.gitlab-ci.yml

sast:
  stage: test
This auto-detects your languages and runs the appropriate analyzers. It works, but it’s a starting point, not the end game. Production pipelines need custom rulesets, ignored paths, and tuned severity thresholds.
Controlling SAST Scope
Let’s face it – repositories contain a lot of code that shouldn’t be scanned. Generated files, vendored dependencies, test fixtures, documentation. Scanning all of it wastes runner minutes and creates noise. Exclude what you don’t need:
include:
  - template: Jobs/SAST.gitlab-ci.yml

variables:
  SAST_EXCLUDED_ANALYZERS: "semgrep,flawfinder"
  SAST_EXCLUDED_PATHS: "vendor/,node_modules/,fixtures/,docs/,**/generated/**"
  SAST_SEMGREP_OPTIONS: "--config /sgrules/custom-rules.yml"

sast:
  stage: test
  rules:
    - if: $CI_PIPELINE_SOURCE == "merge_request_event"
    - if: $CI_COMMIT_BRANCH == $CI_DEFAULT_BRANCH
The SAST_EXCLUDED_PATHS variable accepts glob patterns, so be generous with exclusions. Every false positive chips away at your team’s trust in the scanner. When people see too many false positives, they just stop reading the reports altogether – and that’s worse than not scanning at all.
Custom SAST Rulesets
Semgrep rules define what SAST actually looks for. GitLab ships a default ruleset, but custom rules are where you catch patterns specific to your organization. If your company has internal libraries with known gotchas, or you enforce coding standards that differ from industry defaults, custom rules are the way to enforce them.
Create a .gitlab/sast-ruleset.toml file:
[semgrep]
timeout = 300

[[semgrep.passthrough]]
  type = "git"
  value = "https://gitlab.com/mycompany/security-rules.git"
  ref = "main"
  subdir = "semgrep"
Or embed rules directly:
[semgrep]

[[semgrep.passthrough]]
  type = "file"
  value = "security/custom-semgrep-rules.yml"
The custom Semgrep rules file follows standard Semgrep syntax:
rules:
  - id: mycompany.no-eval
    patterns:
      - pattern: eval(...)
      - pattern-not: eval("use strict")
    message: "eval() usage detected. Use JSON.parse() for data parsing."
    severity: ERROR
    languages: [javascript, typescript]
    metadata:
      category: security
      cwe: "CWE-95: Improper Neutralization of Directives in Dynamic Code Evaluation"

  - id: mycompany.no-sql-concat
    patterns:
      - pattern: |
          $DB.query($QUERY + $VAR)
      - pattern-not: |
          $DB.query($QUERY, [$VAR])
    message: "SQL query constructed with string concatenation. Use parameterized queries."
    severity: CRITICAL
    languages: [python, javascript]
    metadata:
      category: security
      owasp: "A03:2021 - Injection"

  - id: mycompany.aws-hardcoded-region
    pattern: |
      region = "us-east-1"
    message: "Hardcoded AWS region. Use environment variable or config file."
    severity: WARNING
    languages: [python, javascript, typescript]
    metadata:
      category: best-practice
Custom rules are essentially organizational memory codified into the scanner. When a security incident reveals a pattern that led to a vulnerability, write a rule for it. From that point on, the scanner catches it in every future commit. This really compounds over time. After a year of running custom rules, the scanner picks up on patterns specific to your codebase that generic tools would completely miss.
Language-Specific SAST Tuning
Different languages call for different approaches. Python projects should run Bandit alongside Semgrep. Java projects benefit from SpotBugs. Go projects need gosec. GitLab handles all of this automatically, but you can take control when you need to:
variables:
  # Python-specific
  SAST_BANDIT_EXCLUDED_PATHS: "tests/,migrations/"
  SAST_BANDIT_OPTIONS: "--skip B101,B601"

  # Java-specific
  SAST_SPOTBUGS_EXCLUDED_PATHS: "src/test/java/"

  # Go-specific
  SAST_GOSEC_OPTIONS: "-exclude-dir=vendor -exclude-dir=pkg/mocks"
Those B101 and B601 skips in the Bandit example are pretty common. B101 flags assert statements, which are perfectly legitimate in test files. B601 flags paramiko calls, which might be intentional in infrastructure automation code. Skip rules that don’t apply to your use case – just make sure you document why.
SAST False Positive Management
False positives will tank your scanner’s credibility fast. Manage them using .gitlab/sast-ruleset.toml overrides:
[semgrep]

[[semgrep.passthrough]]
  type = "raw"
  value = """
rules:
  - id: gitlab.java.xxe.SAXParserFactory
    severity: WARNING
"""

[[semgrep.passthrough]]
  type = "raw"
  value = """
rules:
  - id: gitlab.javascript.crypto.insecure-randomness
    severity: INFO
"""
This approach demotes specific rules rather than disabling them outright. A WARNING demotion keeps the finding visible but won’t fail your pipeline. An INFO demotion records it for audit purposes without putting it front and center. Whatever you do, don’t suppress findings completely – future code changes might make them relevant again.
Secret Detection
Hardcoded secrets in git history are a stubborn, recurring problem. API keys, database passwords, OAuth tokens, private keys – they get committed by accident, pushed to remote repositories, and cloned by everyone with access. Even after you scrub them from the current code, they linger in git history. Anyone who clones the repo can see every secret that was ever committed.
GitLab’s Secret Detection scanner runs on every push, but here’s the clever part: it checks the diff, not the entire repository. That makes it fast enough to function as a pre-receive hook. On the first push to a new branch, it scans everything. After that, it only looks at the lines that changed.
Basic Configuration
include:
  - template: Jobs/Secret-Detection.gitlab-ci.yml

secret_detection:
  stage: test
  rules:
    - if: $CI_PIPELINE_SOURCE == "push"
    - if: $CI_PIPELINE_SOURCE == "merge_request_event"
The default ruleset covers tokens from major providers: AWS access keys, GitHub tokens, GitLab personal access tokens, Slack webhooks, Stripe keys, SendGrid API keys, and roughly 200 other patterns. The full list lives in the gitleaks rules repository, which is what GitLab uses under the hood.
Custom Secret Patterns
Every organization has internal services with their own custom token formats, and the default ruleset won’t catch those. You’ll need to add custom patterns:
include:
  - template: Jobs/Secret-Detection.gitlab-ci.yml

variables:
  SECRET_DETECTION_RULESET_GIT_URI: "gitlab.com/mycompany/security-rules.git#main:secret-detection"
The custom rules file:
[[rules]]
  id = "mycompany.internal-api-key"
  description = "Internal API Key"
  regex = '''MYCO-[a-zA-Z0-9]{32}'''
  tags = ["key", "mycompany"]

[[rules]]
  id = "mycompany.database-password"
  description = "Database connection string with password"
  regex = '''postgres://[^\s]+:[^\s]+@[^\s]+'''
  tags = ["database", "credential"]

[[rules]]
  id = "mycompany.service-token"
  description = "Internal service authentication token"
  regex = '''svc_tok_[a-f0-9]{40}'''
  tags = ["token", "service"]
Handling Historical Secrets
If you’re turning on Secret Detection for an existing repository, run a historical scan first. This checks every commit in the repo, not just the latest diff:
include:
  - template: Jobs/Secret-Detection.gitlab-ci.yml

variables:
  SECRET_DETECTION_HISTORIC_SCAN: "true"

secret_detection:
  stage: test
  rules:
    - if: $CI_PIPELINE_SOURCE == "schedule"
      when: always
    - when: never
Run this as a scheduled pipeline, not on every push. It’s slow on large repositories – a repo with 50,000 commits might take 30 minutes. Schedule it weekly. When it finds secrets, rotate them immediately and use git filter-repo to scrub them from history. Just removing secrets from the current codebase isn’t enough. Anyone with a clone still has the full history.
Secret Detection with AWS Integration
For AWS workloads, it’s worth combining Secret Detection with the patterns from AWS Secrets Manager Rotation with Lambda. Any secrets found in code should be migrated to AWS Secrets Manager. The rotation Lambda makes sure they change automatically, so even if a secret does leak, its useful lifetime is capped by the rotation interval.
Dynamic Application Security Testing (DAST)
SAST finds vulnerabilities in source code. DAST, on the other hand, finds them in running applications. It sends HTTP requests to your application, probing for SQL injection, cross-site scripting, broken authentication, misconfigured headers, and other vulnerabilities that only show up at runtime.
The catch is that DAST needs a deployed application to test against. It runs after your build and deploy stages. GitLab gives you two modes to work with: full scan and API scan.
DAST Full Scan
The full scan crawls your application the way a real user would. It follows links, submits forms, clicks buttons, and probes every endpoint it discovers for vulnerabilities. It’s thorough, but it’s also slow.
include:
  - template: Jobs/DAST.gitlab-ci.yml

variables:
  DAST_WEBSITE: "https://staging.mycompany.com"
  DAST_AUTH_URL: "https://staging.mycompany.com/login"
  DAST_USERNAME: "dast-scanner"
  DAST_PASSWORD: "$DAST Scanner credentials stored in CI variables"
  DAST_AUTH_EXCLUSION_LIST: "/logout,/admin/impersonate"
  DAST_SPIDER_MINS: 10
  DAST_MAX_VULNERABILITIES_PER_MODEL: 30
  DAST_FULL_SCAN_ENABLED: "true"
  DAST_FULL_SCAN_DOMAIN_VALIDATION_REQUIRED: "false"

dast:
  stage: dast
  rules:
    - if: $CI_COMMIT_BRANCH == $CI_DEFAULT_BRANCH
    - if: $CI_PIPELINE_SOURCE == "schedule"
Getting authentication right is crucial. An unauthenticated scan only hits your public endpoints, but most vulnerabilities lurk behind login walls. You’ll want to configure DAST with real credentials so it can test authenticated functionality:
variables:
  DAST_AUTH_URL: "https://staging.mycompany.com/auth/login"
  DAST_USERNAME: "$DAST_USERNAME_VAR"
  DAST_PASSWORD: "$DAST_PASSWORD_VAR"
  DAST_USERNAME_FIELD: "email"
  DAST_PASSWORD_FIELD: "password"
  DAST_AUTH_VERIFICATION_URL: "https://staging.mycompany.com/dashboard"
The DAST_AUTH_VERIFICATION_URL tells the scanner where to check after logging in. If it can reach this URL, the login worked. If it gets bounced back to the login page, the scan aborts instead of wasting time hammering unauthenticated endpoints.
DAST API Scan
API scans take a different approach – they test REST and GraphQL endpoints directly without crawling. You provide an OpenAPI specification or a Postman collection, and DAST works through every defined endpoint:
include:
  - template: Jobs/DAST-API.gitlab-ci.yml

variables:
  DAST_API_PROFILE: "quick"
  DAST_API_OPENAPI: "openapi-spec.json"
  DAST_API_TARGET_URL: "https://api-staging.mycompany.com"
  DAST_API_HOST_OVERRIDE: "api-staging.mycompany.com"

dast_api:
  stage: dast
  artifacts:
    reports:
      dast_api: gl-dast-api-report.json
  rules:
    - if: $CI_COMMIT_BRANCH == $CI_DEFAULT_BRANCH
    - if: $CI_PIPELINE_SOURCE == "merge_request_event"
      changes:
        - openapi-spec.json
        - src/api/**/*
Your OpenAPI specification pulls double duty here – it’s both documentation and test plan. DAST reads every endpoint definition, fires off requests with malicious payloads, and checks the responses for signs of vulnerabilities. If you keep your OpenAPI spec up to date, this is the most efficient DAST configuration you can get. It tests exactly what you have, nothing more and nothing less.
DAST Tuning and False Positive Reduction
DAST tends to generate more false positives than SAST because it’s interacting with a live application. Network conditions, caching, CSRF tokens, rate limiting – they all affect the results. You can cut down on the noise with some targeted configuration:
variables:
  # Exclude paths that are known to produce false positives
  DAST_EXCLUDE_PATHS: "/health,/metrics,/static/,/favicon.ico"

  # Limit scope to prevent scanning external services
  DAST_SCOPE_DOMAIN: "staging.mycompany.com"

  # Exclude specific vulnerability checks
  DAST_EXCLUDED_RULES: "10096,10097,10098"

  # Set request headers
  DAST_REQUEST_HEADERS: "X-Scanner: gitlab-dast"

  # Timeout for slow responses
  DAST_TIMEOUT: "30"
Those rule IDs 10096-10098 in the exclusion list correspond to specific ZAP (Zed Attack Proxy) passive scan rules that tend to flag informational headers. GitLab’s DAST runs on top of ZAP under the hood, so the ZAP rule reference documents every rule ID you might need.
Container Scanning
Container images are deployment artifacts, and like any artifact, they carry dependencies with known vulnerabilities. A Docker image built on Ubuntu 22.04, for example, inherits every vulnerability in every package pulled from the Ubuntu repositories. Container Scanning checks those packages against vulnerability databases.
include:
  - template: Jobs/Container-Scanning.gitlab-ci.yml

variables:
  CS_DOCKERFILE_PATH: "Dockerfile"
  CS_IMAGE: "$CI_REGISTRY_IMAGE:$CI_COMMIT_SHA"
  CS_SEVERITY_THRESHOLD: "high"
  CS_SCHEMA_MODEL: "15"

container_scanning:
  stage: test
  variables:
    GIT_STRATEGY: fetch
  rules:
    - if: $CI_COMMIT_BRANCH == $CI_DEFAULT_BRANCH
    - if: $CI_PIPELINE_SOURCE == "merge_request_event"
      changes:
        - Dockerfile
        - requirements.txt
        - package-lock.json
The CS_SEVERITY_THRESHOLD variable filters out findings below the level you set. Setting it to high means only high and critical vulnerabilities show up in the report. Low and medium findings still get recorded for audit purposes, but they won’t fail the pipeline.
Multi-Stage Docker Builds and Scanning
Multi-stage builds create smaller images. Smaller images mean fewer packages, and fewer packages mean fewer vulnerabilities. Honestly, this is the single most effective container security strategy out there: build minimal images.
# Build stage
FROM node:20-slim AS builder
WORKDIR /app
COPY package*.json ./
RUN npm ci --only=production
COPY . .
RUN npm run build

# Runtime stage
FROM gcr.io/distroless/nodejs20-debian12
WORKDIR /app
COPY --from=builder /app/dist ./dist
COPY --from=builder /app/node_modules ./node_modules
USER nonroot:nonroot
EXPOSE 3000
CMD ["dist/server.js"]
Distrolless base images come with no package manager, no shell, and no utilities – they dramatically shrink the attack surface. Container Scanning results on distroless images are typically 90% shorter than on standard Ubuntu or Alpine images. For Python workloads, check out Chainguard’s distroless Python images. For Java, Google’s distroless Java images are a solid choice.
The tradeoff, of course, is that debugging gets harder. You can’t shell into a distroless container, so logs become your only diagnostic tool. For production workloads, that’s usually fine. For development, stick with standard images and scan those too.
Dependency Scanning
Your application’s dependencies have dependencies of their own. And those dependencies? They have dependencies too. The transitive dependency tree for a typical Node.js project can contain hundreds of packages. A Python project might have dozens. A Java project could easily reach thousands.
Dependency Scanning analyzes your lockfile or manifest, resolves the full dependency tree, and checks every single resolved package against vulnerability databases. It catches vulnerabilities in packages you never directly imported but still depend on transitively.
include:
  - template: Jobs/Dependency-Scanning.gitlab-ci.yml

dependency_scanning:
  stage: test
  rules:
    - if: $CI_PIPELINE_SOURCE == "merge_request_event"
    - if: $CI_COMMIT_BRANCH == $CI_DEFAULT_BRANCH
  artifacts:
    reports:
      dependency_scanning: gl-dependency-scanning-report.json
GitLab auto-detects your dependency manager, which is handy. For JavaScript, it reads package-lock.json, yarn.lock, or pnpm-lock.yaml. For Python, it looks at requirements.txt, Pipfile.lock, or poetry.lock. Java projects get scanned via pom.xml or gradle.lockfile. Go uses go.sum. .NET uses *.csproj files. PHP reads composer.lock.
Dependency Scanning with Custom Remediation
When Dependency Scanning flags a vulnerable package, the fix is usually just a version upgrade. GitLab Ultimate can generate merge requests that handle these upgrades automatically. On Premium, you’ll need to do this manually. A practical approach is to set up a scheduled pipeline that checks for updates:
dependency_update:
  stage: maintenance
  image: node:20-slim
  script:
    - npm audit --audit-level=high --json > audit-report.json || true
    - |
      if grep -q '"severity":"critical"' audit-report.json; then
        echo "Critical vulnerabilities found. Creating issue..."
        apt-get update && apt-get install -y curl
        curl --request POST \
          --header "PRIVATE-TOKEN: $GITLAB_TOKEN" \
          --data "title=Critical dependency vulnerabilities detected" \
          --data "description=$(cat audit-report.json)" \
          "$CI_API_V4_URL/projects/$CI_PROJECT_ID/issues"
      fi
    - npm audit fix
    - git config user.name "Dependency Bot"
    - git config user.email "[email protected]"
    - |
      if git diff --quiet package-lock.json; then
        echo "No updates available"
      else
        git add package-lock.json package.json
        git commit -m "chore: automated dependency update"
        git push "https://oauth2:$GITLAB_TOKEN@$CI_REPOSITORY_URL" HEAD:$CI_DEFAULT_BRANCH
      fi
  rules:
    - if: $CI_PIPELINE_SOURCE == "schedule"
For deeper supply chain security practices, see SBOM and Supply Chain Security with GitLab CI.
License Compliance
Open source licenses come with obligations. GPL requires source disclosure. AGPL extends that requirement to network services. Some licenses even restrict commercial use. License Compliance scans your dependencies and flags any licenses that conflict with your organization’s policies.
include:
  - template: Jobs/License-Scanning.gitlab-ci.yml

variables:
  LICENSE_MANAGEMENT_SETUP_CMD: "pip install license-checker"

license_scanning:
  stage: test
  artifacts:
    reports:
      license_scanning: gl-license-scanning-report.json
  rules:
    - if: $CI_COMMIT_BRANCH == $CI_DEFAULT_BRANCH
    - if: $CI_PIPELINE_SOURCE == "merge_request_event"
      changes:
        - requirements.txt
        - package.json
        - go.mod
Configure license policies in .gitlab/license-finder.yml:
allowed_licenses:
  - MIT
  - Apache-2.0
  - BSD-2-Clause
  - BSD-3-Clause
  - ISC
  - 0BSD

denied_licenses:
  - GPL-2.0
  - GPL-3.0
  - AGPL-3.0
  - SSPL-1.0

review_licenses:
  - LGPL-2.1
  - LGPL-3.0
  - MPL-2.0
  - CPL-1.0
Denied licenses will block your pipeline from running. Review licenses generate warnings but don’t actually fail the build – they require manual acknowledgment in the Security Dashboard. This two-tier approach prevents accidental GPL inclusion while still giving teams a path to evaluate LGPL or MPL dependencies when the use case justifies it.
Infrastructure as Code Scanning
Terraform, CloudFormation, Kubernetes manifests, Docker Compose files – they all define infrastructure. And misconfigurations in these files create real security vulnerabilities: publicly accessible S3 buckets, security groups allowing SSH from anywhere, IAM policies with administrator privileges, Kubernetes pods running as root.
IaC Scanning catches these issues before the infrastructure ever gets created. It runs on the same schedule as SAST because, at the end of the day, it’s still analyzing source code – just infrastructure source code instead of application source code.
For a complete Terraform pipeline setup, see GitLab CI/CD + Terraform: A Production IaC Pipeline.
include:
  - template: Jobs/SAST-IaC.gitlab-ci.yml

variables:
  SAST_EXCLUDED_ANALYZERS: "bandit,eslint,semgrep"
  SAST_IAC_EXCLUDED_PATHS: "examples/,docs/,tests/terraform/fixtures/"

sast_iac:
  stage: test
  rules:
    - if: $CI_PIPELINE_SOURCE == "merge_request_event"
      changes:
        - "**/*.tf"
        - "**/*.tfvars"
        - "**/*.yml"
        - "**/*.yaml"
    - if: $CI_COMMIT_BRANCH == $CI_DEFAULT_BRANCH
IaC Scanning catches common misconfigurations:
| Vulnerability | Severity | Example |
|---|---|---|
| S3 bucket public access | Critical | acl = "public-read" |
| Security group open ingress | Critical | cidr_blocks = ["0.0.0.0/0"] on port 22 |
| IAM admin policy | High | Action: "*" with Resource: "*" |
| Unencrypted EBS volume | Medium | Missing encrypted = true |
| Missing versioning on S3 | Low | No versioning block |
| Public ECR repository | Medium | No image_tag_mutability set |
If you’re using Terraform specifically, it’s worth pairing IaC Scanning with tfsec or checkov for deeper analysis. These tools actually understand Terraform’s resource graph and can catch logical errors that pattern-matching scanners miss:
iac_custom_scan:
  stage: test
  image: aquasec/tfsec:latest
  script:
    - tfsec --format json --out tfsec-report.json --soft-fail .
    - tfsec --format markdown --out tfsec-report.md .
  artifacts:
    paths:
      - tfsec-report.json
      - tfsec-report.md
    reports:
      sast: tfsec-report.json
  rules:
    - changes:
        - "**/*.tf"
        - "**/*.tfvars"
The --soft-fail flag keeps the job from failing while you’re still getting onboarded. Once you’ve triaged the initial findings and knocked out the critical ones, remove it so the pipeline actually fails on new vulnerabilities.
The Security Dashboard
Individual scanner reports are useful during development, but the Security Dashboard is where everything comes together. It aggregates findings across the project lifecycle, shows trends, tracks vulnerability status across merges, and provides audit trails for compliance.
The dashboard has three views worth knowing about:
Project-level shows vulnerabilities for a single project. Every merge request that introduced or fixed a vulnerability shows up in the timeline. You can filter by scanner, severity, status, and activity. This is where developers typically spend most of their time.
Group-level rolls up vulnerabilities across all projects in a GitLab group. It’s built for security teams and engineering managers who need visibility across the organization – which projects have the most vulnerabilities, which teams are fixing them fastest, and where the oldest unresolved issues are hiding.
Instance-level (Ultimate only) aggregates across all groups. This is the view for CISOs and compliance officers who need a single snapshot of the organization’s overall security posture.
Vulnerability status flows through a defined lifecycle:
| Status | Meaning | Action Required |
|---|---|---|
| Detected | Newly found, not triaged | Triage within SLA |
| Confirmed | Valid vulnerability | Create issue, plan fix |
| Dismissed | False positive or accepted risk | Document justification |
| Resolved | Fixed in code | Verify in next pipeline |
| Auto-dismissed | No longer detected in scan | Review periodically |
The key workflow is straightforward: detect, triage, then either confirm and fix it or dismiss it with justification. Every dismissal should have a documented reason. Auditors will absolutely ask for it. Something like “False positive because our authentication middleware prevents this attack vector” is a solid reason. “Not important” doesn’t cut it.
Building the Complete Security Pipeline
Now let’s put it all together – a single pipeline that runs every scanner. This is what production actually looks like:
stages:
  - build
  - test
  - container-build
  - deploy-staging
  - dast
  - deploy-production

variables:
  # Container registry
  CI_REGISTRY: "registry.mycompany.com"
  CI_REGISTRY_IMAGE: "$CI_REGISTRY/security-demo"

  # DAST target
  DAST_WEBSITE: "https://staging.mycompany.com"

  # Scanner configuration
  SAST_EXCLUDED_PATHS: "vendor/,node_modules/,docs/,fixtures/"
  SECRET_DETECTION_EXCLUDED_PATHS: "tests/fixtures/"
  CS_SEVERITY_THRESHOLD: "high"

# --- Build Stage ---

build_application:
  stage: build
  image: node:20-slim
  script:
    - npm ci
    - npm run build
    - npm run test:unit
  artifacts:
    paths:
      - dist/
      - node_modules/
    expire_in: 1 hour

# --- Test Stage (parallel scanners) ---

include:
  - template: Jobs/SAST.gitlab-ci.yml
  - template: Jobs/Secret-Detection.gitlab-ci.yml
  - template: Jobs/Dependency-Scanning.gitlab-ci.yml
  - template: Jobs/SAST-IaC.gitlab-ci.yml
  - template: Jobs/License-Scanning.gitlab-ci.yml

sast:
  stage: test
  rules:
    - if: $CI_PIPELINE_SOURCE == "merge_request_event"
    - if: $CI_COMMIT_BRANCH == $CI_DEFAULT_BRANCH

secret_detection:
  stage: test
  rules:
    - if: $CI_PIPELINE_SOURCE == "push"
    - if: $CI_PIPELINE_SOURCE == "merge_request_event"

dependency_scanning:
  stage: test
  rules:
    - if: $CI_PIPELINE_SOURCE == "merge_request_event"
    - if: $CI_COMMIT_BRANCH == $CI_DEFAULT_BRANCH

sast_iac:
  stage: test
  rules:
    - if: $CI_PIPELINE_SOURCE == "merge_request_event"
      changes:
        - "**/*.tf"
        - "**/*.yml"
        - "**/*.yaml"
    - if: $CI_COMMIT_BRANCH == $CI_DEFAULT_BRANCH

license_scanning:
  stage: test
  rules:
    - if: $CI_COMMIT_BRANCH == $CI_DEFAULT_BRANCH

# --- Container Build Stage ---

build_container:
  stage: container-build
  image: docker:24
  services:
    - docker:24-dind
  script:
    - docker build -t $CI_REGISTRY_IMAGE:$CI_COMMIT_SHA .
    - docker push $CI_REGISTRY_IMAGE:$CI_COMMIT_SHA
  rules:
    - if: $CI_COMMIT_BRANCH == $CI_DEFAULT_BRANCH
    - if: $CI_PIPELINE_SOURCE == "merge_request_event"

container_scanning:
  stage: container-build
  image: docker:24
  variables:
    CS_IMAGE: "$CI_REGISTRY_IMAGE:$CI_COMMIT_SHA"
  rules:
    - if: $CI_COMMIT_BRANCH == $CI_DEFAULT_BRANCH

# --- Deploy to Staging ---

deploy_staging:
  stage: deploy-staging
  image: bitnami/kubectl:latest
  script:
    - kubectl config use-context staging
    - kubectl set image deployment/app app=$CI_REGISTRY_IMAGE:$CI_COMMIT_SHA
    - kubectl rollout status deployment/app --timeout=120s
  environment:
    name: staging
    url: https://staging.mycompany.com
  rules:
    - if: $CI_COMMIT_BRANCH == $CI_DEFAULT_BRANCH

# --- DAST Stage ---

include:
  - template: Jobs/DAST.gitlab-ci.yml

dast:
  stage: dast
  needs: ["deploy_staging"]
  variables:
    DAST_FULL_SCAN_ENABLED: "true"
    DAST_AUTH_URL: "https://staging.mycompany.com/login"
    DAST_USERNAME: "$DAST_USER"
    DAST_PASSWORD: "$DAST_PASS"
  rules:
    - if: $CI_COMMIT_BRANCH == $CI_DEFAULT_BRANCH

# --- Deploy to Production ---

deploy_production:
  stage: deploy-production
  image: bitnami/kubectl:latest
  script:
    - kubectl config use-context production
    - kubectl set image deployment/app app=$CI_REGISTRY_IMAGE:$CI_COMMIT_SHA
    - kubectl rollout status deployment/app --timeout=180s
  environment:
    name: production
    url: https://mycompany.com
  when: manual
  rules:
    - if: $CI_COMMIT_BRANCH == $CI_DEFAULT_BRANCH
This pipeline runs SAST, Secret Detection, Dependency Scanning, IaC Scanning, and License Scanning in parallel during the test stage. Container Scanning kicks in after the image is built. DAST runs after deployment to staging. And production deployment requires a manual sign-off.
For deploying to Kubernetes with GitOps, see GitLab ArgoCD GitOps on EKS.
AWS Integration with GitLab Security
Most production workloads end up running on AWS. Integrating GitLab’s security scanners with AWS services gives you a defense-in-depth strategy that catches vulnerabilities in code while also monitoring for exploitation attempts in production.
OIDC-Based Pipeline Authentication
Use OIDC to authenticate GitLab runners to AWS without long-lived credentials. This is covered in detail in GitLab CI/CD + Terraform: A Production IaC Pipeline, but here’s the security-relevant configuration:
# Terraform: IAM role for GitLab security scanners
resource "aws_iam_role" "gitlab_security_scanner" {
  name = "gitlab-security-scanner"

  assume_role_policy = jsonencode({
    Version = "2012-10-17"
    Statement = [
      {
        Effect = "Allow"
        Principal = {
          Federated = "arn:aws:iam::${data.aws_caller_identity.current.account_id}:oidc-provider/gitlab.com"
        }
        Action = "sts:AssumeRoleWithWebIdentity"
        Condition = {
          StringEquals = {
            "gitlab.com:aud" = "https://gitlab.com"
          }
          StringLike = {
            "gitlab.com:sub" = "project_path:mycompany/*:ref_type:branch:ref:main"
          }
        }
      }
    ]
  })
}

resource "aws_iam_role_policy" "scanner_permissions" {
  name = "scanner-permissions"
  role = aws_iam_role.gitlab_security_scanner.id

  policy = jsonencode({
    Version = "2012-10-17"
    Statement = [
      {
        Effect = "Allow"
        Action = [
          "ecr:DescribeImages",
          "ecr:DescribeRepositories",
          "ecr:GetLifecyclePolicy",
          "inspector:ListFindings",
          "inspector:DescribeFindings",
          "securityhub:BatchImportFindings",
          "securityhub:GetFindings"
        ]
        Resource = "*"
      }
    ]
  })
}
Forwarding GitLab Findings to AWS Security Hub
GitLab vulnerability reports integrate with AWS Security Hub. This centralizes security findings from GitLab scanners alongside findings from AWS Inspector, GuardDuty, and Macie:
forward_to_security_hub:
  stage: .post
  image: python:3.12-slim
  script:
    - pip install boto3 requests
    - |
      python3 << 'PYTHON_SCRIPT'
      import json
      import boto3
      import os

      # Read GitLab vulnerability report
      with open("gl-sast-report.json") as f:
          sast_report = json.load(f)

      hub = boto3.client("securityhub", region_name="us-east-1")

      findings = []
      for vuln in sast_report.get("vulnerabilities", []):
          findings.append({
              "SchemaVersion": "2018-10-08",
              "Id": f"gitlab-sast/{vuln['id']}",
              "ProductArn": f"arn:aws:securityhub:us-east-1:{os.environ['AWS_ACCOUNT_ID']}:product/{os.environ['AWS_ACCOUNT_ID']}/gitlab-sast",
              "GeneratorId": "gitlab-sast",
              "AwsAccountId": os.environ["AWS_ACCOUNT_ID"],
              "Types": ["Software and Configuration Checks/Vulnerabilities/SAST"],
              "CreatedAt": vuln.get("createdAt", ""),
              "UpdatedAt": vuln.get("createdAt", ""),
              "Severity": {"Label": vuln.get("severity", "INFORMATIONAL").upper()},
              "Title": vuln.get("name", "GitLab SAST Finding"),
              "Description": vuln.get("message", ""),
              "Resources": [{"Type": "GitLabProject", "Id": os.environ.get("CI_PROJECT_URL", "")}],
              "RecordState": "ACTIVE"
          })

      if findings:
          response = hub.batch_import_findings(Findings=findings)
          print(f"Imported {len(findings)} findings: {response}")
      PYTHON_SCRIPT
  rules:
    - if: $CI_COMMIT_BRANCH == $CI_DEFAULT_BRANCH
      exists:
        - gl-sast-report.json
GitLab Security vs. Standalone Tools
GitLab is not the only option. Snyk, SonarQube, and Checkmarx all provide security scanning. Some organizations use GitLab for CI/CD and a standalone tool for security. The comparison below is based on running all four in production environments.
| Feature | GitLab Premium | Snyk Developer | SonarQube Developer | Checkmarx One |
|---|---|---|---|---|
| SAST | Semgrep-based, 25+ languages | Proprietary + Semgrep, 30+ languages | Proprietary, 30+ languages | Proprietary, 35+ languages |
| DAST | ZAP-based, full + API | Not included | Not included | DAST Express included |
| Secret Detection | Gitleaks-based, 200+ patterns | Included, custom patterns | Limited (community plugins) | Included |
| Container Scanning | Trivy-based | Included | Not included | Included |
| Dependency Scanning | Trivy + advisories | Core product, strongest offering | Limited (requires plugin) | Included |
| IaC Scanning | KICS-based | Included | Not included | Included |
| License Compliance | Built-in | Included | Requires plugin | Included |
| IDE Integration | GitLab VS Code extension | VS Code, JetBrains, Vim | VS Code, JetBrains | VS Code, JetBrains |
| Pipeline Integration | Native (zero config) | CLI or plugin per scanner | Scanner plugin per language | CLI or plugin |
| Dashboard | Unified security dashboard | Snyk.io dashboard | SonarQube dashboard | Checkmarx portal |
| Auto-remediation | Ultimate only (MR generation) | Included | Not available | Available |
| Self-hosted | Yes | No (SaaS only) | Yes (core is free) | Yes |
Where Each Tool Excels
GitLab excels at integration. If your CI/CD is already on GitLab, adding security scanning is a template include. No separate installation, no separate dashboard, no separate user management. The findings live next to the code. Developers see them in merge requests. The learning curve is minimal.
Snyk excels at dependency scanning. Its vulnerability database is the most current and comprehensive. If supply chain security is your primary concern, Snyk is the best tool for that specific job. Snyk’s developer experience is also the most polished. Fixing a vulnerability is often a single click.
SonarQube excels at code quality. It sits at the intersection of quality and security, catching maintainability issues that pure security scanners ignore. If you want one tool that handles code smells, test coverage, duplication, and security, SonarQube is the right choice. Its free Community edition covers most small-team needs.
Checkmarx excels at enterprise compliance. It has the most comprehensive audit reporting, the most granular access controls, and the deepest customization options. If you’re in a regulated industry where auditors demand specific scanner configurations and documented evidence, Checkmarx provides the paperwork.
Combining Tools
Running multiple scanners is common. GitLab SAST + Snyk for dependencies covers most needs without overlap:
# GitLab SAST for code analysis
include:
  - template: Jobs/SAST.gitlab-ci.yml

# Snyk for dependency scanning (replaces GitLab Dependency Scanning)
snyk_dependency_scan:
  stage: test
  image: snyk/snyk:node
  script:
    - snyk test --severity-threshold=high --json > snyk-report.json
    - snyk monitor --org=$SNYK_ORG
  artifacts:
    paths:
      - snyk-report.json
  allow_failure: true
  rules:
    - if: $CI_PIPELINE_SOURCE == "merge_request_event"
    - if: $CI_COMMIT_BRANCH == $CI_DEFAULT_BRANCH
For runner configuration details to support this setup, see GitLab Runner Tags in 2026.
Cost Analysis
Security scanning costs come from two sources: license fees and runner minutes. GitLab’s pricing is per user per year. Runner costs depend on your infrastructure.
| Component | GitLab Premium | GitLab Ultimate | Alternative |
|---|---|---|---|
| License (annual, per user) | $1,228 | $2,456 | Snyk: $456/dev, SonarQube: $150/dev |
| Runner minutes (SAST) | 3-8 min/scan | 3-8 min/scan | N/A (your runners) |
| Runner minutes (DAST) | 15-45 min/scan | 15-45 min/scan | N/A (your runners) |
| Runner minutes (Dependencies) | 2-5 min/scan | 2-5 min/scan | N/A (your runners) |
| Runner minutes (Container) | 1-3 min/scan | 1-3 min/scan | N/A (your runners) |
| Storage (artifacts) | ~50MB/pipeline | ~50MB/pipeline | S3: ~$0.023/GB/month |
For a team of 20 developers on GitLab Premium with self-hosted runners, the annual cost breaks down as:
| Cost Item | Monthly | Annual |
|---|---|---|
| GitLab Premium (20 users) | $2,047 | $24,560 |
| Self-hosted runners (EC2 x2) | $400 | $4,800 |
| S3 artifact storage (50 GB) | $12 | $144 |
| Operational overhead (10% of eng time) | $4,000 | $48,000 |
| Total | $6,459 | $77,504 |
The alternative, running Snyk + SonarQube alongside GitLab Free, costs:
| Cost Item | Monthly | Annual |
|---|---|---|
| GitLab Free | $0 | $0 |
| Snyk Developer (20 users) | $760 | $9,120 |
| SonarQube Developer (20 users) | $250 | $3,000 |
| Self-hosted SonarQube server | $200 | $2,400 |
| Self-hosted runners (EC2 x2) | $400 | $4,800 |
| Integration maintenance (15% of eng time) | $6,000 | $72,000 |
| Total | $7,610 | $91,320 |
GitLab Premium is cheaper when you account for integration maintenance. The “free” tools cost more in engineer time spent configuring, maintaining, and context-switching between dashboards. The savings are not in license fees. They are in operational simplicity.
Best Practices
Pipeline Design
Run scanners in parallel. SAST, Secret Detection, Dependency Scanning, and IaC Scanning all analyze source code. They don’t depend on each other. Run them simultaneously in the test stage. DAST is the exception because it needs a running application.
Use changes rules to avoid unnecessary scans. Dependency Scanning doesn’t need to run when you change documentation. IaC Scanning doesn’t need to run when you change application code. Use changes rules to trigger scanners only when relevant files change:
dependency_scanning:
  rules:
    - changes:
        - package-lock.json
        - requirements.txt
        - go.sum
        - pom.xml
Fail on critical, warn on high, track everything else. Pipeline failures should be reserved for vulnerabilities that have active exploits or affect sensitive data. Low and medium findings create noise if they fail pipelines. Track them in the dashboard and address them in dedicated sprint slots.
Vulnerability Management
Define SLAs for each severity. Critical vulnerabilities should be triaged within 24 hours and fixed within 72 hours. High within one week. Medium within one sprint. Low when convenient. Document these SLAs. Auditors ask for them.
Assign ownership. Every project should have a designated security owner. Not a security team member. An engineer on the project who is responsible for triaging findings and driving fixes. Distributed ownership scales better than a centralized security team trying to manage findings across dozens of projects.
Run historical scans quarterly. New vulnerability databases are published daily. A dependency that was clean when you scanned it three months ago might have a published CVE today. Schedule quarterly full-repository scans to catch retroactive findings.
Dismiss with justification. Every false positive you dismiss should have a written reason. “False positive: our ORM parameterizes all queries at the database driver level, making SQL injection impossible through this code path.” This documentation satisfies auditors and helps future maintainers understand why specific findings were accepted.
Team Culture
Treat security findings like bugs. Vulnerabilities are not a separate category of work that goes to a security team. They are bugs that happen to have security implications. They go in the backlog, get estimated, and get fixed during sprints. Special security sprints or hardening weeks are a sign that security is not integrated into the development process.
Show findings in merge requests. GitLab displays security findings directly in the merge request UI. Developers see vulnerabilities before the code merges. This is the most effective time to fix them. The code is fresh in their mind. The fix is a simple amendment to the merge request. After merge, the context is gone and the fix becomes a separate task that competes with feature work.
Track mean time to remediation. Measure how long it takes from vulnerability detection to fix. Track this by severity. If critical vulnerabilities take two weeks to fix, your process is broken. If medium vulnerabilities take three months, that might be acceptable depending on your risk tolerance. But you need the data to make informed decisions.
Invest in custom rules. The default rulesets catch common vulnerabilities. Custom rules catch the patterns specific to your organization. After every security incident, write a rule that would have caught it. After a year, your custom rules become a competitive advantage. They encode organizational security knowledge that no vendor can provide.
Runner Configuration
Use tagged runners for security jobs. Security scanners should run on dedicated runners with adequate resources. SAST on large repositories can consume significant memory. DAST needs network access to the staging environment. Tag these runners appropriately:
sast:
  tags:
    - security-scanner
    - high-memory

dast:
  tags:
    - security-scanner
    - dast-network
Refer to GitLab Runner Tags in 2026 for detailed runner tag strategies.
Cache analyzer images. Security analyzers are Docker images that get pulled on every pipeline run. If you’re running 50 pipelines a day, that’s 50 pulls per analyzer. Cache them on your runners or use a local registry mirror.
Common Pitfalls
Scanning too much. Running every scanner on every pipeline regardless of what changed wastes resources and generates noise. A documentation-only commit should not trigger SAST, DAST, and Container Scanning. Use changes rules and rules:if conditions to run scanners only when relevant.
Ignoring findings. The worst security dashboard is the one nobody reads. If your dashboard shows 500 unresolved vulnerabilities, the team has stopped looking. Start by triaging everything above medium. Create issues for confirmed findings. Track resolution. Once the dashboard is manageable, expand to medium findings.
Scanning only the default branch. Feature branches introduce vulnerabilities. Merge requests are where you catch them. If scanners only run on the default branch, vulnerabilities exist in production until someone notices them after merge. Run SAST, Secret Detection, and Dependency Scanning on every merge request.
Not scanning container images. Application code scanning catches vulnerabilities in your source code. Container scanning catches vulnerabilities in your base image and OS packages. A perfectly secure Node.js application running on an Ubuntu image with 47 known CVEs in system libraries is still vulnerable. Both layers need scanning.
Treating DAST as optional. SAST cannot find runtime vulnerabilities. It doesn’t know if your authentication is actually enforced. It doesn’t know if your HTTPS redirects work. It doesn’t know if your session cookies have the Secure flag. DAST finds these. It’s slower and more complex to set up, but it catches a fundamentally different class of vulnerabilities.
Not keeping OpenAPI specs updated. DAST API scans are only as good as the specification they test against. If your OpenAPI spec is outdated, DAST skips endpoints that exist in the application but not in the spec. Treat the spec as a living document. Update it with every API change. Consider generating it automatically from code annotations.
Conclusion
GitLab’s security suite provides comprehensive coverage when configured correctly. The scanners catch vulnerabilities at every layer: source code, dependencies, containers, running applications, infrastructure definitions, and license compliance. The unified dashboard and merge request integration make findings actionable without context-switching between tools.
The configuration matters more than the tool. A well-configured GitLab Premium setup with custom rulesets, proper exclusions, and a mature triage process outperforms an Ultimate installation running default settings with no ownership. Invest time in the ruleset. Invest time in the triage process. Invest time in building a culture where security findings are treated like any other bug.
Start with SAST and Secret Detection on every merge request. Add Dependency Scanning and Container Scanning within the first week. Add DAST once you have a stable staging environment. Add IaC Scanning when you have Terraform or CloudFormation in the repository. Add License Compliance when legal asks about it. Layer the scanners incrementally rather than trying to enable everything at once.
The pipeline is the artifact. The scanners are the sensors. The dashboard is the interface. The process is what makes it work.
Explore more like this

Terraform State Locking with S3 and DynamoDB in 2026
The moment two engineers run terraform apply at the same time without state locking, you have a race condition that can corrupt your entire infrastructure state. Both processes read the...

GitLab CI Environments and Review Apps in 2026
Review apps changed how my team does code review. Instead of reading diffs, reviewers click a link and see the actual change running. The designer can verify spacing on the...

Comments