Sonarqube with Docker and Javascript [Everything That You Need to Know]
![Sonarqube with Docker and Javascript [Everything That You Need to Know]](/wp-content/uploads/sites/5/2021/08/Images-Feature.png)
If you want to analyze a JavaScript project with SonarQube but don’t want to install Java, Node.js, and a bunch of other tools on your machine, Docker is the way to go. You can spin up SonarQube, build your code, and run the scanner, all inside containers.
This works for Angular, React, Vue, plain Node.js, or any other JavaScript stack.
In a previous post, I covered SonarQube with Docker for Java and Maven projects. JavaScript is a different story. You don’t need extra plugins, but you do need the SonarScanner CLI to kick off the analysis.
Prerequisites
You need two things:
- Docker
- Git
That’s it. Everything else runs inside containers.
SonarQube JavaScript Plugin
You don’t need to install any additional plugins. SonarQube has built-in JavaScript and TypeScript analysis out of the box.
How to use SonarQube with Node.js
For a Node.js project, you typically compile TypeScript down to JavaScript first. In the example below, I use an Angular project, but the same approach works for React, Vue, or any other framework.
I’ll walk you through starting a SonarQube container, then running the analysis.
SonarQube JavaScript Example
I put together a simple “Hello World” Angular project to demonstrate the full workflow. You can grab it from my GitHub repository:
git clone https://github.com/clebermasters/sonarqube-javascript.git
cd sonarqube-javascript
The repo has scripts that handle most of the work.
If you want more background on how the Docker Container is set up, check out my previous post which goes into detail on the SonarQube container configuration.
When you run the build script:
./build.sh
It compiles the Angular project. TypeScript becomes JavaScript, and that output is what SonarQube analyzes.
docker build -t www.bitslovers.com/angular:v1 .
export PROJECT=$(pwd)/angular-project
docker run --rm --name node -v $PROJECT/:/tmp/angular  -t www.bitslovers.com/angular:v1 npm install
docker run --rm --name node -v $PROJECT/:/tmp/angular  -t www.bitslovers.com/angular:v1 npm run build
The first step builds a Docker image with Node.js and npm. The second and third steps use that image to install dependencies and compile the project.
No tricks here. It’s just npm install followed by ng build, same as any standard Node project, except it happens inside a container.
Note: This approach is handy for quickly testing against a different version of Node.js without messing with your local setup.
Starting SonarQube
Run the start-sonar.sh script from the same repo. It pulls the SonarQube image from Docker Hub and starts the container.
Once SonarQube is up, open your browser and go to http://localhost:9000.
Log in with the default credentials:
user -> admin
password -> admin
You’ll be prompted to change the password on first login.
Next, you need to create an access token so the scanner can call the SonarQube API. For details on generating the token, check this guide.
Copy that token and set it as the SONAR_TOKEN environment variable in the scan.sh script.
Also, check that the SONAR_HOST variable matches your Docker bridge IP. To find it:
ip addr show docker0
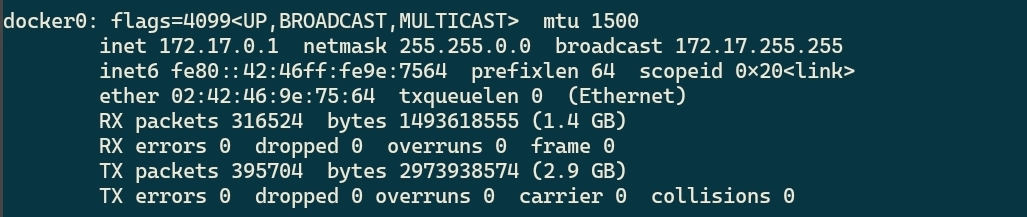
How to check your IP from Docker Bridge: Get the docker0 interface IP
The interface is usually docker0, and the IP is typically 172.17.0.1. If you get a connection refused error, double-check this IP and make sure port 9000 is open on your localhost.
The SonarScanner
The SonarScanner CLI is the tool that sends your source code to SonarQube for analysis. It works through the SonarQube API and is available for any operating system. The current version is 7.x, and from version 6.0 onward, it ships with its own JRE so you don’t need Java installed separately.
How to Run SonarQube Scanner
sonar-scanner -Dproject.settings=../sonar-project.properties
That’s the simplest way to run it. The scan.sh script from the GitHub repo handles this for you and uses the official sonarsource/sonar-scanner-cli Docker image, so you don’t need to download anything.
SonarScanner Download
If you prefer not to use Docker, you can download the scanner as a zip file from the SonarSource binaries page.
Extract it, add the bin directory to your path, and you’re good to go.
For each project, you need a sonar-project.properties file in the root directory. Here are the main properties:
sonar.projectKey=BITSLOVERS_PROJECT_V1
sonar.projectName=BITSLOVERS_PROJECT_V1
sonar.projectVersion=1.0
sonar.sources=src
sonar.exclusions=node_modules/**,src/environments/**,**/*.spec.ts,dist/**,**/docs/**,**/*.js,e2e/**,coverage/**
sonar.typescript.tsconfigPaths=tsconfig.json
sonar.javascript.lcov.reportPaths=coverage/lcov.info
The projectKey has to be unique across your SonarQube instance. projectName is what shows up in the dashboard.
Ignoring Files and Folders
The sonar.exclusions property lets you skip specific paths during analysis. In this example, I exclude node_modules (too many third-party files), test specs, and build output. This speeds up the scan and keeps the results focused on your actual code.
Once everything is configured, run:
./scan.sh
SonarScanner Authentication Error
If you see something like this:
ERROR: Error during SonarScanner execution
ERROR: Not authorized. Analyzing this project requires authentication. Please provide a user token in sonar.login or other credentials in sonar.login and sonar.password.
ERROR:
ERROR: Re-run SonarScanner using the -X switch to enable full debug logging
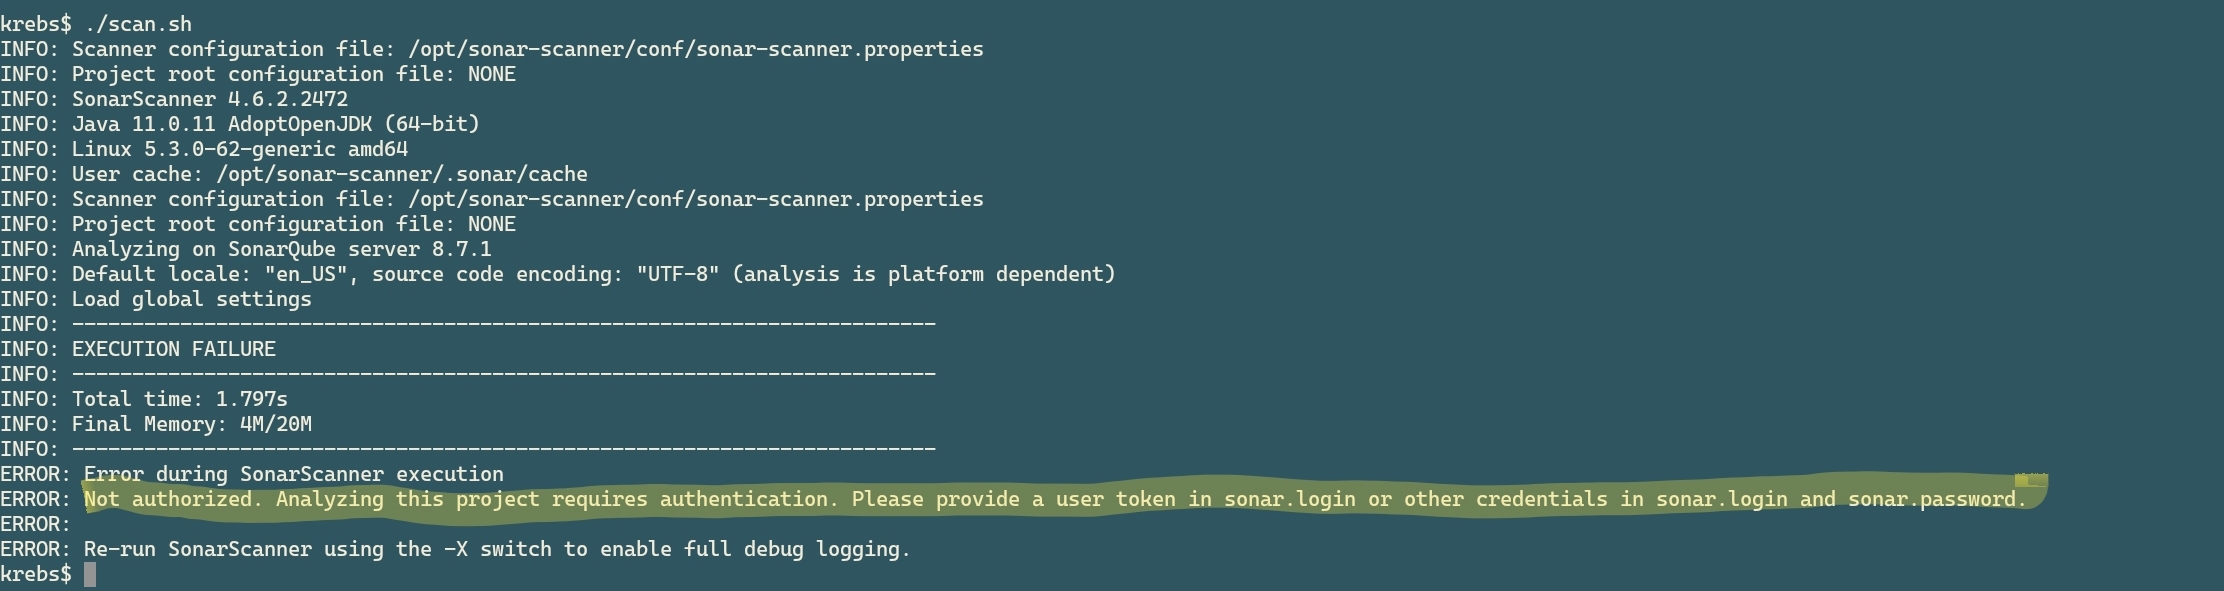
How to resolve the “Not Authorized” error from the SonarQube Scanner
Check that you set the token correctly in scan.sh. If you’re running the scanner manually from the zip file, pass it on the command line:
sonar-scanner -Dsonar.token=yourToken
Note: the older sonar.login parameter is deprecated. Use sonar.token instead.
When the scan finishes, you’ll see a link in the output. Open it in your browser to review the results.
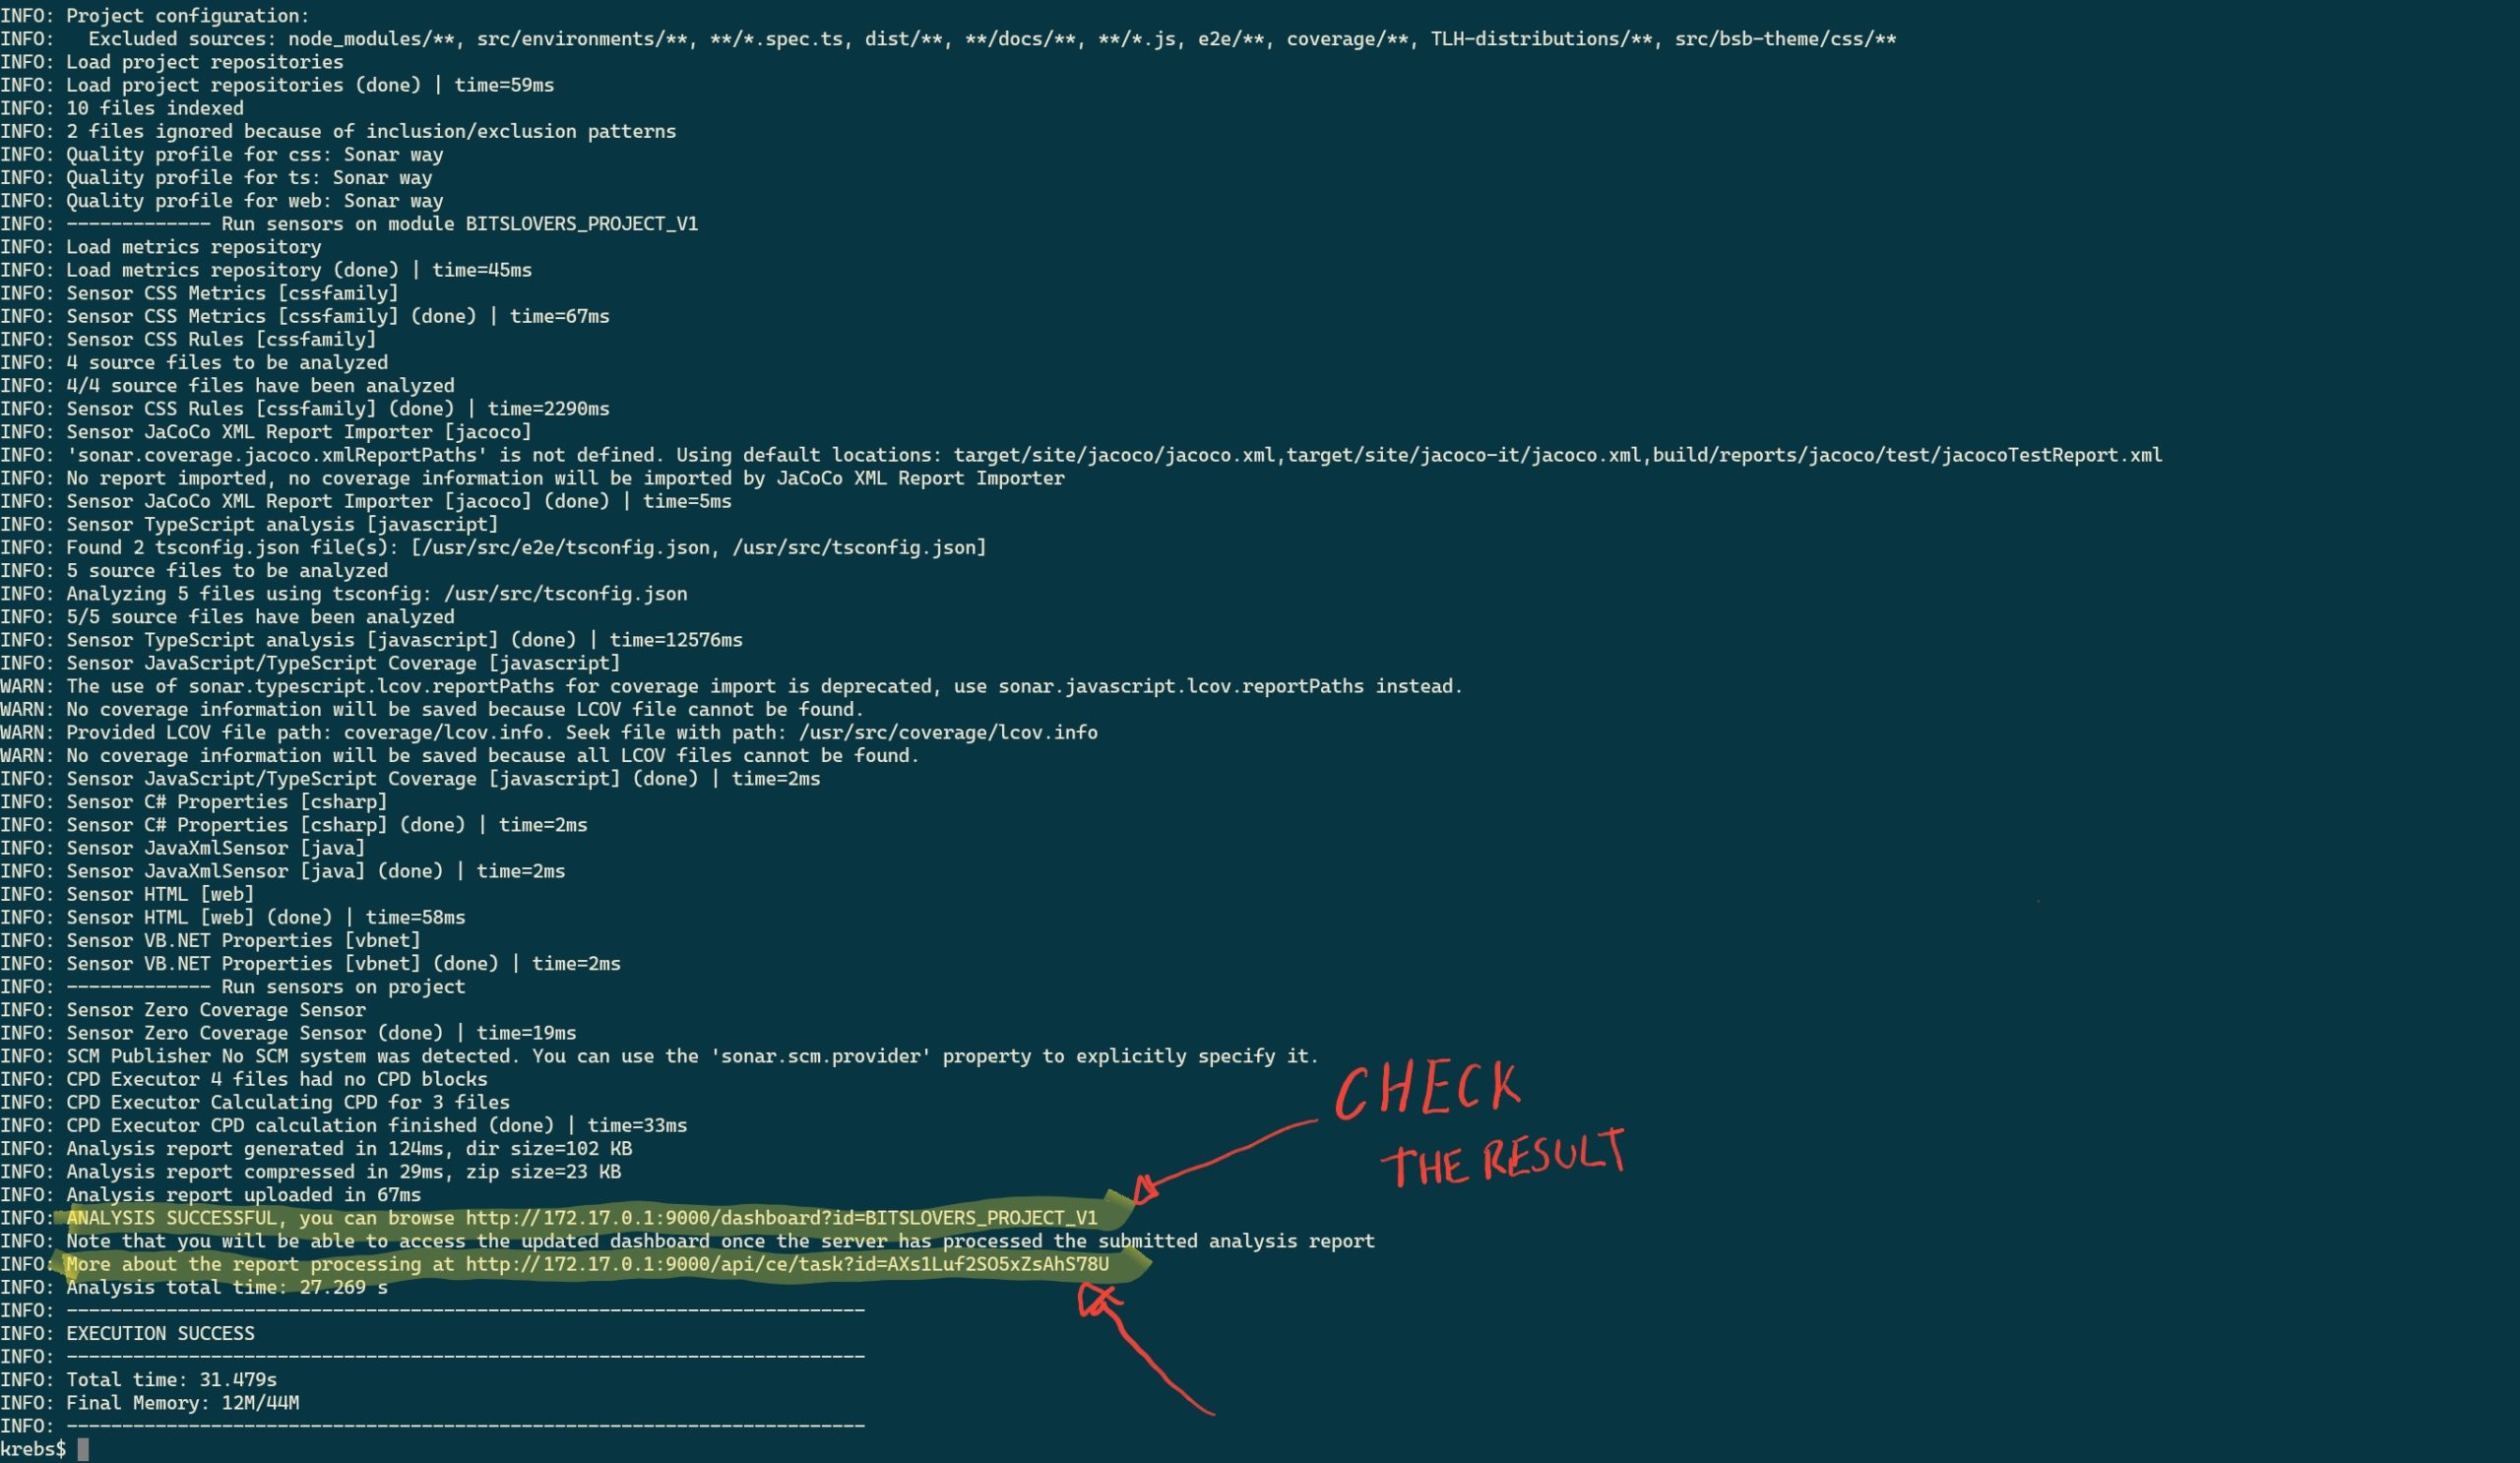
SonarQube Result Output
From there you can browse through bugs, vulnerabilities, code smells, and coverage data.
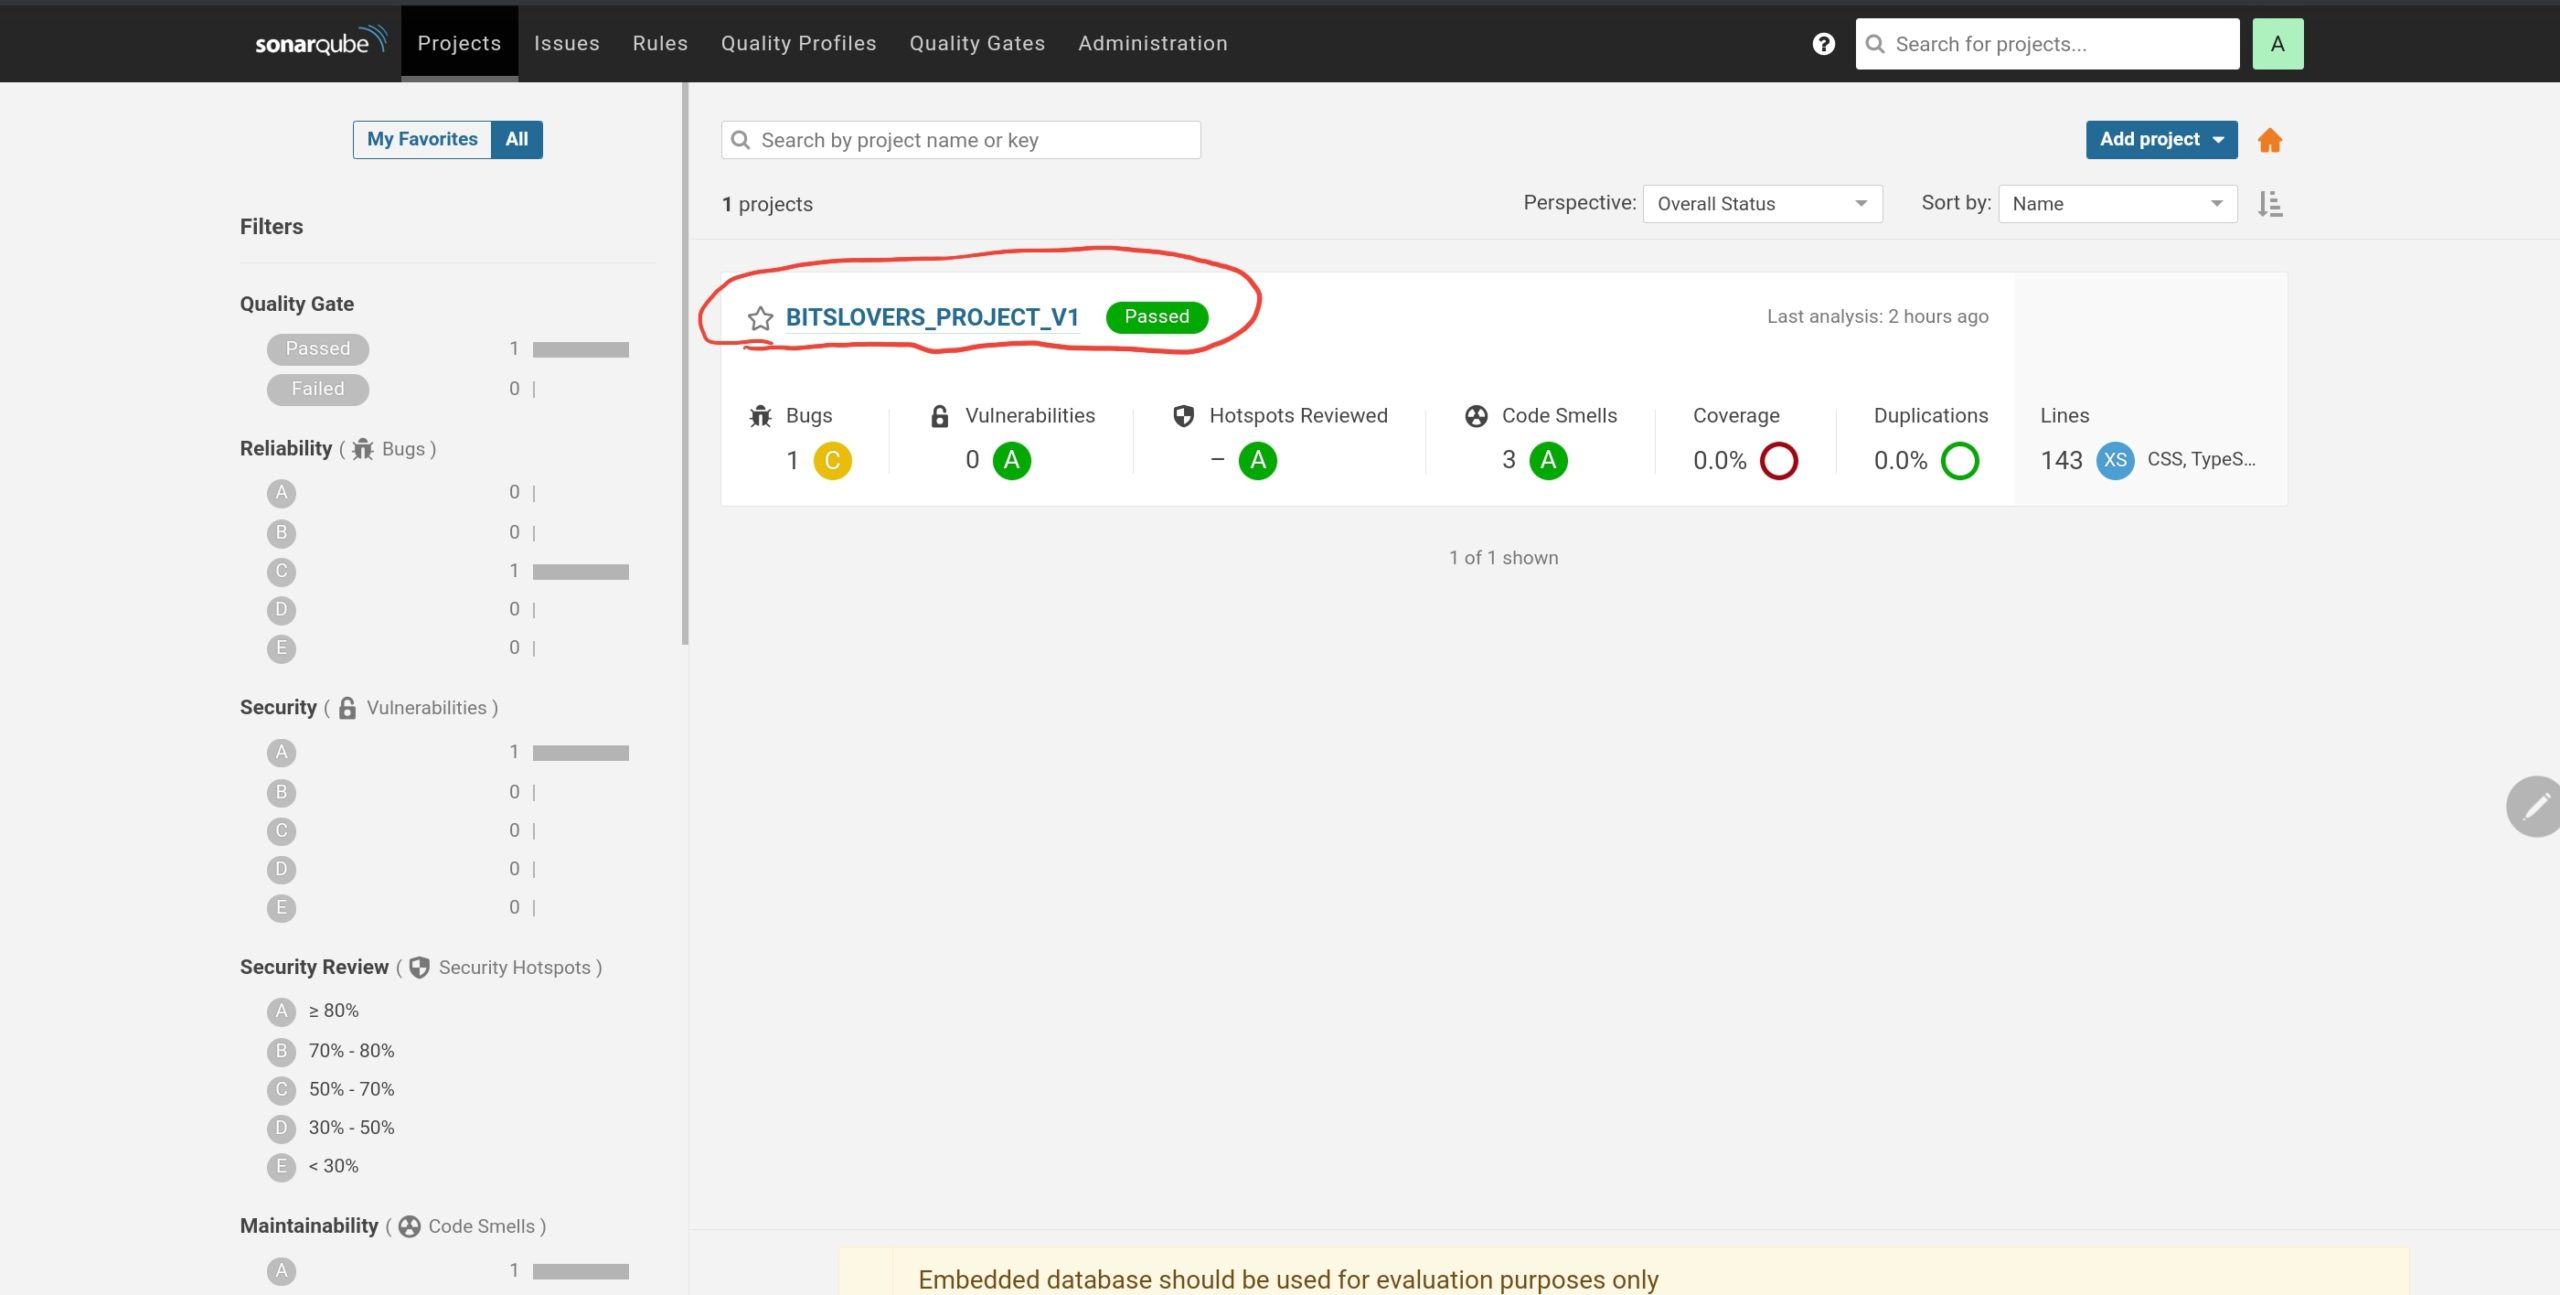
SonarQube Project List - JavaScript Project
SonarScanner and SSL Certificates
If your SonarQube instance uses HTTPS with a self-signed certificate, the scanner will reject the connection. There’s no flag to skip certificate verification. Instead, you need to add your certificate to the Java keystore inside the scanner.
Self-Signed Certificate Setup
The sonarsource/sonar-scanner-cli Docker image uses OpenJDK. Here’s how to add your certificate:
- Export the cacerts file from the image:
docker pull sonarsource/sonar-scanner-cli
docker run \
    --rm \
    --entrypoint cat sonarsource/sonar-scanner-cli /opt/java/openjdk/lib/security/cacerts > cacerts
- Import your certificate (assuming it’s named
sonar.cer):
docker run \
    --rm \
    -v `pwd`:/tmp/certs \
    sonarsource/sonar-scanner-cli \
    bash -c 'cd /tmp/certs && keytool -keystore cacerts -storepass changeit -noprompt -trustcacerts -importcert -alias sonar -file sonar.cer'
- Mount the updated cacerts when running the scanner:
docker run \
    --rm \
    -e SONAR_HOST_URL="http://${SONAR_HOST}" \
    sonarsource/sonar-scanner-cli
If you modify the scan.sh script from the repo, add the cacerts mount:
docker run \
     --rm \
     -e SONAR_HOST_URL="http://${SONAR_HOST}" \
     -e SONAR_TOKEN="${SONAR_TOKEN}" \
     -v "${REPO}:/usr/src" \
     -v $CONFIG_FILE:/opt/sonar-scanner/conf/sonar-scanner.properties \
     -v `pwd`/cacerts:/opt/java/openjdk/lib/security/cacerts \
     sonarsource/sonar-scanner-cli
Integrating SonarQube Analysis into Your Pipeline
Running scans locally is useful for development, but in a real project you want this automated. You can trigger SonarQube analysis from Jenkins, GitLab CI, GitHub Actions, or any CI/CD tool.
I’ve used both Jenkins and GitLab for this, and they each have tradeoffs.
My Experience with Jenkins
Jenkins is flexible and has a plugin for almost everything. That sounds good until you realize you depend on a lot of plugins to get anything done.
The real problem is upgrades. Updating Jenkins regularly breaks plugins, and fixing those issues often means editing XML files on the server by hand. In my experience, nobody updates Jenkins unless they absolutely have to.
Moving to GitLab
We eventually moved our source code to GitLab and set up the pipelines there too. It was a much better experience. Builds trigger on commit, you see the results right next to your code, and there are no plugins to maintain.
Conclusion
Whether you go with Jenkins, GitLab, or GitHub Actions, integrating SonarQube analysis is straightforward. You build your code the same way you already do, then add a scanner step. No extra plugins needed.
And yes, you can run all of this locally for free. Spin up the Docker container, run the scanner, and see exactly what SonarQube finds in your code.
Explore more like this

Terraform State Locking with S3 and DynamoDB in 2026
The moment two engineers run terraform apply at the same time without state locking, you have a race condition that can corrupt your entire infrastructure state. Both processes read the...

GitLab CI Environments and Review Apps in 2026
Review apps changed how my team does code review. Instead of reading diffs, reviewers click a link and see the actual change running. The designer can verify spacing on the...

Comments