Container Security on EKS: Trivy, ECR Scanning, and Runtime Protection
I’ve watched teams build gorgeous Kubernetes clusters on EKS, then basically shrug at container security. The cluster runs great, pipelines are solid, autoscaling hums along – and then someone actually runs a vulnerability scan and finds 847 CVEs sitting in the running workloads, 23 of them critical. That’s not a made-up number, either. I pulled it straight from a real cluster audit last quarter.
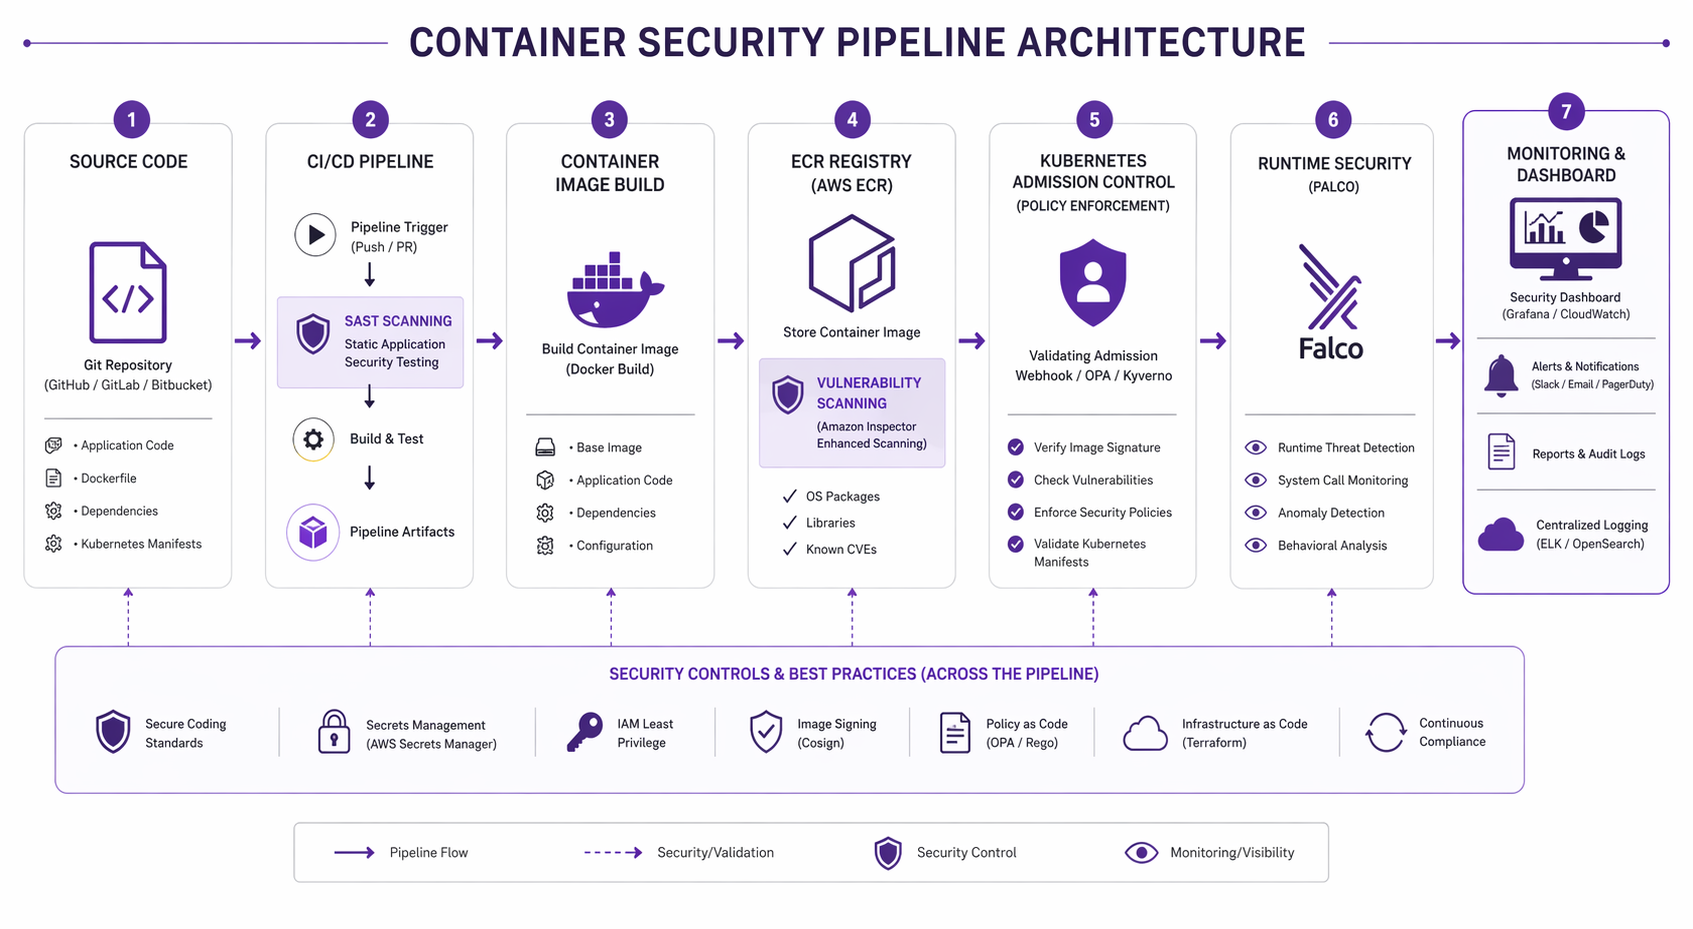
Container security on EKS isn’t something you can solve with a single tool or a quick checklist. It’s a discipline you have to apply across every layer – from the base image you pick all the way through to what your workloads actually do at runtime. In this post, we’re going to cover the whole picture: image scanning with Trivy, registry-level scanning with Amazon ECR, admission control to keep bad images out, runtime protection with Falco, network policies, secrets management, supply chain integrity, and the compliance frameworks that hold it all together.
If you’re still spinning up your first EKS cluster, head over to the EKS getting started guide first and circle back once things are up and running. Hardening security on a cluster that isn’t even operational yet is putting the cart before the horse.
The Container Security Landscape in 2026
The threat model for containers has shifted pretty dramatically. Three years ago, most of us were mainly worried about base image vulnerabilities. Today the attack surface is way wider and the stakes keep climbing:
- Software supply chain attacks keep climbing year after year, with attackers going straight after build pipelines, dependency feeds, and container registries.
- Runtime exploitation of application-level vulnerabilities (think Log4Shell-class events) means a bug in a dependency you didn’t even realize you had can take down the whole workload.
- Regulatory requirements now demand Software Bill of Materials (SBOM) generation and vulnerability disclosure timelines. Between the EU Cyber Resilience Act and US Executive Order 14028, this is no longer optional for a lot of organizations.
- Cryptomining and resource abuse is still one of the most common things attackers do once they get inside a container.
On the bright side, the tooling has come a long way. Open source projects like Trivy and Falco are production-grade now, AWS has beefed up ECR scanning with Amazon Inspector integration, and the Kubernetes community has settled on some clear patterns for admission control and policy enforcement.
The Six Layers of Container Security
Container security is a layered discipline. No single layer gets the job done by itself. Here’s how those layers break down on EKS:
| Layer | Scope | Primary Tools | What It Catches |
|---|---|---|---|
| Image | Build time | Trivy, Grype, Snyk | Known CVEs, secrets, misconfigs in images |
| Registry | Push time | ECR Enhanced Scanning, Amazon Inspector | Vulnerabilities before deployment |
| Orchestrator | Deploy time | OPA Gatekeeper, Kyverno, Pod Security Standards | Policy violations, privileged pods, bad configs |
| Runtime | Running workloads | Falco, GuardDuty Runtime Monitoring | Anomalous behavior, shell spawns, unexpected network calls |
| Network | Pod-to-pod traffic | Network Policies, Calico, Cilium | Lateral movement, unauthorized communication |
| Host | Node-level | Bottlerocket, CIS Benchmarks, kube-bench | Kernel exploits, node-level privilege escalation |
Each layer has its own tooling, its own failure modes, and its own way of responding when things go wrong. You really need all six working in concert. Let’s walk through each one in detail, starting with the foundation: image scanning.
For identity-driven service authentication on EKS, the SPIFFE and SPIRE workload identity guide complements image scanning by reducing shared-secret exposure between workloads.
Layer 1: Image Scanning with Trivy
Trivy (built by Aqua Security) has become the go-to open source vulnerability scanner across the Kubernetes ecosystem – and for good reason. It covers a lot of ground: OS package vulnerabilities, language-specific dependency issues (Python, Node.js, Java, Go, Rust, you name it), hardcoded secrets, infrastructure-as-code misconfigurations, and even license compliance.
Installing Trivy
On macOS:
brew install trivy
On Linux:
sudo apt-get install wget apt-transport-https gnupg lsb-release
wget -qO - https://aquasecurity.github.io/trivy-repo/deb/public.key | sudo gpg --dearmor -o /usr/share/keyrings/trivy.gpg
echo "deb [signed-by=/usr/share/keyrings/trivy.gpg] https://aquasecurity.github.io/trivy-repo/deb $(lsb_release -sc) main" | sudo tee /etc/apt/sources.list.d/trivy.list
sudo apt-get update
sudo apt-get install trivy
Scanning a Container Image
The most common operation. Scan an image before pushing it to ECR:
trivy image --severity HIGH,CRITICAL --format table your-ecr-repo.amazonaws.com/my-app:v1.2.3
Output looks like this:
your-ecr-repo.amazonaws.com/my-app:v1.2.3 (debian 12.5)
========================================================
Total: 42 (HIGH: 31, CRITICAL: 11)

┌──────────────────┬────────────────┬──────────┬───────────────────┐
│     Library      │ Vulnerability  │ Severity │ Installed Version │
├──────────────────┼────────────────┼──────────┼───────────────────┤
│ libcurl4         │ CVE-2026-12345 │ CRITICAL │ 7.88.1-10         │
│ openssl          │ CVE-2026-67890 │ HIGH     │ 3.0.11-1          │
│ libxml2          │ CVE-2026-11111 │ HIGH     │ 2.9.14+dfsg-1.3   │
└──────────────────┴────────────────┴──────────┴───────────────────┘
For CI/CD integration, use JSON or table format and set exit codes:
trivy image \
  --severity HIGH,CRITICAL \
  --exit-code 1 \
  --format json \
  --output trivy-results.json \
  your-ecr-repo.amazonaws.com/my-app:v1.2.3
The --exit-code 1 flag is what makes this useful in CI – it returns a non-zero exit code whenever HIGH or CRITICAL vulnerabilities show up, which is how you fail a pipeline build when things cross your threshold.
Scanning a Kubernetes Cluster
Trivy can scan all workloads running in a cluster, not just individual images:
# Scan the entire cluster
trivy k8s --cluster --report summary

# Scan a specific namespace
trivy k8s --namespace production --report all

# Generate an SBOM for all workloads in a namespace
trivy k8s --namespace production --format cyclonedx-json > production-sbom.json
Scanning for Secrets and Misconfigurations
Trivy isn’t just for CVEs, by the way. It’ll also catch hardcoded credentials, API keys, and private keys that someone accidentally baked into an image:
# Scan for secrets
trivy image --scanners secret your-ecr-repo.amazonaws.com/my-app:v1.2.3

# Scan Infrastructure as Code files
trivy config ./terraform/

# Scan a Dockerfile for misconfigurations
trivy config Dockerfile
Generating an SBOM
These days, generating a Software Bill of Materials is something more and more organizations are being required to do for compliance:
# Generate SPDX format SBOM
trivy image --format spdx-json --output sbom.json your-ecr-repo.amazonaws.com/my-app:v1.2.3

# Generate CycloneDX format SBOM
trivy image --format cyclonedx-json --output sbom.cdx.json your-ecr-repo.amazonaws.com/my-app:v1.2.3
Trivy in Server Mode
For high-volume environments, run Trivy as a server to avoid downloading the vulnerability database on every scan:
# Start the Trivy server
trivy server --listen 0.0.0.0:4954

# Scan using the server
trivy image --server http://trivy-server:4954 your-ecr-repo.amazonaws.com/my-app:v1.2.3
Layer 2: Amazon ECR Security
Amazon ECR gives you two scanning modes: basic scanning (which uses the Clair-based open source engine) and enhanced scanning (powered by Amazon Inspector). For production workloads, enhanced scanning is the way to go.
Enabling Enhanced Scanning
Enable enhanced scanning on an ECR repository using Terraform:
resource "aws_ecr_repository" "app" {
  name                 = "my-app"
  image_tag_mutability = "IMMUTABLE"

  image_scanning_configuration {
    scan_on_push = true
  }
}

resource "aws_ecr_registry_scanning_configuration" "enhanced" {
  scan_type = "ENHANCED"

  rule {
    scan_frequency = "SCAN_ON_PUSH"
    repository_filter {
      filter      = "*"
      filter_type = "WILDCARD"
    }
  }

  rule {
    scan_frequency = "CONTINUOUS_SCAN"
    repository_filter {
      filter      = "production-*"
      filter_type = "WILDCARD"
    }
  }
}
Pay attention to the CONTINUOUS_SCAN frequency for production repositories here. What this does is have Amazon Inspector keep re-scanning your images as new vulnerabilities get published – even if the image itself hasn’t changed at all. That matters more than you’d think, because a perfectly clean image pushed on Monday can suddenly become vulnerable on Wednesday when a new CVE drops.
ECR Scan Types Comparison
| Feature | Basic Scanning | Enhanced Scanning |
|---|---|---|
| Engine | Open source (Clair) | Amazon Inspector |
| OS packages | Yes | Yes |
| Application packages | Limited | Full (Python, Node.js, Java, Go, .NET, Rust) |
| Continuous re-scan | No | Yes |
| Lambda function scanning | No | Yes |
| Export to Security Hub | No | Yes |
| Cost | Free | Per-image pricing |
| Scan on push | Yes | Yes |
Querying Scan Results
After a scan completes, query the results programmatically:
# Get scan findings for a specific image
aws ecr describe-image-scan-findings \
  --repository-name my-app \
  --image-id imageTag=v1.2.3 \
  --region us-east-1

# List all images with critical findings using AWS CLI
aws ecr describe-images \
  --repository-name my-app \
  --query 'imageDetails[?imageScanFindingsSummary.findingSeverityCounts.CRITICAL > `0`]' \
  --region us-east-1
ECR Lifecycle Policies for Vulnerable Images
Automatically clean up old or vulnerable images with lifecycle policies:
aws ecr put-lifecycle-policy \
  --repository-name my-app \
  --lifecycle-policy-text '{
    "rules": [
      {
        "rulePriority": 1,
        "description": "Remove untagged images older than 14 days",
        "selection": {
          "tagStatus": "untagged",
          "countType": "sinceImagePushed",
          "countUnit": "days",
          "countNumber": 14
        },
        "action": { "type": "expire" }
      },
      {
        "rulePriority": 2,
        "description": "Keep only last 10 tagged images",
        "selection": {
          "tagStatus": "tagged",
          "tagPrefixList": ["v"],
          "countType": "imageCountMoreThan",
          "countNumber": 10
        },
        "action": { "type": "expire" }
      }
    ]
  }'
For more on ECR configuration including pull-through caches and referrer discovery, see the Amazon ECR pull-through cache and referrer discovery guide.
Enforcing Image Tag Immutability
Image tag immutability is one of those quiet settings that punches above its weight – it stops anyone with push access from overwriting a “clean” image tag with something malicious:
resource "aws_ecr_repository" "app" {
  name                 = "my-app"
  image_tag_mutability = "IMMUTABLE"
}
It’s a simple toggle with outsized impact on supply chain integrity. Once v1.2.3 gets pushed, that tag is locked – nobody can sneak a different image behind it. Need to ship an update? Push a new tag.
Layer 3: Admission Control
Admission controllers sit between the Kubernetes API server and whatever’s trying to create or update resources. Think of this layer as your last line of defense before a workload actually lands on the cluster. Two tools dominate this space: OPA Gatekeeper and Kyverno.
Pod Security Standards
Before you reach for a full-blown policy engine, though, enable Kubernetes’ built-in Pod Security Standards. This gives you baseline security enforcement right at the namespace level:
apiVersion: v1
kind: Namespace
metadata:
  name: production
  labels:
    pod-security.kubernetes.io/enforce: restricted
    pod-security.kubernetes.io/audit: restricted
    pod-security.kubernetes.io/warn: restricted
The three profiles available:
| Profile | What It Blocks |
|---|---|
| Privileged | Nothing (unrestricted) |
| Baseline | Host namespace sharing, host ports, privileged containers, host path mounts |
| Restricted | All baseline restrictions plus: must run as non-root, drop all capabilities, no privilege escalation, read-only root filesystem |
For most production clusters, we’d suggest starting with baseline enforcement and restricted audit/warn, then gradually migrating workloads to full restricted enforcement as you go.
Kyverno Policies for Container Security
Kyverno is a policy engine built specifically for Kubernetes, and one of the things I like about it is that policies are just regular Kubernetes resources – no new language to learn. Here are the policies I’d consider essential:
Block images from unapproved registries:
apiVersion: kyverno.io/v1
kind: ClusterPolicy
metadata:
  name: restrict-image-registries
spec:
  validationFailureAction: Enforce
  background: false
  rules:
    - name: validate-registry
      match:
        any:
          - resources:
              kinds:
                - Pod
      validate:
        message: "Images must come from the approved ECR registry."
        foreach:
          - list: "request.object.spec.containers[].image"
            pattern:
              "request.object.spec.containers[].image": "123456789012.dkr.ecr.us-east-1.amazonaws.com/*"
Block privileged containers:
apiVersion: kyverno.io/v1
kind: ClusterPolicy
metadata:
  name: block-privileged-containers
spec:
  validationFailureAction: Enforce
  background: false
  rules:
    - name: check-privileged
      match:
        any:
          - resources:
              kinds:
                - Pod
      validate:
        message: "Privileged containers are not allowed in production."
        pattern:
          spec:
            containers:
              - securityContext:
                  privileged: false
Require resource limits:
apiVersion: kyverno.io/v1
kind: ClusterPolicy
metadata:
  name: require-resource-limits
spec:
  validationFailureAction: Enforce
  background: false
  rules:
    - name: check-resource-limits
      match:
        any:
          - resources:
              kinds:
                - Pod
      validate:
        message: "CPU and memory resource limits are required."
        pattern:
          spec:
            containers:
              - resources:
                  limits:
                    memory: "?*"
                    cpu: "?*"
OPA Gatekeeper Example
OPA Gatekeeper takes a different approach, using Rego for policy definitions. You get more expressive power that way, but there’s a steeper learning curve to deal with:
apiVersion: templates.gatekeeper.sh/v1
kind: ConstraintTemplate
metadata:
  name: k8sblocklatesttag
spec:
  crd:
    spec:
      names:
        kind: K8sBlockLatestTag
  targets:
    - target: admission.k8s.gatekeeper.sh
      rego: |
        package k8sblocklatesttag
        violation[{"msg": msg}] {
          container := input.review.object.spec.containers[_]
          endswith(container.image, ":latest")
          msg := sprintf("Container <%v> uses the :latest tag which is not allowed.", [container.name])
        }
---
apiVersion: constraints.gatekeeper.sh/v1beta1
kind: K8sBlockLatestTag
metadata:
  name: block-latest-tag
spec:
  match:
    kinds:
      - apiGroups: [""]
        kinds: ["Pod"]
    namespaces:
      - "production"
      - "staging"
Admission Control Tool Comparison
| Feature | Kyverno | OPA Gatekeeper |
|---|---|---|
| Policy language | Native YAML | Rego |
| Learning curve | Low | Medium to high |
| Mutation support | Yes | Limited |
| Image verification | Built-in (Cosign, Notary) | Requires external integration |
| Generate resources | Yes | No |
| Policy library | Extensive community library | Limited |
| Performance | Lower latency per request | Higher latency for complex Rego |
| Best for | Most EKS deployments | Complex policy logic |
For most teams running EKS, Kyverno is the better starting point. The native YAML policy format means your platform team can write and maintain policies without having to learn Rego from scratch. Reach for OPA Gatekeeper when you genuinely need the full expressiveness of a general-purpose policy language.
Layer 4: Runtime Security with Falco
Image scanning and admission control do a solid job of protecting you at build and deploy time. But what happens when a vulnerability nobody knew about gets exploited inside a running container? That’s where runtime security comes in. Falco, now a CNCF graduated project, has become the standard tool for exactly this scenario.
How Falco Works
Falco runs as a DaemonSet on every node in your EKS cluster. It hooks into system calls at the kernel level (using either a kernel module or an eBPF probe) and checks each syscall against a set of rules. Whenever something matches, Falco fires off an alert.
Under the hood, it works like this:
- A syscall happens inside a container (say, a shell process spawns)
- The Falco driver captures the syscall event
- The Falco userspace program checks the event against its loaded rules
- If something matches, Falco outputs an alert to stdout, a file, or whatever output channel you’ve configured
Installing Falco on EKS
Install Falco using the Helm chart:
helm repo add falcosecurity https://falcosecurity.github.io/charts
helm repo update

helm install falco falcosecurity/falco \
  --namespace falco \
  --create-namespace \
  --set driver.kind=ebpf \
  --set falco.jsonOutput=true \
  --set falco.httpOutput.enabled=true \
  --set falco.httpOutput.url="http://falcosidekick:2801/"
That driver.kind=ebpf setting matters quite a bit on EKS. eBPF is the preferred probe type because it doesn’t require compiling a kernel module – something that can be a real headache on managed node groups running Bottlerocket AMIs.
Also deploy Falcosidekick to handle alert routing:
helm install falcosidekick falcosecurity/falcosidekick \
  --namespace falco \
  --set config.slack.webhookurl="https://hooks.slack.com/services/..." \
  --set config.aws.cloudwatch.loggroup="/falco/alerts" \
  --set config.aws.cloudwatch.region="us-east-1" \
  --set config.aws.cloudwatch.sendcheck=true
Essential Falco Rules for EKS
Falco comes with a solid default rule set out of the box. But for EKS workloads specifically, these are the rules we’ve found matter most:
Detect a shell spawned inside a container:
- rule: Terminal Shell in Container
  desc: A shell was spawned in a container with an attached terminal
  condition: >
    spawned_process and container and shell_procs and proc.tty != 0
    and container_entrypoint
  output: >
    A shell was spawned in a container with an attached terminal
    (user=%user.name user_uid=%user.uid container_id=%container.id
    image=%container.image.repository process=%proc.name
    parent=%proc.pname command=%proc.cmdline terminal=%proc.tty)
  priority: WARNING
  tags: [container, shell, mitre_execution]
Detect unexpected outbound network connections:
- rule: Unexpected Outbound Connection
  desc: Detect outbound connections to unexpected ports from containers
  condition: >
    evt.type=connect and container and
    not fd.sport in (80, 443, 8080) and
    not k8s_containers and
    evt.res=success
  output: >
    Unexpected outbound connection from container
    (user=%user.name container=%container.name image=%container.image.repository
    connection=%fd.name port=%fd.rport command=%proc.cmdline)
  priority: WARNING
  tags: [network, container, mitre_command_and_control]
Detect reading of sensitive files:
- rule: Read Sensitive File
  desc: Detect attempts to read sensitive files like /etc/shadow
  condition: >
    evt.type=open and evt.arg.flags contains O_RDONLY and
    (fd.name startswith /etc/shadow or
     fd.name startswith /etc/passwd or
     fd.name startswith /etc/ssh/ or
     fd.name startswith /root/.ssh/ or
     fd.name startswith /var/run/secrets/)
    and container
  output: >
    Sensitive file read in container
    (user=%user.name file=%fd.name container=%container.name
     image=%container.image.repository command=%proc.cmdline)
  priority: CRITICAL
  tags: [filesystem, container, mitre_credential_access]
Detect namespace manipulation (potential container escape):
- rule: Change Namespace via Unshare
  desc: Detect namespace privilege changes via unshare syscall
  condition: >
    evt.type=unshare and container and
    not thread.cap_permitted contains CAP_SYS_ADMIN
  output: >
    Namespace privilege change via unshare
    (user=%user.name uid=%user.uid container=%container.name
     image=%container.image.repository command=%proc.cmdline)
  priority: CRITICAL
  tags: [container, privilege_escalation, mitre_privilege_escalation]
Falco Alert Output Examples
When Falco catches something, the alert it generates packs in a lot of useful context:
{
  "output": "A shell was spawned in a container with an attached terminal (user=root user_uid=0 container_id=abc123 image=my-app process=bash parent=runc command=bash terminal=34816)",
  "priority": "Warning",
  "rule": "Terminal Shell in Container",
  "time": "2026-04-22T14:32:15.123456789Z",
  "output_fields": {
    "container.id": "abc123",
    "container.image.repository": "123456789012.dkr.ecr.us-east-1.amazonaws.com/my-app",
    "proc.name": "bash",
    "proc.cmdline": "bash",
    "user.name": "root",
    "user.uid": 0
  }
}
AWS GuardDuty Runtime Monitoring
AWS offers a managed alternative to self-hosting Falco through GuardDuty EKS Runtime Monitoring. It deploys the GuardDuty security agent as a DaemonSet and gives you built-in detections without having to manage rule files yourself.
There’s a tradeoff, though. GuardDuty is fully managed and plugs right into the AWS security ecosystem, but you don’t get the same level of control over detection rules and alert formatting that you’d have with Falco. Plenty of teams actually run both – Falco for custom detections tuned to their specific applications, and GuardDuty for the broad, AWS-managed coverage.
Layer 5: Network Policies
Here’s something that catches people off guard: by default, every pod in a Kubernetes cluster can talk to every other pod. That flat network model is great for development, but it’s a real liability in production. Network policies let you lock down pod-to-pod communication.
Default Deny All Traffic
Start with a default deny policy in every namespace:
apiVersion: networking.k8s.io/v1
kind: NetworkPolicy
metadata:
  name: default-deny-all
  namespace: production
spec:
  podSelector: {}
  policyTypes:
    - Ingress
    - Egress
That blocks all inbound and outbound traffic for every pod in the namespace. From there, you layer allow policies on top of this deny-everything base.
Allow Specific Application Traffic
apiVersion: networking.k8s.io/v1
kind: NetworkPolicy
metadata:
  name: allow-frontend-to-backend
  namespace: production
spec:
  podSelector:
    matchLabels:
      app: backend-api
  policyTypes:
    - Ingress
  ingress:
    - from:
        - podSelector:
            matchLabels:
              app: frontend
      ports:
        - port: 8080
          protocol: TCP
Allow DNS Egress
One thing people often forget: every pod needs DNS resolution. Once you’ve put that default deny in place, you have to explicitly allow egress to the CoreDNS service:
apiVersion: networking.k8s.io/v1
kind: NetworkPolicy
metadata:
  name: allow-dns-egress
  namespace: production
spec:
  podSelector: {}
  policyTypes:
    - Egress
  egress:
    - to:
        - namespaceSelector:
            matchLabels:
              kubernetes.io/metadata.name: kube-system
          podSelector:
            matchLabels:
              k8s-app: kube-dns
      ports:
        - port: 53
          protocol: UDP
        - port: 53
          protocol: TCP
Network Policy Enforcement on EKS
EKS supports two CNI plugins with network policy enforcement:
| CNI Plugin | Policy Engine | Performance | Best For |
|---|---|---|---|
| Amazon VPC CNI | Built-in (EKS 1.25+) | Line rate | Most EKS deployments |
| Calico | Calico policy engine | High | Advanced policy needs |
| Cilium | eBPF-based | Very high | High-scale environments |
Starting with EKS 1.25, the Amazon VPC CNI plugin supports Kubernetes NetworkPolicy natively, which covers most use cases just fine. Turn to Calico or Cilium when you need advanced features like global network policies, HTTP-level rules, or eBPF-based observability.
For a deeper dive into network-level protection, see the AWS WAF rules deep dive which covers the ingress protection layer in front of your cluster.
Layer 6: Host Security
Everything runs on top of the host layer, which makes it the foundation of the whole stack. If a node gets compromised, the attacker essentially gets the keys to every container sitting on that node.
Bottlerocket as the Host OS
Bottlerocket is Amazon’s container-focused host OS, and it ships with a dramatically smaller attack surface compared to general-purpose Linux distros:
| Feature | Bottlerocket | Amazon Linux 2023 | Ubuntu 22.04 |
|---|---|---|---|
| SSH access | Disabled by default | Enabled | Enabled |
| Package manager | None | dnf | apt |
| Shell | No interactive shell | bash | bash |
| Attack surface | Minimal | Standard | Standard |
| Immutable filesystem | Yes | No | No |
| CIS Benchmark profile | Level 1 and 2 | Level 1 | Level 1 |
Our advice: use Bottlerocket for EKS managed node groups whenever you don’t need custom host-level packages. It’s probably the single most impactful host security decision you can make.
CIS Benchmarks with kube-bench
Run CIS Kubernetes Benchmark tests against your EKS nodes:
# Install kube-bench
kubectl apply -f https://raw.githubusercontent.com/aquasecurity/kube-bench/main/job-eks.yaml

# View results
kubectl logs job/kube-bench
The benchmark runs your setup against the CIS EKS Benchmark recommendations, covering everything from control plane configuration to worker node settings and policies.
EKS Managed Node Group Configuration
resource "aws_eks_node_group" "production" {
  cluster_name    = aws_eks_cluster.main.name
  node_group_name = "production"
  node_role_arn   = aws_iam_role.node.arn
  subnet_ids      = aws_subnet.private[*].id

  scaling_config {
    desired_size = 3
    max_size     = 10
    min_size     = 3
  }

  instance_types = ["m6i.large"]

  # Use Bottlerocket AMI
  ami_type       = "BOTTLEROCKET_x86_64"

  labels = {
    "workload" = "production"
  }

  tags = {
    SecurityLevel = "restricted"
  }
}
Secrets Management
Let’s be blunt about this: Kubernetes stores Secrets as base64-encoded objects in etcd. That’s encoding, not encryption. If you’re running production EKS clusters, you need an actual secrets management strategy.
AWS Secrets Manager Integration
Use the AWS Secrets and Configuration Provider (ASCP) for the CSI Secrets Driver to mount secrets from AWS Secrets Manager directly into pods:
apiVersion: secrets-store.csi.x-k8s.io/v1
kind: SecretProviderClass
metadata:
  name: app-db-credentials
  namespace: production
spec:
  provider: aws
  parameters:
    objects: |
      - objectName: "prod/db-credentials"
        objectType: "secretsmanager"
        jmesPath:
          - path: username
            objectAlias: dbusername
          - path: password
            objectAlias: dbpassword
Then reference it in your pod spec:
apiVersion: v1
kind: Pod
metadata:
  name: my-app
  namespace: production
spec:
  containers:
    - name: app
      image: 123456789012.dkr.ecr.us-east-1.amazonaws.com/my-app:v1.2.3
      env:
        - name: DB_USERNAME
          valueFrom:
            secretKeyRef:
              name: app-db-credentials
              key: dbusername
        - name: DB_PASSWORD
          valueFrom:
            secretKeyRef:
              name: app-db-credentials
              key: dbpassword
      volumeMounts:
        - name: secrets-store
          mountPath: "/mnt/secrets-store"
          readOnly: true
  volumes:
    - name: secrets-store
      csi:
        driver: secrets-store.csi.k8s.io
        readOnly: true
        volumeAttributes:
          secretProviderClass: "app-db-credentials"
For automated secret rotation, see the AWS Secrets Manager rotation with Lambda guide.
Envelope Encryption for etcd
Enable envelope encryption for the Kubernetes secrets stored in etcd. This adds an additional encryption layer using a KMS key:
resource "aws_eks_cluster" "main" {
  name     = "production"
  role_arn = aws_iam_role.cluster.arn

  encryption_config {
    provider {
      key_arn = aws_kms_key.eks.arn
    }
    resources = ["secrets"]
  }

  vpc_config {
    subnet_ids = aws_subnet.private[*].id
  }
}

resource "aws_kms_key" "eks" {
  description             = "EKS Secret Encryption Key"
  deletion_window_in_days = 30
  enable_key_rotation     = true
}
SBOM and Supply Chain Security
Supply chain security used to be something you’d do if you had extra time. Not anymore – it’s now a regulatory requirement in many cases. Here’s how to put it together end-to-end on EKS.
Generate and Sign Artifacts
The full supply chain pipeline looks like this: generate an SBOM, scan it for vulnerabilities, sign the image with Cosign, and then verify that signature at admission time.
# Step 1: Generate SBOM
trivy image --format cyclonedx-json \
  --output sbom.json \
  123456789012.dkr.ecr.us-east-1.amazonaws.com/my-app:v1.2.3

# Step 2: Sign the image with Cosign
cosign sign \
  --key cosign.key \
  123456789012.dkr.ecr.us-east-1.amazonaws.com/my-app:v1.2.3

# Step 3: Attach the SBOM as an OCI referrer
cosign attach sbom \
  --sbom sbom.json \
  123456789012.dkr.ecr.us-east-1.amazonaws.com/my-app:v1.2.3

# Step 4: Verify the signature
cosign verify \
  --key cosign.pub \
  123456789012.dkr.ecr.us-east-1.amazonaws.com/my-app:v1.2.3
Verify Signatures at Admission with Kyverno
Enforce that only signed images can be deployed to production:
apiVersion: kyverno.io/v1
kind: ClusterPolicy
metadata:
  name: verify-image-signature
spec:
  validationFailureAction: Enforce
  background: false
  webhookTimeoutSeconds: 30
  rules:
    - name: verify-cosign-signature
      match:
        any:
          - resources:
              kinds:
                - Pod
      verifyImages:
        - imageReferences:
            - "123456789012.dkr.ecr.us-east-1.amazonaws.com/*"
          failureAction: Enforce
          attestors:
            - entries:
                - keys:
                    publicKeys: |-
                      -----BEGIN PUBLIC KEY-----
                      MFkwEwYHKoZIzj0CAQYIKoZIzj0DAQcDQgAE...
                      -----END PUBLIC KEY-----
CI/CD Security Pipeline
None of these security layers matter much if they’re not wired into your CI/CD pipeline. Let’s look at a complete GitHub Actions workflow that strings together the full scanning chain:
name: Container Security Pipeline

on:
  push:
    branches: [main]
    paths:
      - 'src/**'
      - 'Dockerfile'
      - 'k8s/**'

env:
  ECR_REGISTRY: 123456789012.dkr.ecr.us-east-1.amazonaws.com
  IMAGE_NAME: my-app

jobs:
  build-and-scan:
    runs-on: ubuntu-latest
    permissions:
      id-token: write
      contents: read
      security-events: write

    steps:
      - name: Checkout
        uses: actions/checkout@v4

      - name: Configure AWS Credentials
        uses: aws-actions/configure-aws-credentials@v4
        with:
          role-to-assume: arn:aws:iam::123456789012:role/github-actions
          aws-region: us-east-1

      - name: Login to ECR
        uses: aws-actions/amazon-ecr-login@v2

      - name: Build Image
        run: |
          docker build -t $ECR_REGISTRY/$IMAGE_NAME:$ .

      - name: Trivy Vulnerability Scan
        uses: aquasecurity/trivy-action@master
        with:
          image-ref: '$/$:$'
          format: 'sarif'
          output: 'trivy-results.sarif'
          severity: 'HIGH,CRITICAL'
          exit-code: '1'

      - name: Trivy SBOM Generation
        uses: aquasecurity/trivy-action@master
        with:
          image-ref: '$/$:$'
          format: 'cyclonedx-json'
          output: 'sbom.json'
          scan-type: 'image'

      - name: Trivy Secret Scan
        uses: aquasecurity/trivy-action@master
        with:
          image-ref: '$/$:$'
          format: 'table'
          scan-type: 'image'
          scanners: 'secret'

      - name: Sign Image with Cosign
        uses: sigstore/cosign-installer@v3
      - run: |
          cosign sign --key env://COSIGN_PRIVATE_KEY \
            $ECR_REGISTRY/$IMAGE_NAME:$
        env:
          COSIGN_PRIVATE_KEY: $
          COSIGN_PASSWORD: $

      - name: Push to ECR
        run: |
          docker push $ECR_REGISTRY/$IMAGE_NAME:$
          docker tag $ECR_REGISTRY/$IMAGE_NAME:$ \
                     $ECR_REGISTRY/$IMAGE_NAME:latest
          docker push $ECR_REGISTRY/$IMAGE_NAME:latest

      - name: Upload Trivy Results to Security Tab
        uses: github/codeql-action/upload-sarif@v3
        with:
          sarif_file: 'trivy-results.sarif'
So before an image ever reaches ECR, this pipeline runs four security gates: vulnerability scan (fail on HIGH/CRITICAL), SBOM generation, secret detection, and image signing. The push only happens if every single check passes.
Vulnerability Scanner Comparison
Picking the right scanner really comes down to your budget, compliance requirements, and how you prefer to operate. Let’s break down the four leading options:
| Feature | Trivy (Open Source) | Snyk Container | Aqua Platform | Prisma Cloud |
|---|---|---|---|---|
| License | Apache 2.0 | Commercial | Commercial | Commercial |
| OS package scanning | Yes | Yes | Yes | Yes |
| Language-specific scanning | 15+ languages | 12+ languages | 15+ languages | 12+ languages |
| IaC scanning | Yes | Yes | Yes | Yes |
| Secret scanning | Yes | Yes | Yes | Yes |
| SBOM generation | SPDX, CycloneDX | CycloneDX | SPDX, CycloneDX | CycloneDX |
| Kubernetes operator | Trivy Operator | Snyk Controller | Aqua Enforcer | Prisma Defender |
| Runtime protection | No (use Falco) | No | Yes | Yes |
| CI/CD integrations | All major platforms | All major platforms | All major platforms | All major platforms |
| Cost | Free | ~$100/developer/mo | Custom pricing | Custom pricing |
| Best for | Budget-conscious teams, full pipeline coverage | Developer-centric workflows | Enterprise runtime + image security | Enterprise with existing Palo Alto stack |

For most teams running EKS, we’d go with Trivy for build-time and CI/CD scanning paired with Falco for runtime protection. You get full coverage without any commercial licensing costs. Consider Snyk if your developers are after tight IDE integration, Aqua if you need commercial-grade runtime protection, or Prisma Cloud if you’re already deep in the Palo Alto ecosystem.
Compliance Frameworks
Container security doesn’t exist in a vacuum, of course. Most organizations have to show compliance with one or more regulatory frameworks, so let’s connect the dots.
Mapping Security Controls to Compliance
| Security Control | SOC 2 | PCI-DSS | HIPAA |
|---|---|---|---|
| Image vulnerability scanning | CC6.1 | 6.2 | 164.308(a)(5) |
| Registry scanning and enforcement | CC6.1 | 6.2 | 164.308(a)(5) |
| Admission control policies | CC6.3 | 6.3 | 164.312(a)(1) |
| Runtime threat detection | CC7.2 | 10.4 | 164.312(b) |
| Network segmentation | CC6.6 | 1.3 | 164.312(e)(1) |
| Secrets encryption at rest | CC6.1 | 3.4 | 164.312(a)(2)(iv) |
| SBOM and supply chain integrity | CC6.1 | 6.2 | 164.308(a)(5) |
| Audit logging and monitoring | CC7.2 | 10.2 | 164.312(b) |
| Host hardening (CIS Benchmark) | CC6.1 | 2.2 | 164.310(b) |
CIS Benchmark Checklist for EKS
Work through this checklist for every EKS cluster you run in production:
| Item | Benchmark Section | Action | Verification |
|---|---|---|---|
| Control plane logging | 3.1 | Enable all five log types | aws eks describe-cluster --query 'cluster.logging' |
| API server audit logs | 3.2 | Configure audit log policy | Verify log entries in CloudWatch |
| etcd encryption | 4.1 | Enable KMS envelope encryption | Check encryptionConfig in cluster spec |
| Node IAM least privilege | 4.2 | Use IRSA, minimize node role | Review IAM policy attached to node role |
| Pod Security Standards | 5.1 | Enforce baseline or restricted | Check namespace labels |
| Network policies | 5.2 | Default deny in all namespaces | kubectl get networkpolicy --all-namespaces |
| Secrets encryption | 5.3 | Use AWS Secrets Manager + CSI driver | Check SecretProviderClass resources |
| RBAC least privilege | 5.4 | Audit cluster role bindings | kubectl get clusterrolebindings -o yaml |
| Image provenance | 5.5 | Verify image signatures at admission | Check Kyverno/Gatekeeper policies |
Cost Analysis
Security tooling isn’t free, so let’s look at what you’re actually going to spend. Here’s a realistic breakdown for a mid-size EKS deployment (5 clusters, 50 nodes, 200 workloads):
| Component | Monthly Cost | Notes |
|---|---|---|
| Trivy (self-hosted) | $0 (open source) | Compute for Trivy server: ~$50 if using dedicated instance |
| ECR Enhanced Scanning | $200-400 | Based on image count and re-scan frequency |
| Falco (self-hosted) | $0 (open source) | DaemonSet runs on each node, minimal resource usage |
| Falcosidekick + CloudWatch | $50-100 | Log ingestion and alert routing |
| Kyverno | $0 (open source) | Runs as in-cluster deployment |
| AWS KMS (etcd encryption) | $1-5 per key | Key usage charges |
| AWS Secrets Manager | $0.40 per secret/month | Plus API call charges |
| GuardDuty EKS Runtime | $4.50 per million events | Varies by cluster activity |
| S3 (SBOM storage) | $5-20 | Minimal storage costs |
| Total Estimated | $300-600/month | For the full stack across 5 clusters |
Stack that up against commercial alternatives and the math gets interesting fast. Snyk Container alone runs about $100 per developer per month. Aqua Platform and Prisma Cloud typically start north of $20,000 a year. The open source stack (Trivy + Falco + Kyverno) delivers something like 80-90% of the coverage at a fraction of the cost. The catch, of course, is operational ownership – your team has to manage the tooling instead of paying a vendor to handle it.
Best Practices Summary
Having implemented container security across dozens of EKS clusters, here’s what we’ve found actually moves the needle:
-
Start with image scanning in CI/CD. This one’s the highest-impact, lowest-effort security control you can add. Wire Trivy into your pipeline and fail builds on HIGH/CRITICAL vulnerabilities. Do this before anything else.
-
Use Bottlerocket for node groups. The reduced attack surface alone makes the switch worthwhile. No SSH, no package manager, no interactive shell. If you need to debug a node, reach for SSM Session Manager instead.
-
Enable ECR continuous scanning. A clean image today can turn into a vulnerable one tomorrow. Continuous re-scanning catches new CVEs in images you deployed weeks or even months ago.
-
Default deny network policies. Put a default deny-all policy in every namespace, then layer specific allow rules on top. This is what stops lateral movement if a pod gets compromised.
-
Enforce Pod Security Standards. At a minimum, enforce the
baselineprofile. Then work your way towardrestrictedacross all production namespaces. -
Deploy Falco for runtime detection. Image scanning can’t help you against zero-day exploits in running workloads. Falco catches anomalous behavior right at the syscall level.
-
Sign images and verify at admission. Use Cosign to sign images in your pipeline, and have Kyverno verify those signatures before any pods get created. That way, tampered images never get a chance to run.
-
Use AWS Secrets Manager, not Kubernetes Secrets. Kubernetes Secrets are base64-encoded, not encrypted (well, unless you enable envelope encryption). Use the CSI driver to mount secrets from AWS Secrets Manager instead.
-
Generate SBOMs for every image. Regulatory requirements are making this mandatory in a lot of places now. Even without a mandate, SBOMs are absolute lifesavers when a new CVE drops and you need to quickly figure out which images are affected.
-
Automate everything. Manual security checks simply don’t scale. Every control we’ve talked about in this post should be baked into your CI/CD pipeline and cluster configuration.
Putting It All Together
Container security on EKS isn’t really about picking the right tool – it’s about layering the right controls across every stage of the container lifecycle. Scan images at build time with Trivy. Enforce policies at the registry with ECR Enhanced Scanning. Block bad configurations at admission with Kyverno. Detect runtime threats with Falco. Segment the network with NetworkPolicies. Protect secrets with AWS Secrets Manager. Sign images with Cosign and verify them at the gate.
No single layer catches everything, and that’s the whole point. The shell that slips past your admission controller? Falco catches it at runtime. The CVE that nobody knew about yesterday? ECR continuous scanning flags it tomorrow. The lateral movement attempt? Your default-deny network policy blocks it cold. That’s how layered defense actually works.
The full stack we covered here (Trivy, ECR Enhanced Scanning, Kyverno, Falco, NetworkPolicies, Secrets Manager, Cosign) runs about $300-600 per month for a mid-size deployment and delivers coverage comparable to commercial platforms that cost five to ten times as much. The tradeoff is that you own the operations – but that investment pays for itself pretty quickly.
For more on the broader security architecture around your EKS workloads, see the Docker sandboxes and microVM security guide for isolation strategies beyond traditional containers.
Copy Fail update
For a current Linux host-risk example, see the Copy Fail patch guide for Kubernetes nodes and CI runners: Copy Fail CVE-2026-31431: Patch Linux, Kubernetes Nodes, and CI Runners First.
Explore more like this

Aurora Serverless v2 + Bedrock: AI Database Queries in 2026
I connected Bedrock to our Aurora cluster last month. The first thing I asked it was “show me all customers who churned in Q1 but came back in Q2” —...
AWS WAF Rules Deep Dive: Rate-Based, Geo, and Custom Rules
WAF is one of those services where the default managed rules get you 80% of the way there. The last 20% is where it gets interesting.

Comments