How to create GitLab Accounts for Students (Step-by-Step)

If you’re studying software development, you’ve probably heard about Git. It’s the version control system that pretty much everyone uses these days. But here’s the thing — Git isn’t just for professional developers. It’s actually pretty useful for students too.
Let me explain why I think every student should consider using Git for their coursework.
Why Use Git for Coursework?
Git keeps everything in one place. When you’re juggling multiple courses with different deadlines, having a centralized location for all your work is a lifesaver. No more searching through old emails or USB drives to find that assignment from three weeks ago.
It also gives you a history of your work. You can see when you completed assignments, what changes you made, and even roll back if you messed something up. I’ve found this incredibly helpful when reviewing for exams or trying to remember how I solved a particular problem.
Then there’s the collaboration aspect. Group projects are way less painful when everyone can work on the same codebase without overwriting each other’s changes. Git handles all of that for you.
Creating a GitLab Account
I’ll walk you through setting up a GitLab account. It’s pretty straightforward.
Step 1: Head to the Sign-Up Page
Go to https://gitlab.com/users/sign_up. You can sign up with your email, or if you already have a Google or GitHub account, you can use those to speed things up.
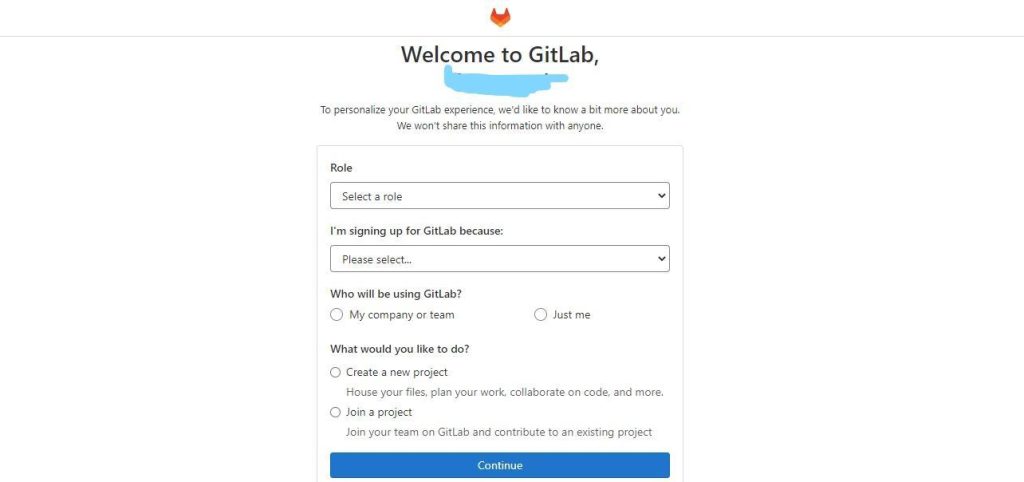
Step 2: Fill in Your Details
Enter your name, email, username, and password. Then click ‘Register.’
Step 3: Verify Your Email
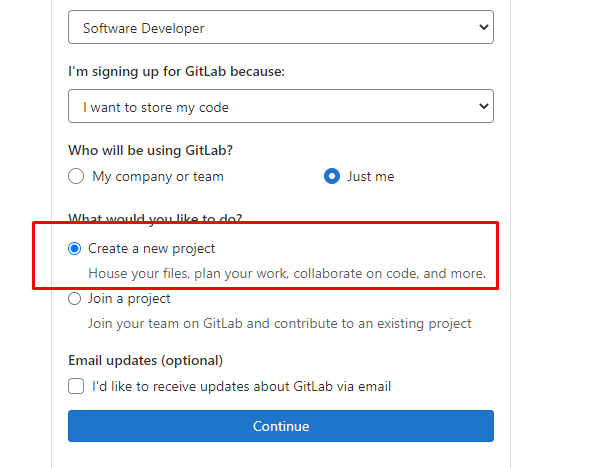
GitLab will send you a confirmation email. Click the link in that email to verify your account. Once that’s done, you can set up your profile if you want — add a profile picture, bio, that sort of thing. It’s optional but nice if you’re collaborating with others.
Step 4: Create Your First Project
After you verify your email, GitLab will ask what you want to do. Choose ‘Create a new project’ and click ‘Continue.’
Setting Up Your First Project
Now you’ll see the project creation screen. A project is basically a repository where you’ll store your work.
Fill in the project name. You can leave it as a personal project or add it to a group if you’re working with a team. For your first project, just keep it simple — make it a personal project with a clear name like ‘CS101-Assignments’ or whatever makes sense for your coursework.
Click ‘Create project’ and you’re done.
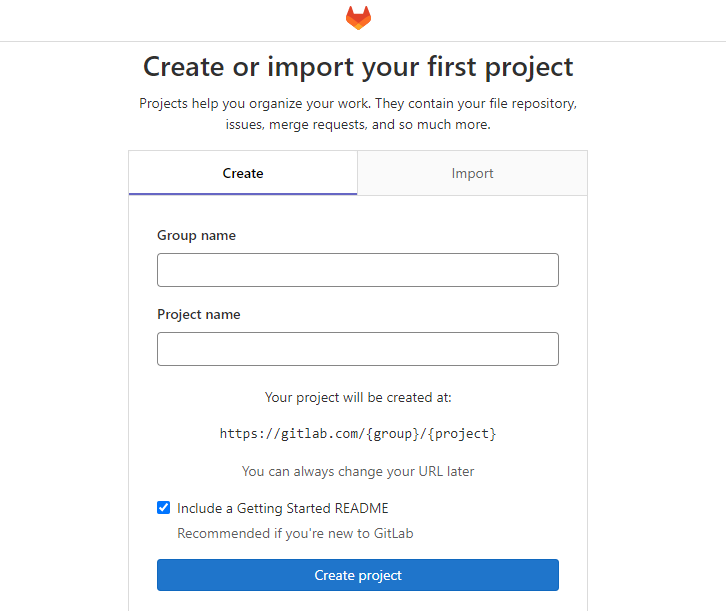
GitLab will show you your project URL. You’ll need this when you’re cloning the repository to your local machine or setting up VS Code to work with Git.
Understanding Permissions
Before you start inviting teammates, you should understand how GitLab permissions work. Each person you add to a project has a specific role that determines what they can do.
Here are the main roles:
- Guest: Can view the project and leave comments, but can’t push code
- Reporter: Can create issues and manage merge requests, but still can’t push code
- Developer: Can push code and manage branches
- Maintainer: Can do everything a developer can do, plus manage project settings
- Owner: Full control over the project (only available at the group level)
For most student projects, you’ll want to give your teammates Developer or Maintainer access. That way everyone can contribute code without constantly asking for permissions.
One thing to note: if someone is in both your project and your project’s group, they get the higher permission level. Also, when a team member leaves a project, any merge requests or issues assigned to them get unassigned automatically.
Adding Teammates to Your Project
Working with others? Here’s how to add them to your project.
Step 1: Open your project in GitLab. On the left sidebar, you’ll see ‘Project Information.’ Click that, then select ‘Members.’
Step 2: Click the ‘Invite members’ button.
Step 3: Enter your teammate’s email address. They’ll need an existing GitLab account, or they’ll be prompted to create one when they accept the invitation.
Step 4: Choose their role. For most student projects, ‘Developer’ or ‘Maintainer’ works well.
Step 5: Optionally, set an access expiration date. This is useful if you want to limit how long someone has access — handy for semester-long projects.
Step 6: Click ‘Invite.’
Your teammate will get an email with the invitation. If they don’t accept it right away, GitLab sends reminder emails after a few days. Invitations expire after 90 days if not accepted.
Importing Members from Another Project
If you’ve already worked with someone on a different GitLab project, you can import them instead of sending individual invitations.
Step 1: Go to your project’s Members page (Project Information > Members).
Step 2: Click ‘Import members.’
Step 3: Select the project you want to import members from. You’ll only see projects where you have Maintainer or Owner permissions.
Step 4: Click ‘Import members.’
The imported members keep their permissions from the original project. Refresh the page and you’ll see them listed in your project’s members.
What About GitLab for Education?
If you’re a student, you should check out GitLab for Education. They offer free GitLab Ultimate licenses to students, which gets you:
- Unlimited private repositories
- More CI/CD minutes per month
- Advanced security features
- Better collaboration tools
You’ll need to verify your student status (usually with a .edu email or student ID), but it’s worth it if you’re planning to use GitLab heavily for your coursework.
Cleaning Up Old Projects
As you move through your courses, you’ll accumulate projects. When a semester ends, you might want to delete projects you no longer need. Just be careful — once you delete a project, it’s gone for good (unless you’re on a paid plan with recovery options).
Getting Started
That’s really all there is to it. Create your account, set up a project, invite your teammates if you’re working in a group, and start coding. Git takes a bit of getting used to, but once you understand the basics, you’ll wonder how you managed coursework without it.
If you run into issues, GitLab’s documentation is pretty thorough, and there are tons of tutorials online. Don’t be afraid to experiment — that’s how you learn.
Explore more like this

Pulumi vs Terraform: The Real Infrastructure as Code Tradeoffs
Pulumi vs Terraform is usually framed as “real programming languages versus HCL.” That framing is useful for about five minutes, then it starts hiding the real decision.

Kafka vs Apache Pulsar: Usability, Workflows, Tradeoffs, and Paradoxes
Kafka vs Apache Pulsar is no longer a simple “streaming log versus cloud-native queue” debate. That shortcut used to be useful, but it is now too shallow for real platform...


Comments