How to use Sonarqube with Docker and Maven
I’ve been using SonarQube with Docker and Maven for years, and it’s still my go-to setup for local development. Let me walk you through how I run it without spending hours on installation and configuration.
What is SonarQube?
According to Wikipedia:
SonarQube is an open-source platform developed by SonarSource for continuous inspection of code quality to perform automatic reviews with static code analysis to detect bugs, code smells, and security vulnerabilities on 20+ programming languages.
Why I Use SonarQube
Developers face tight deadlines. We cut corners on code quality, leave bugs, duplicate code, and create unnecessary complexity. We forget to close connections, leave unused variables, and accumulate technical debt.
SonarQube catches these issues automatically. It identifies bugs, warns developers before production releases, and highlights complex areas that lack unit test coverage. It reduces software development risk without slowing down delivery.
Editions and Pricing
SonarQube comes in four editions:
- Community Edition (Free and Open Source)
- Developer (Paid)
- Enterprise (Paid)
- Data Center (Paid)
Check current pricing.
The Community Edition works well for getting started, but it has two limitations: it restricts the number of code lines analyzed across your entire SonarQube instance, and C++ and C# analysis requires at least the Developer Edition.
The Community Edition also supports JavaScript projects. If you want to learn how to analyze JavaScript, check out our guide.
Source Code
SonarQube source code is open-source. You can modify it for your needs and find it on GitHub.
Installation Options
SonarQube has three components:
- The SonarQube server runs:
- A web server for the user interface
- A search server based on Elasticsearch
- A compute engine that processes code analysis reports and saves them to the database
- The database stores:
- Metrics and issues from code scans
- SonarQube instance configuration
- Scanners run on your build or CI servers to analyze projects
The easiest way I’ve found to run SonarQube is with Docker Compose on Linux. You define two components in a YAML file and run locally without extra configuration. The Docker version includes an embedded database, but I don’t recommend that for production because it limits performance and upgrade flexibility.
Other installation options include:
- Running as a service on Windows
- Deploying on a Kubernetes Cluster
Docker Image
Pull the latest image from DockerHub:
docker pull sonarqube:10.4.1-community
If you always want the latest version:
docker pull sonarqube:latest
Note: In production scripts, always specify a tested version. Avoid docker pull sonarqube:latest in automated pipelines.
If you want to build your own image, here’s a Dockerfile example:
SonarQube Dockerfile
FROM openjdk:11-jre-slim
RUN apt-get update \
    && apt-get install -y curl gnupg2 unzip \
    && rm -rf /var/lib/apt/lists/*
ENV SONAR_VERSION=7.9.6 \
    SONARQUBE_HOME=/opt/sonarqube \
    SONARQUBE_JDBC_USERNAME=sonar \
    SONARQUBE_JDBC_PASSWORD=sonar \
    SONARQUBE_JDBC_URL=""
# Http port
EXPOSE 9000
RUN groupadd -r sonarqube && useradd -r -g sonarqube sonarqube
# pub   2048R/D26468DE 2015-05-25
#       Key fingerprint = F118 2E81 C792 9289 21DB  CAB4 CFCA 4A29 D264 68DE
# uid                  sonarsource_deployer (Sonarsource Deployer) <[email protected]>
# sub   2048R/06855C1D 2015-05-25
RUN for server in $(shuf -e ha.pool.sks-keyservers.net \
                            hkp://p80.pool.sks-keyservers.net:80 \
                            keyserver.ubuntu.com \
                            hkp://keyserver.ubuntu.com:80 \
                            pgp.mit.edu) ; do \
        gpg --batch --keyserver "$server" --recv-keys F1182E81C792928921DBCAB4CFCA4A29D26468DE && break || : ; \
    done
RUN set -x \
    && cd /opt \
    && curl -o sonarqube.zip -fSL https://binaries.sonarsource.com/Distribution/sonarqube/sonarqube-$SONAR_VERSION.zip \
    && curl -o sonarqube.zip.asc -fSL https://binaries.sonarsource.com/Distribution/sonarqube/sonarqube-$SONAR_VERSION.zip.asc \
    && gpg --batch --verify sonarqube.zip.asc sonarqube.zip \
    && unzip -q sonarqube.zip \
    && mv sonarqube-$SONAR_VERSION sonarqube \
    && chown -R sonarqube:sonarqube sonarqube \
    && rm sonarqube.zip* \
    && rm -rf $SONARQUBE_HOME/bin/*
VOLUME "$SONARQUBE_HOME/data"
WORKDIR $SONARQUBE_HOME
COPY run.sh $SONARQUBE_HOME/bin/
USER sonarqube
ENTRYPOINT ["./bin/run.sh"]
Docker Compose with Embedded Database
This example uses the embedded database (good for testing, not production):
version: "3"
services:
  sonarqube:
    image: sonarqube:10.4.1-community
    ulimits:
      nofile:
        soft: "65536"
        hard: "65536"
    volumes:
      - sonarqube_conf:/opt/sonarqube/conf
      - sonarqube_data:/opt/sonarqube/data
      - sonarqube_extensions:/opt/sonarqube/extensions
    ports:
      - "9000:9000"
volumes:
  sonarqube_conf:
  sonarqube_data:
  sonarqube_extensions:
This configuration sets a file descriptor limit of 65536, which SonarQube requires because it uses an embedded Elasticsearch.
If you see this error:
max virtual memory areas vm.max_map_count [65530] is too low, increase to at least [262144]
Fix it on Linux with:
sudo su
sysctl -w vm.max_map_count=262144
sysctl -w fs.file-max=65536
ulimit -n 65536
ulimit -u 65536
Docker Compose with External Database
For production, use an external database:
version: "3"
services:
  sonarqube:
    image: sonarqube:10.4.1-community
    depends_on:
      - db
    environment:
      SONAR_JDBC_URL: jdbc:postgresql://db:5432/sonar
      SONAR_JDBC_USERNAME: sonar
      SONAR_JDBC_PASSWORD: sonar
    ulimits:
      nofile:
        soft: "65536"
        hard: "65536"
    volumes:
      - sonarqube_conf:/opt/sonarqube/conf
      - sonarqube_data:/opt/sonarqube/data
      - sonarqube_extensions:/opt/sonarqube/extensions
    ports:
      - "9000:9000"
  db:
    image: postgres:12
    environment:
      POSTGRES_USER: sonar
      POSTGRES_PASSWORD: sonar
      PGDATA: /var/lib/postgresql/data/pgdata
    volumes:
      - postgres_data:/var/lib/postgresql/data
volumes:
  sonarqube_conf:
  sonarqube_data:
  sonarqube_extensions:
  postgres_data:
Configure these environment variables:
SONAR_JDBC_URL
SONAR_JDBC_USERNAME
SONAR_JDBC_PASSWORD
I’ve tested this configuration with Postgres 9.12 on AWS RDS, and it works well.
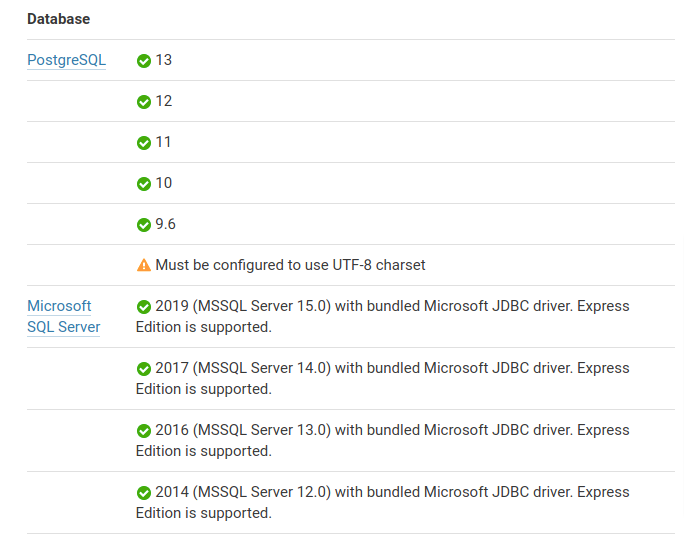
MySQL Support
Newer SonarQube versions don’t support MySQL. Here are the currently supported databases:
Running with Docker Run
If you don’t want to use Docker Compose:
mkdir -p ./opt/sonarqube/conf
mkdir -p ./opt/sonarqube/data
mkdir -p ./opt/sonarqube/logs
mkdir -p ./opt/sonarqube/extensions
export SONARQUBE_DIR=$(pwd)/opt

docker run --detach \
  -p 9000:9000 \
  --name sonarqube \
  --rm \
  --stop-timeout 3600 \
  -v $SONARQUBE_DIR/conf:/opt/sonarqube/conf \
  -v $SONARQUBE_DIR/logs:/opt/sonarqube/data \
  -v $SONARQUBE_DIR/data:/opt/sonarqube/logs \
  -v $SONARQUBE_DIR/extensions:/opt/sonarqube/extensions \
sonarqube:10.4.1-community
Now you can manage the container:
docker stop sonarqube
docker restart sonarqube
Enabling HTTPS
SonarQube doesn’t handle HTTPS directly. You need to create an HTTPS reverse proxy using Nginx or Apache2. For local testing, HTTP is fine, but production requires HTTPS.
I created a Docker container using Apache2 for this. You can find the code in our repository.
Mount the certificates volume:
# Build the Container
cd sonarqube-https-apache2
docker build -t sonarqube-bitslovers-http-proxy:v1 .
# Run the container
docker run -d -v /root/certs:/etc/apache2/certs --rm -it sonarqube-bitslovers-http-proxy:v1
The /root/certs folder should contain:
server.crt
server.pem
chain.pem
The proxy forwards requests from SonarQube port 9000 to port 80 (HTTP) and 443 (HTTPS).
If you don’t have certificates, issue them for free using Let’s Encrypt.
If you’re deploying on AWS with a Load Balancer, handle SSL at the LB level.
Initial Configuration
SonarQube needs minimal configuration to start scanning:
- Create a user token (see below)
- Set up users, groups, and permissions
- Create a Quality Gate for your project or use the default
If you don’t assign a specific Quality Gate, SonarQube uses the global one.
Change the default password immediately:
Default admin credentials:
- Username:
admin - Password:
admin
Analyzing Your Project
For authentication, you need a token to call SonarQube from your pipeline. If you see “maven sonar not authorized” or “Not authorized. Analyzing this project requires authentication. Please provide a user token in sonar.login or other credentials in sonar.login and sonar.password.”, you need to create a token.
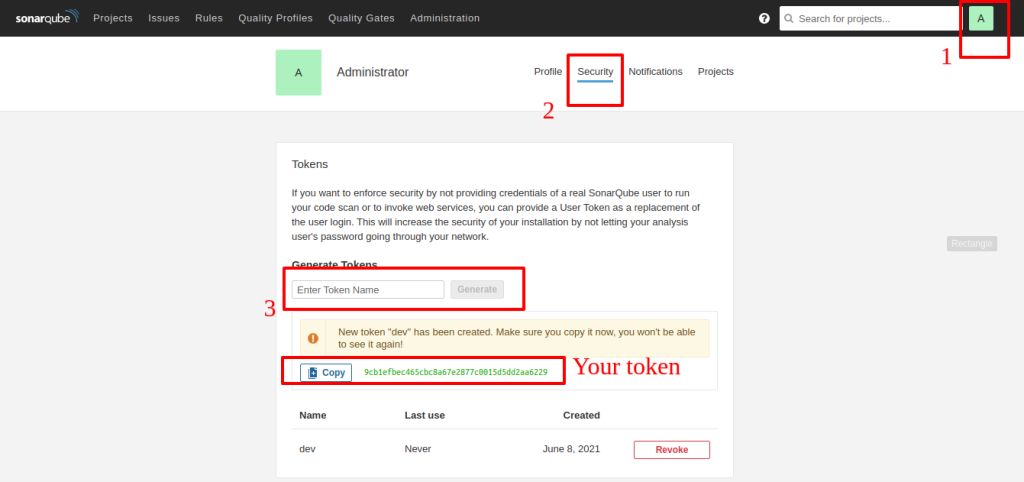
Creating a Token
Go to User > My Account > Security. Click Generate and copy the token immediately. Once you dismiss the notification, you can’t recover it.
Creating a Project
SonarQube creates projects automatically on the first analysis. But if you want to configure settings before the first scan, create it manually via Administration or the + menu.
Maven Integration
To integrate with Maven, create a Maven profile and specify the goal. You have two options:
- Add the profile to each project’s
pom.xml - Add it globally to
~/.m2/settings.xml(better if you have many projects)
Here’s the global settings.xml configuration:
<settings>
    <pluginGroups>
        <pluginGroup>org.sonarsource.scanner.maven</pluginGroup>
    </pluginGroups>
    <profiles>
        <profile>
            <id>sonar</id>
            <activation>
                <activeByDefault>true</activeByDefault>
            </activation>
            <properties>
                <!-- Optional URL to server. Default value is http://localhost:9000 -->
                <sonar.host.url>
                  http://myserver:9000
                </sonar.host.url>
                <sonar.login>
                  93744265cebbe989946c0250b96c09fa8b20732b
                </sonar.login>
                <sonar.scm.provider>
                  git
              	</sonar.scm.provider>
            </properties>
        </profile>
     </profiles>
</settings>
Replace myserver:9000 with your server and port, and update the sonar.login token.
The sonar.scm.provider assumes Git, but change it if you use something else.
Running Analysis
Analyze a Maven project by running the sonar:sonar goal from the directory containing your pom.xml:
mvn sonar:sonar
If your settings.xml is configured:
mvn clean verify sonar:sonar
Without Global Configuration
If you don’t want to edit settings.xml:
mvn sonar:sonar \
  -Dsonar.projectKey=Devops-API \
  -Dsonar.host.url=http://myserver:9000 \
  -Dsonar.scm.provider=git \
  -Dsonar.login=93744265cebbe989946c0250b96c09fa8b20732b
Quality Gates
Quality gates are acceptance criteria that projects must meet. SonarQube comes with predefined quality gates, but I recommend creating custom ones for your specific needs.
When you integrate SonarQube into your pipeline, the analysis results in two outcomes:
- Project meets all Quality Gate criteria → pipeline continues
- Project fails at least one criterion → pipeline should fail
By default, SonarQube and Maven don’t fail the build if Quality Gates fail. To enforce this, add:
-Dsonar.qualitygate.wait=true -Dsonar.qualitygate.timeout=3000
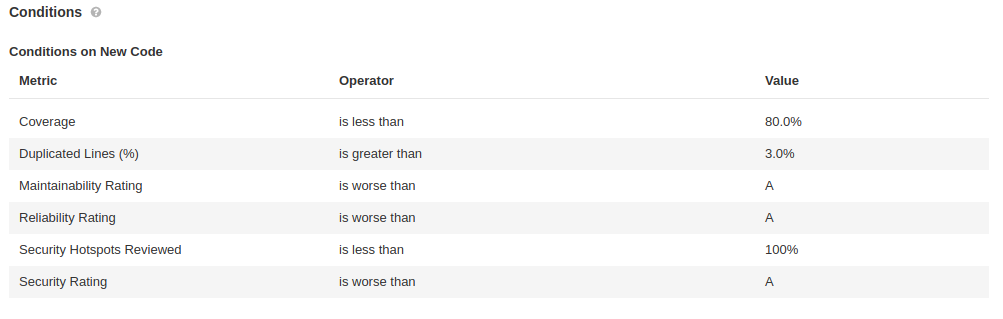
Sonarqube Conditions on New Code
Available Quality Gate conditions include:
Added Technical Debt<br></br>Blocker Issues<br></br>Bugs<br></br>Code Smells<br></br>Cognitive Complexity<br></br>Complexity / Class<br></br>Complexity / File<br></br>Complexity / Function<br></br>Complexity in Classes<br></br>Complexity in Functions<br></br>Condition Coverage<br></br>Condition Coverage on New Code<br></br>Critical Issues<br></br>Duplicated Blocks<br></br>Duplicated Blocks on New Code<br></br>Duplicated Files<br></br>Duplicated Lines<br></br>Major Issues<br></br>Minor Issues<br></br>New Blocker Issues<br></br>New Bugs<br></br>New Code Smells<br></br>New Critical Issues<br></br>New Security Hotspots<br></br>New Vulnerabilities<br></br>Public Undocumented API<br></br>Reliability Rating<br></br>Security Rating on New Code<br></br>Skipped Unit Tests<br></br>Technical Debt<br></br>Unit Test Errors<br></br>Unit Test Failures<br></br>Unit Test Success (%)<br></br>Vulnerabilities
Learn more about Quality Gates.
Jenkins Integration
Running scans locally works, but integrating SonarQube into your CI pipeline ensures code quality before deployment. For Jenkins, use the SonarQube Scanner plugin.
The plugin provides:
- SonarQube server configuration – stores server location and credentials
- SonarQube Quality Gate webhook – notifies Jenkins when analysis completes so the pipeline can pass or fail
Here’s how the flow works:
- Jenkins pipeline starts
- SonarQube scanner runs and sends the report to the server
- SonarQube analyzes and checks Quality Gate compliance
- SonarQube sends the result back to Jenkins via webhook
- Pipeline continues or fails based on the result
No Jenkins Plugin Required
You don’t actually need the Jenkins plugin. You can use the Maven plugin directly in your pipeline by configuring pom.xml or settings.xml on your Jenkins agent.
GitLab Integration
Integrating SonarQube with GitLab is straightforward and doesn’t require plugins. Configure your pom.xml or settings.xml (ideally on your Runner) to call SonarQube. I’ll cover this in more detail in a future post.
Conclusion
SonarQube with Docker and Maven is my favorite combination for local development. This tutorial covers the essentials, but there’s much more you can do. We’re preparing more content on advanced scenarios, so stay tuned.
We covered analyzing Java code with Maven, but you can also use Gradle.
For other languages like C#, C++, or JavaScript, use the SonarQube scanner CLI. Learn more in our JavaScript guide.
Join our telegram channel or Twitter for updates!
Explore more like this

Terraform State Locking with S3 and DynamoDB in 2026
The moment two engineers run terraform apply at the same time without state locking, you have a race condition that can corrupt your entire infrastructure state. Both processes read the...

GitLab CI Environments and Review Apps in 2026
Review apps changed how my team does code review. Instead of reading diffs, reviewers click a link and see the actual change running. The designer can verify spacing on the...


Comments