Run Terraform from Gitlab CI
Gitlab, a tool that delivers much more besides a code repository, allows us to build our application and execute any deployment.
The technologies of Infrastructure as Code have facilitated our DevOps Engineer lives. As it is easy to deploy Cloud Formation using Gitlab, we can also deploy using Terraform.
Why Run Terraform from Gitlab CI?
You may be thinking, why use Gitlab to deploy Terraform scripts? It’s already easy to execute it locally.
Let’s see some scenarios where using Gitlab with Terraform could be a lot easier than executing locally.
First, imagine medium or large corporations with a vast team deploying their applications several times by day.
The Terraform State
If you have already used Terraform for a while, you may notice that Terraform has a lot of released versions. The Terraform State is directly affected by the Terraform version.
In other words, if you generate or update a remote state built using terraform 1.29.9, and later someone updates the state with a newer version, 1.30.1, everybody will need to update their local computer to install the more recent version.
Can you imagine the nightmare for a big team?
Also, performing deployments using GitLab gives visibility of who and when a person did the deployments, the logs from all plans, and applying execution to track all processes.
Another advantage is that it allows anyone to execute a deployment without even knowing how to perform it. So, for example, if you have a complex script that requires a lot of variables and parameters, once it is automated, anyone can trigger it and doesn’t need to know all details about it.
Le’s build a pipeline that executes the Plan, Apply, and Destroy phase.
Terraform Gitlab CI YML
variables:
  AWS_REGION: us-east-1
  PHASE: BUILD
before_script:
  - apk add --no-cache curl jq python2 py-pip git
  - pip install awscli
  - aws configure set region ${AWS_REGION}
stages:
  - plan
  - deploy
Plan:
  image:
    name: hashicorp/terraform:0.14.4
    entrypoint: [""]
  stage: plan
  artifacts:
    paths:
    - plan.bin
    - app_config.zip
    expire_in: 2 week
  script:
    - terraform --version
    - terraform init
    - terraform plan -input=false -out=plan.bin
  only:
    variables:
      - $PHASE == "BUILD"
Apply:
  image:
    name: hashicorp/terraform:0.14.4
    entrypoint: [""]
  when: manual
  stage: deploy
  script:
    - terraform init
    - terraform apply -auto-approve -input=false plan.bin
  only:
    variables:
      - $PHASE == "BUILD"
  environment:
    name: snunv
Destroy:
  image:
    name: hashicorp/terraform:0.14.4
    entrypoint: [""]
  stage: deploy
  script:
    - terraform init
    - terraform destroy -auto-approve
  only:
    variables:
      - $PHASE == "DESTROY"
  environment:
    name: snunv
    action: stop
On this terraform Gitlab CI example, for best practices, you will notice that phase Apply and Destroy trigger manually, and also, they are separated into a different stages. Why?
Let’s suppose that you are updating the Terraform scripts, and you would like to commit your changes without deploying them yet. So, when you commit, the Plan will be automatically executed, validating your changes, and if you feel ready to deploy your changes, you can easily trigger the Apply.
Gitlab Terraform Destroy – The Destroy Phase
Executing the Destroy phase in your environment could be catastrophic if you trigger it by mistake. So, protecting your environment requires an extra step to run, but it is still an easy process. Let’s see how.
On your project, go to the Pipeline page and click on the button “Run Pipeline.”
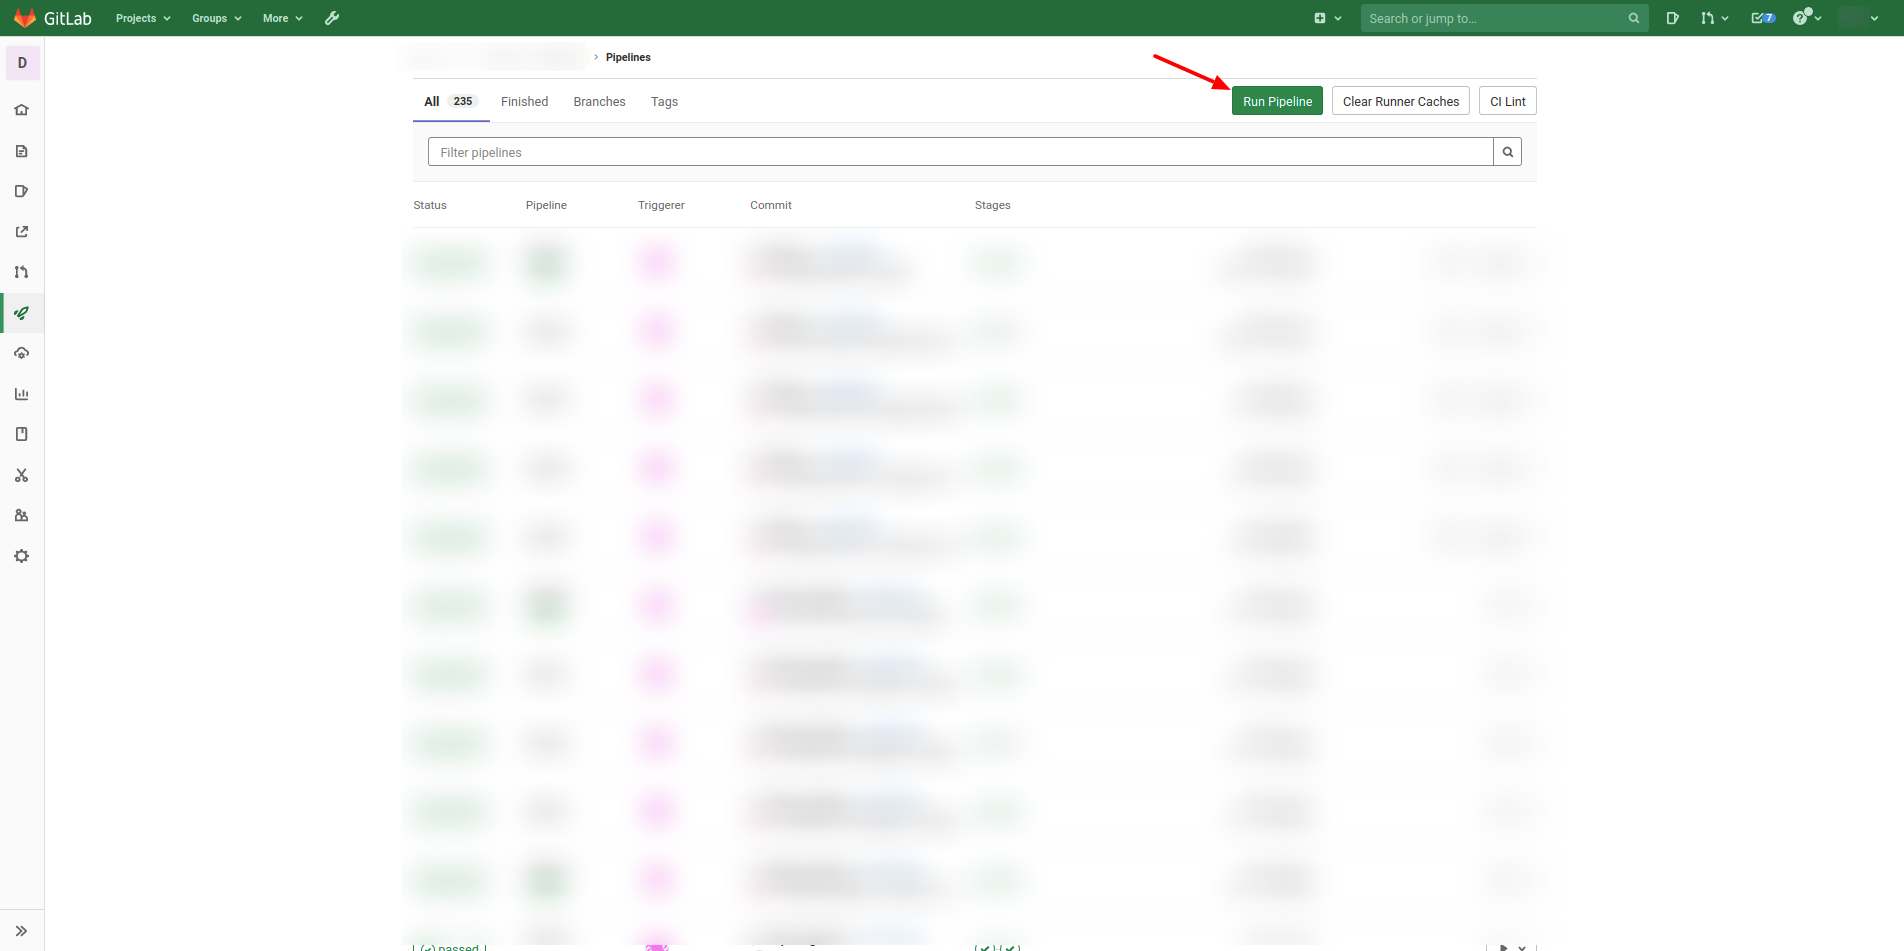 Later you need to select the branch that you would like to execute the pipeline. And for last, you need to specify a key and value for the variable that will trigger and select the logic to destroy our resources.
 For the CI Variable key, put “PHASE,” and for it, the value, put “DESTROY,” then click on “Run Pipeline” and follow the logs. See our tutorial about CI Variables and create your own variables for your needs.
From Docker Hub, you can find all tags for all released versions of the Terraform. And I recommend not using the tag “latest” on your pipeline because it changes so often.
Conclusion
Run Terraform from Gitlab CI. It’s an easy process that helps DevOps Engineers to be more productive.
That is all for this post; it’s a small post but very straightforward.
Boost your Terraform skills:
Split your resources using Terraform Modules, and improve the usability and maintainability.
How to create complex expressions using Terraform Template.
What is the difference between Locals and Terraform Variables?
How to use the Terraform Data on your modules.
What are the advantages of Terraform Output?
Learn how to create multiple copies from the same resource on Terraform.
How to create a Pipeline on Gitlab to execute a Terraform code?
Please check our other posts related to Gitlab:
How to use the Gitlab CI Variables
Effective Cache Management with Maven Projects on Gitlab.
Pipeline to build Docker in Docker on Gitlab.
How to Autoscaling the Gitlab Runner.
How to execute Cloud Formation on Gitlab.
Explore more like this
DevOps for Microservices: Enhancing Scalability in Startup Environments
In the dynamic and competitive landscape of startups, the strategic integration of microservices architecture with DevOps practices has emerged as a pivotal driver for achieving scalability, flexibility, and operational efficiency....

Microservices vs Monolithic Architectures
In the ever-evolving world of software development, choosing the right architectural style can make or break your project. Do you opt for the venerable monolithic architecture, with its sturdy and...


Comments