Autoscaling GitLab CI on AWS Fargate
I have been running GitLab CI at scale for a while now, and one thing I keep running into is the need for more hardware as applications get more complex. Scaling the release process is where things get interesting.
GitLab has a nice way of handling this. It decouples the build process from the GitLab server using a component called a Runner, which is basically a separate machine that handles builds. GitLab calls the Runner whenever a pipeline needs to run.
In this post I want to share how I scaled the build process on AWS Fargate without spending a fortune.
What is AWS Fargate?
Here is a short video that explains the basics:
When to Use Autoscaling GitLab CI on AWS Fargate
Why scale at all? If you have a team of any size, you have probably seen GitLab get bogged down with multiple pipelines firing off at once. Compilation steps for Node.js, C++, or Java eat resources fast. QA teams running Cypress in headless mode with parallel threads are the worst offenders. When everyone starts building at the same time, the whole team feels it.
And pipelines are not just about building code. You might have deployment stages for Development, Testing, or Production all hitting the same Runner. For a large DevOps team, that is a bottleneck.
GitLab itself handles this fine because the actual work happens on the Runner, not on GitLab. The bottleneck is the Runner. That is what we need to scale.
Autoscaling GitLab Runner on AWS: Alternatives
You can set up a Runner on GitLab a few different ways. When it comes to AWS Fargate specifically, there are two main approaches.

The first approach runs entirely on Fargate but still needs a Runner server on a regular EC2 instance with a Fargate Driver. When you push a commit, GitLab tells the Runner to start the pipeline, and the Runner creates a Fargate Task with a Container to execute the job. The Runner talks to the Executor over SSH.
GitLab Runner on AWS Fargate: Important Notes
This approach has a dealbreaker: no Docker-in-Docker support. If you do not need that, it might work for you. But I wanted something more flexible, so let me show you a different approach.
A Better Solution: Autoscaling GitLab CI on AWS Fargate
The approach I prefer also uses Fargate, but the Runner itself runs serverless. No EC2 instance to manage. You still register it on GitLab the usual way.
And unlike the first approach, this one supports Docker-in-Docker builds.
The way it works is straightforward: when you trigger a pipeline, the Runner spins up an EC2 instance (called the Executor) on demand to handle the job.
How the Workflow Works
Before I walk through the flow, here is what we are working with:
- GitLab
- One ECS Cluster
- One Docker Image (the Runner) running on Fargate
- An Executor (one or more EC2 instances created on demand by the Fargate Runner)
Here is how they interact:
The Runner lives as a serverless container. It sits there waiting for GitLab to send jobs, and when it gets one, it spins up an Executor to do the actual work.
Let’s say you have “Project B” configured to build an application. You trigger the build, GitLab figures out which Runner to use, and sends an API request.
In this setup, the Runner is not a traditional server. It is a container that runs 24/7, waiting. Registration works the same as any other Runner.
The key difference: the build does not run on the Runner. Instead, the Runner creates a temporary Executor just for that job. Everything stays isolated, so builds do not interfere with each other.
When the job finishes, the Executor gets destroyed. Clean slate.
CloudFormation for Autoscaling GitLab CI on AWS Fargate
I put together a CloudFormation template that sets up the ECS Cluster and Fargate Task for you. It takes most of the manual work out of the process.
You can find it on my GitHub:
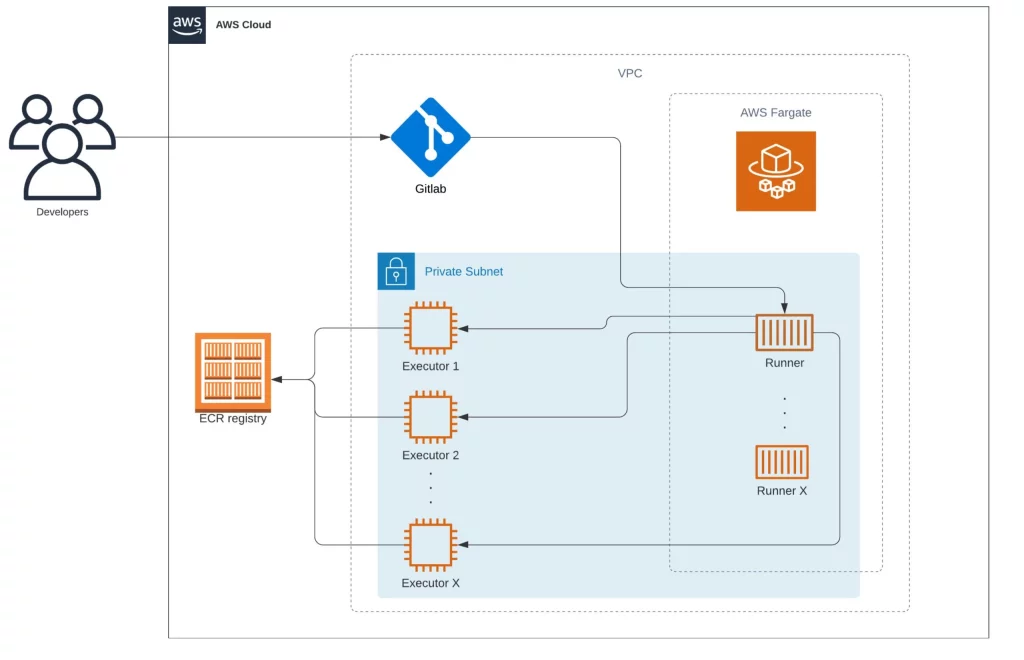
This diagram shows all the resources and how they relate to each other:

Deploying Autoscaling GitLab CI on AWS Fargate Using CloudFormation
You can run the CloudFormation template a few ways: AWS CLI, or upload it through the AWS Console where it gets pushed to a temporary S3 bucket automatically.
Using GitLab to deploy a CloudFormation template:
Personally, I set up a GitLab pipeline that runs the template for me. That way anyone on the team can trigger a deploy. But use whatever method fits your workflow.
The repo has an example .gitlab-ci.yml. It builds a Docker image (the Dockerfile is included), then runs the CloudFormation commands. The sam deploy command at the end passes all the variables from .gitlab-ci.yml into the template using --parameter-overrides:
variables:
  AWS_REGION: us-east-1
  GIT_SSL_NO_VERIFY: "true"
  MODE: BUILD
  STACK_NAME: 'bitslovers-runner-dev'
  VPC_IP: '' #VpcId
  SUBNET: '' #SubnetId
  GITLAB_RUL: 'http://YOUR_GITLAB.COM' #GitLabURL
  GITLAB_TOKEN: '' #GitLabRegistrationToken
  RUNNER_TAG: 'aws-fargate-dev' #RunnerTagList
  DOCKER_IMAGE_DEFAULT: 'alpine:latest' #DockerImageDefault
  DOCKER_IMAGE_RUNNER: 'XXXXXXXX.dkr.ecr.us-east-1.amazonaws.com/ec2-gitlab-runners-fargate:dev' #DockerImageRunner
  AWS_SUBNET_ZONE: 'a' #SubnetZoneEC2Runner

stages:
  - prep
  - deploy

Prep:
  image: docker:latest
  stage: prep
  script:
    - docker build -t build-container .

Deploy:
  image:
    name: build-container:latest
    entrypoint: [""]
  stage: deploy
  script:
    - aws configure set region ${AWS_REGION}
    - sam deploy --template-file template.yml --stack-name $STACK_NAME --capabilities CAPABILITY_NAMED_IAM --region us-east-1 --parameter-overrides VpcId=\"${VPC_IP}\" SubnetId=\"${SUBNET}\" SubnetZoneEC2Runner=\"${AWS_SUBNET_ZONE}\" GitLabURL=\"${GITLAB_RUL}\" GitLabRegistrationToken=\"${GITLAB_TOKEN}\" RunnerTagList=\"${RUNNER_TAG}\" DockerImageRunner=\"${DOCKER_IMAGE_RUNNER}\" RunnerIamRole=\"${RUNNER_IAM_PROFILE}\"
Before Creating the CloudFormation Stack
Before you deploy, you need to fill in some parameters: VPC ID, Subnet ID, Stack name, GitLab URL, GitLab Token, Runner tag, and Docker images. Have a Docker image built and ready before you run the stack. (The Dockerfile is further down in this post.)
A few variables worth explaining:
DOCKER_IMAGE_DEFAULT is the fallback image the Executor loads when your .gitlab-ci.yml does not specify one.
DOCKER_IMAGE_RUNNER is the image that runs inside the Fargate Task. Public or private registry both work. ECR private images are supported.
GITLAB_TOKEN is the registration token. Grab it from https://<your-gitlab-host>/admin/runners.
Important: your GitLab server needs to be reachable from both the Runner and the Executor. Deploying in the same VPC as GitLab makes this easy. Otherwise, check your Security Group rules.
Once the parameters are filled in, the whole deployment takes maybe 30 minutes.
All Resources Created
Once the stack is up, AWS will have created a handful of resources:

Check the ECS Cluster:
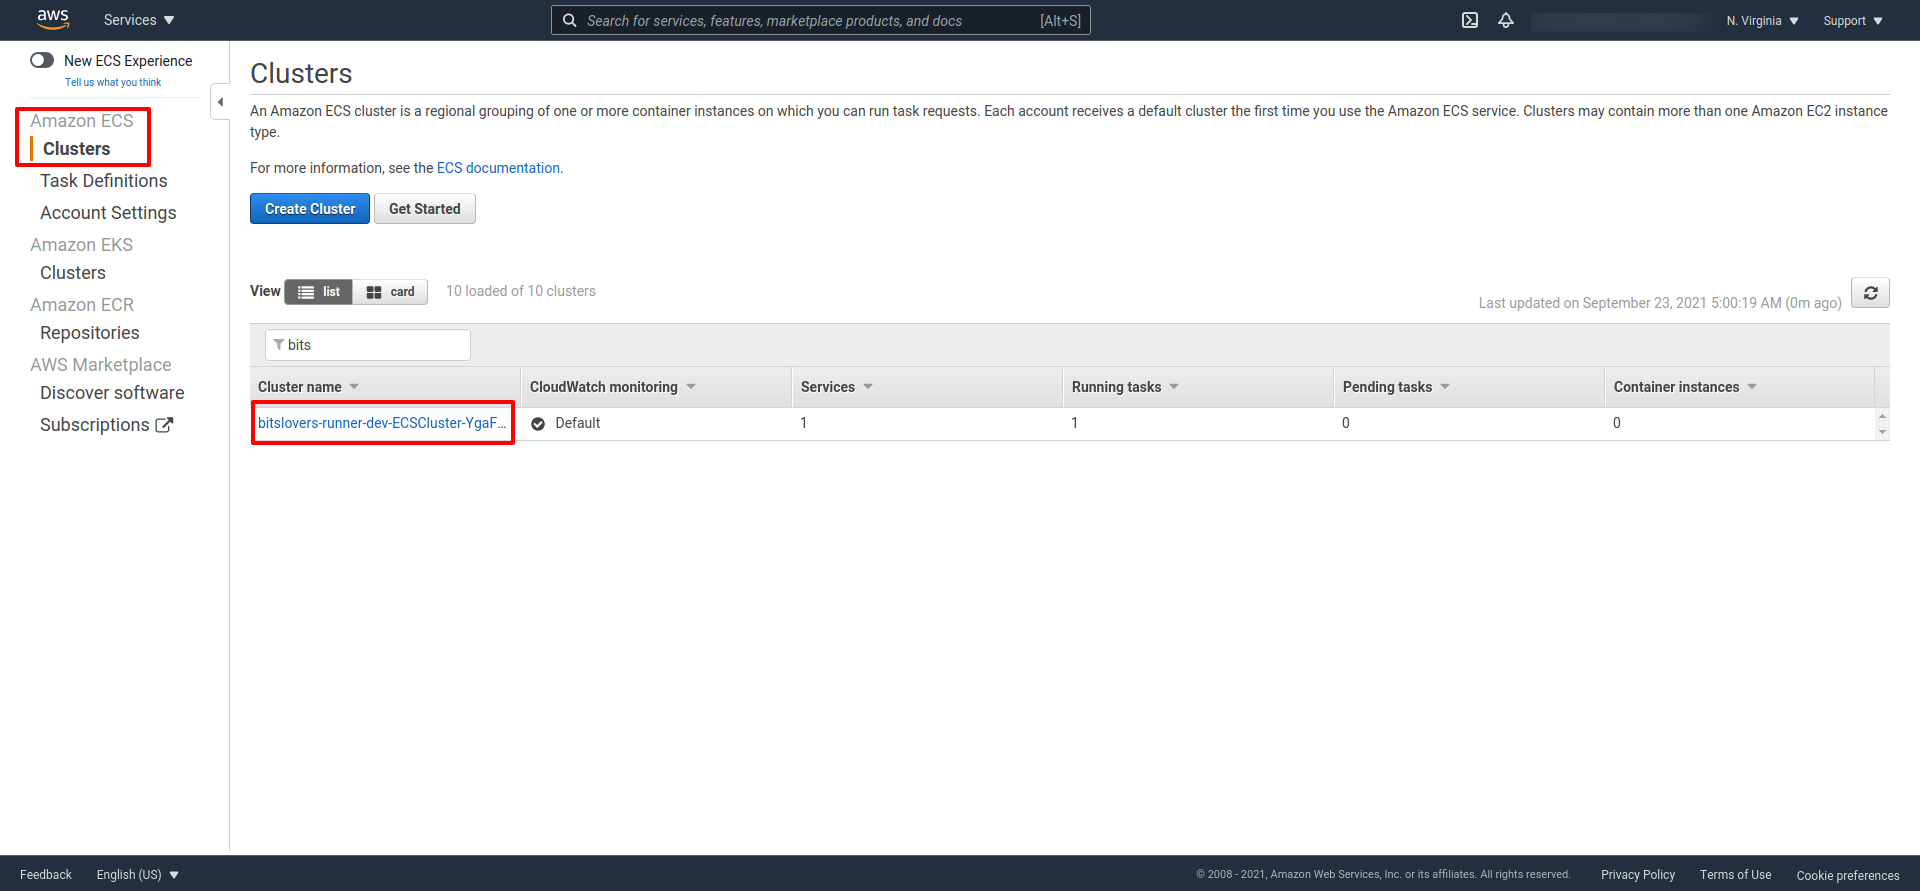
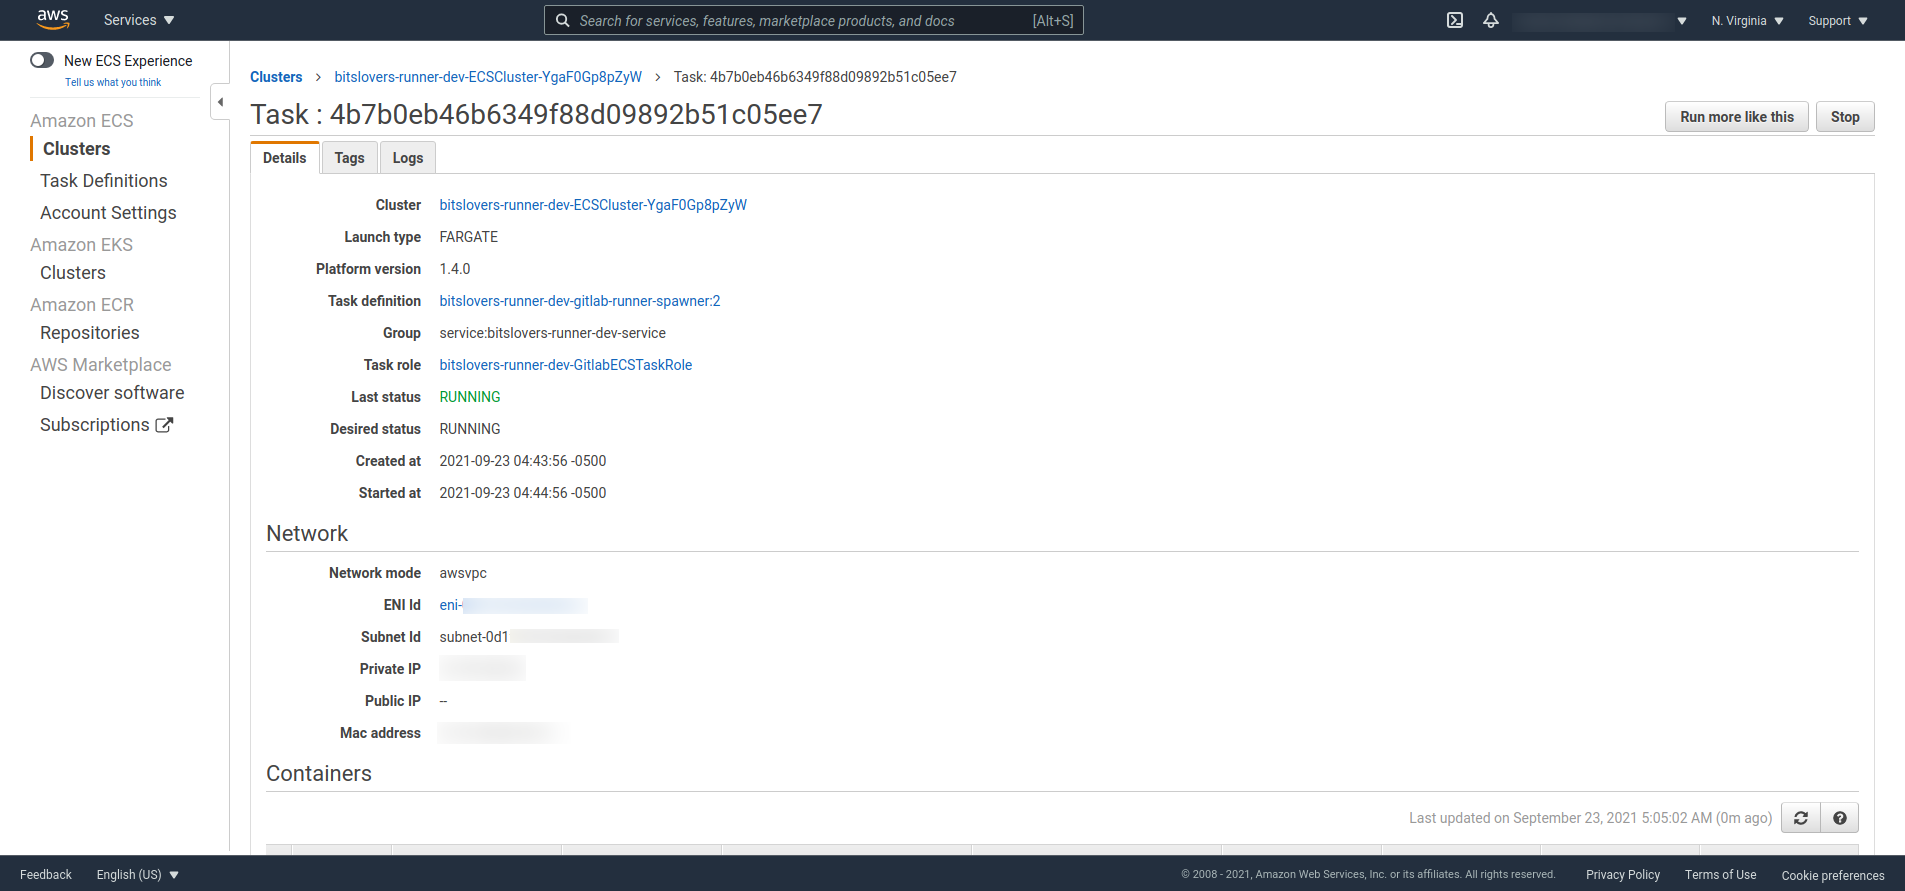
The cluster details should look something like this:
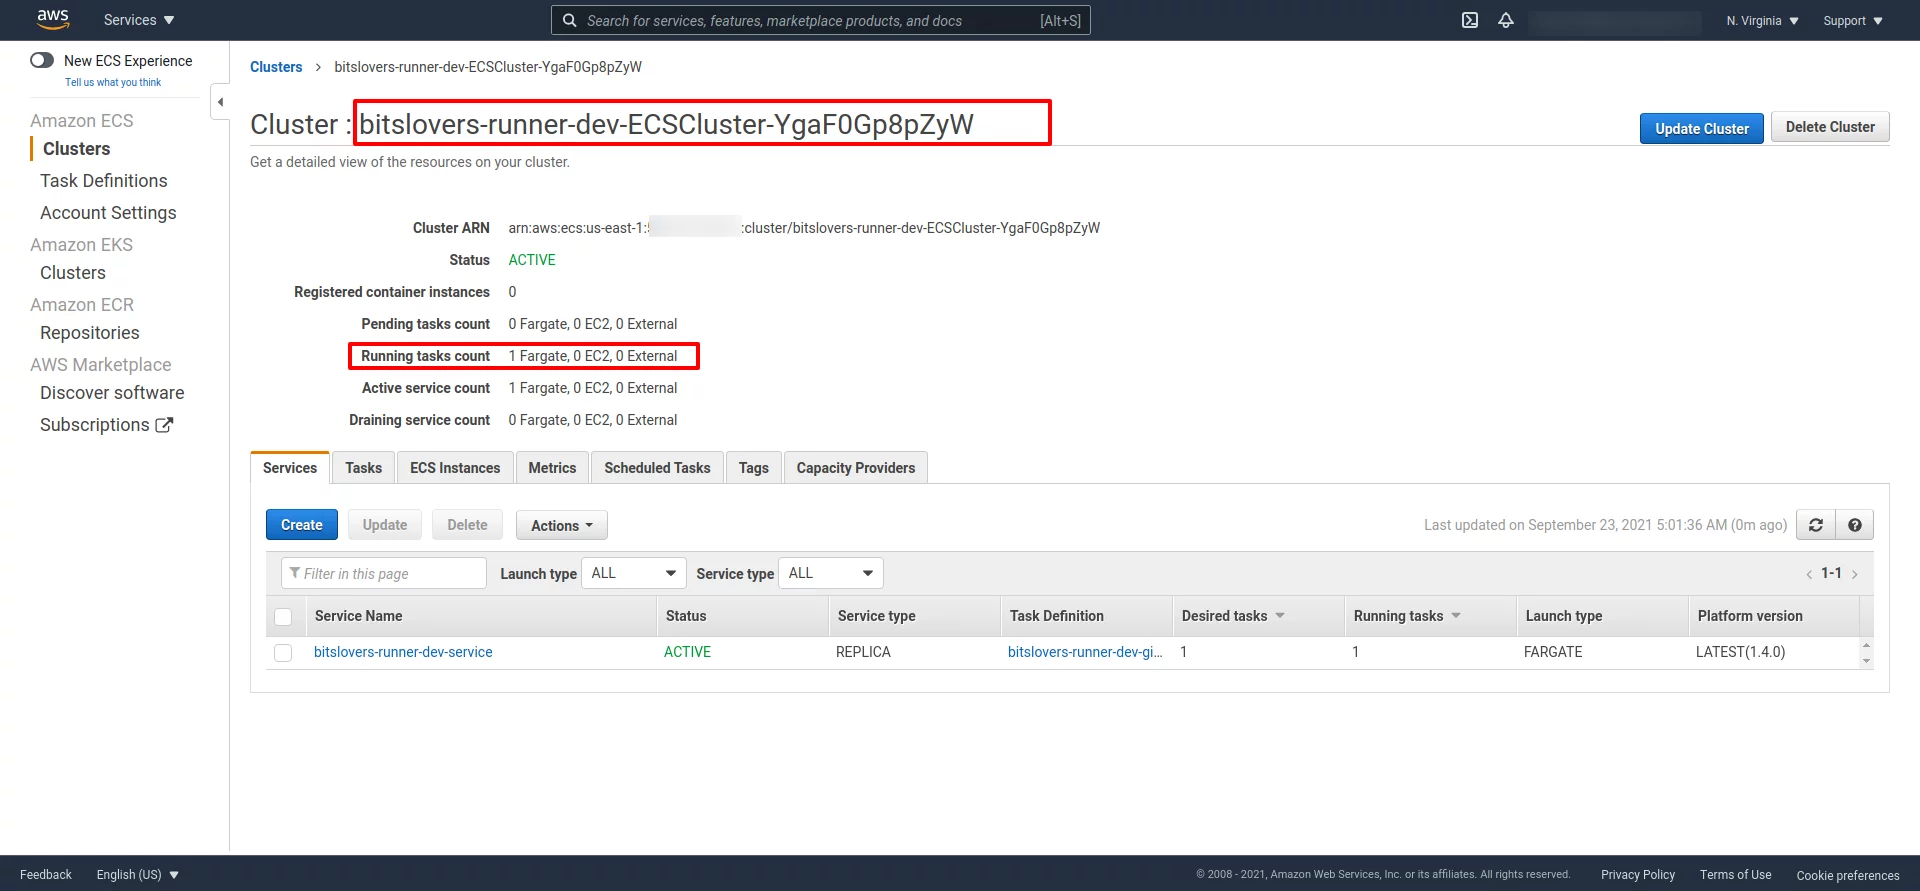
Make sure the Task shows “Running” status:
Troubleshooting the Runner on AWS Fargate
When something goes wrong (registration fails, EC2 does not launch, etc.), go to CloudWatch. The CloudFormation template sets up a log group that captures the registration process and Executor launches.
To find the logs, expand the Task details and look for the CloudWatch link:

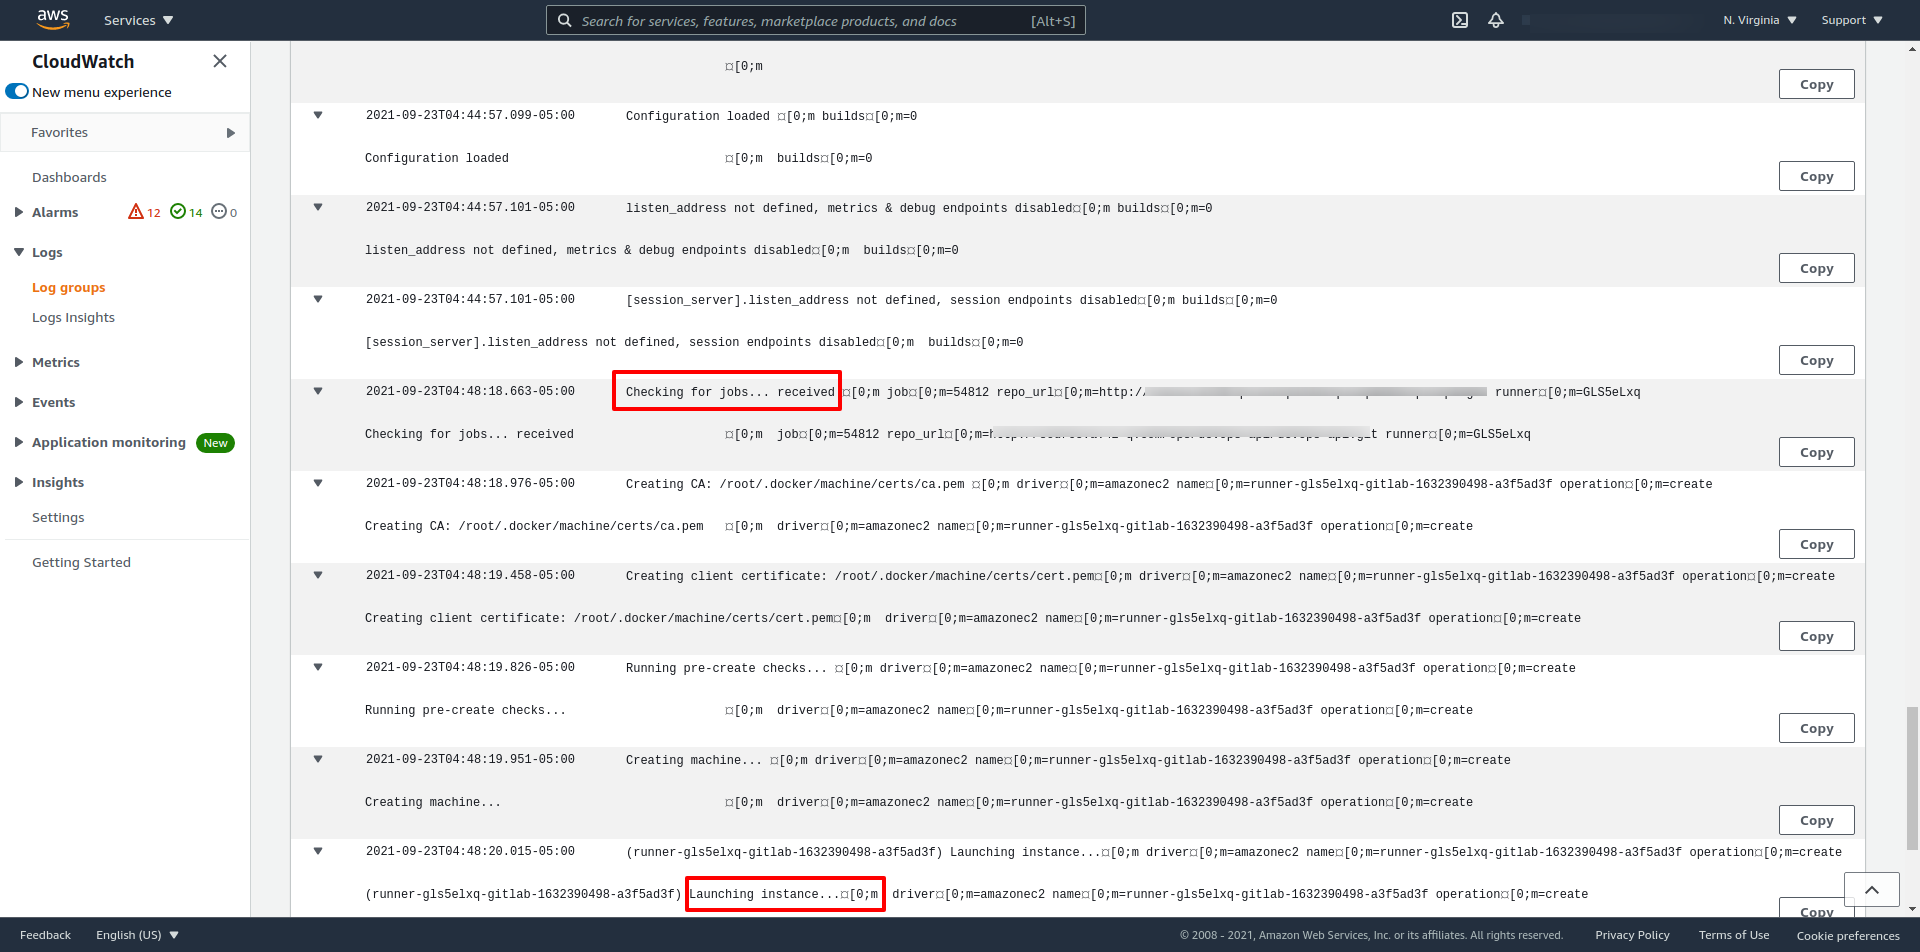
Here is what it looks like when the Runner picks up a job:
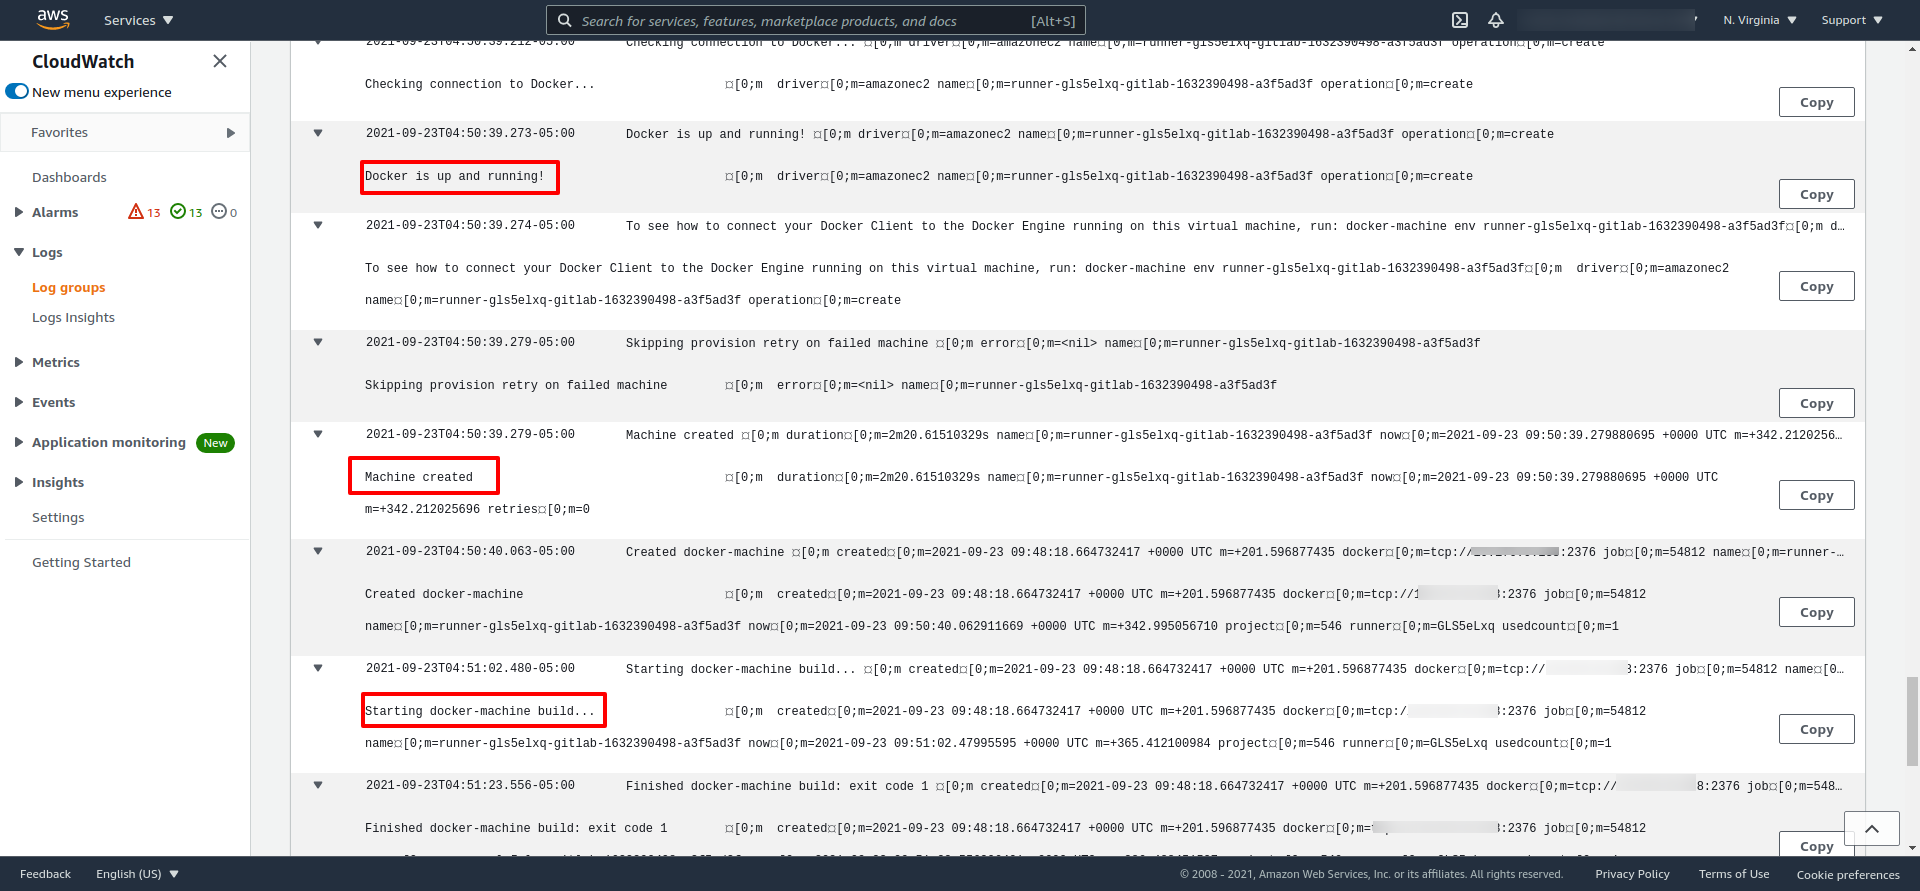
And after the Executor is provisioned, you can watch the pipeline start:
The Docker Image for the Runner
You also need a Docker image for the Runner itself. I have the Dockerfile on GitHub:
FROM ubuntu:20.04
LABEL maintainer="[email protected]"
# Install deps
RUN apt-get update && \
	apt-get install -y --no-install-recommends \
	ca-certificates \
	curl \
	git \
	amazon-ecr-credential-helper \
	dumb-init && \
	# Decrease docker image size
	rm -rf /var/lib/apt/lists/* && \
	# Install Gitlab Runner
	curl -LJO "https://gitlab-runner-downloads.s3.amazonaws.com/latest/deb/gitlab-runner_amd64.deb" && \
	dpkg -i gitlab-runner_amd64.deb && \
	# Install Docker Machine
	curl -L https://gitlab-docker-machine-downloads.s3.amazonaws.com/v0.16.2-gitlab.11/docker-machine-Linux-x86_64 > /usr/local/bin/docker-machine && \
	chmod +x /usr/local/bin/docker-machine
COPY ./entrypoint.sh ./entrypoint.sh
RUN mkdir -p /root/.docker/
COPY config.json /root/.docker/
ENV REGISTER_NON_INTERACTIVE=true
ENTRYPOINT ["/usr/bin/dumb-init", "--", "./entrypoint.sh" ]
This image installs a few things the serverless Runner needs:
Pull and Push Private Images from AWS ECR
The Amazon ECR Credential Helper handles authentication with ECR. Normally you would need to run docker login with a token that expires every 12 hours. The helper takes care of that automatically when your .gitlab-ci.yml references a private ECR image.
Drop the config.json file into the home directory of the user running Docker. Since our Dockerfile uses root, that is /root/.docker/.
The content of config.json:
{
  "credsStore": "ecr-login"
}
GitLab Runner
GitLab Runner: The gitlab-runner binary handles registration and communicates with GitLab over its API.
Docker Machine: This tool installs Docker Engine on virtual hosts and manages them. It supports AWS, Azure, DigitalOcean, and other cloud providers. You get commands to start, stop, and inspect managed hosts.
The entrypoint is where the real work happens. That is where the Runner registers itself with GitLab:
gitlab-runner register --executor docker+machine \
--docker-tlsverify \
--docker-volumes '/var/run/docker.sock:/var/run/docker.sock' \
--docker-pull-policy="if-not-present" \
--run-untagged="true" \
--machine-machine-driver "amazonec2" \
--machine-machine-name "gitlab-%s" \
--request-concurrency "$RUNNER_REQUEST_CONCURRENCY" \
--machine-machine-options amazonec2-use-private-address \
--machine-machine-options amazonec2-security-group="$AWS_SECURITY_GROUP" \
--machine-machine-options amazonec2-subnet-id="$AWS_SUBNET_ID" \
--machine-machine-options amazonec2-zone="$AWS_SUBNET_ZONE" \
--machine-machine-options amazonec2-vpc-id="$AWS_VPC_ID" \
--machine-machine-options amazonec2-iam-instance-profile="$RUNNER_IAM_PROFILE" \
"${RUNNER_TAG_LIST_OPT[@]}" \
"${ADDITIONAL_REGISTER_PARAMS_OPT[@]}"
How the Runner Works Inside the AWS Fargate Container
Just to be clear: the Fargate Task handles the registration. The container then sits idle, waiting for jobs.
The registration happens through entrypoint.sh in the container running on Fargate.
CloudFormation provides all the variables. They end up in the Fargate Task Definition.
With --executor docker+machine, the registration looks a bit different because you have to pass machine-specific options for the AWS Docker Machine driver.
The --machine-machine-options flags control how the Executor servers are created (instance type, subnet, security group, IAM profile, etc.). The other flags are for the Runner registration itself.
Need extra registration parameters? Pass them via the ADDITIONAL_REGISTER_PARAMS_OPT variable in CloudFormation.
Important Notes About Runner Registration
You can tag the Runner during registration. Tagged Runners only pick up jobs from projects that match. Set the tag in CloudFormation or leave it blank.
No tag? The script falls back to --run-untagged=true, turning your Runner into a Shared Runner that GitLab can assign to any project.
AWS_SUBNET_ZONE is just the availability zone letter. For us-east-1a, that is a.
Network Gotchas
If your GitLab is not publicly accessible, put the Runner in a private subnet and use a NAT gateway. A public subnet causes headaches here: every time the Runner spins up an EC2 instance, it gets a different public IP. Your GitLab Security Group will not recognize it and will drop the connection.
Use the private IP of your GitLab server if you can. Saves a lot of trouble.
Configuring the Concurrency Limit
The sed command in entrypoint.sh patches the concurrent value because the registration command does not expose it. It is a manual config edit under the hood.
What I Learned: Autoscaling GitLab CI on AWS Fargate
Here is what I learned after running this in production. Take what is useful, skip what is not.
What Works Well
If you are building heavy applications that need a lot of CPU or memory, this setup is great. The Runner spins up an Executor on demand, runs the job, and tears it down. You pay only for what you use.
No server maintenance. No patching. The Runner container on Fargate handles everything.
Each pipeline gets its own Executor, so builds run in parallel without stepping on each other. You can cap the number of parallel Executors to keep costs under control during spikes.
Disadvantages
The Startup Time Problem
For small projects where the pipeline finishes in under 3 minutes, this is not the best fit. The Executor takes about 2.5 minutes just to boot up before it can start running anything. Waiting that long for a 30-second build gets frustrating after a while.
What I Did About It
You can set an idle timeout so the Executor sticks around between jobs instead of shutting down immediately. Whether that is worth it depends on how often builds run. For GitLab projects that build infrequently, the boot time is still there.
Using Runner Tags Strategically
What I ended up doing was keeping a small, cheap EC2 instance running full-time as a Runner for quick builds (under 3 minutes). I tagged it accordingly. Heavy builds get routed to the Fargate Runner through a different tag. This gave me the best of both worlds. Check out our post on how to use GitLab Tags for your Runner for the details.
The Cache Problem
Because every job gets a fresh Executor, you lose all cache between builds. If your project relies on cached dependencies, this hurts.
Java Example
A Java project pulling lots of dependencies from Nexus is a good example. The first build downloads everything. The second build? Downloads everything again, because the Executor from the first build is gone.
GitLab does have an S3 cache feature for Runners. I looked into it but the documentation was not clear about whether my version supported it, and it looked like it was being replaced by other approaches. I never got it working reliably. If you have, I would love to hear about it.
Docker Volumes
Since the Runner and Executor are on different machines, Docker volumes do not work for sharing files between them. You will need S3 or some other shared storage. This is different from a regular Runner that builds locally, where volumes work fine.
Deprecation Notice (Updated 2026)
A heads-up: the docker+machine executor used in this post was deprecated in GitLab 17.5 and will be removed in GitLab 20.0 (May 2027). GitLab is moving to the Docker Autoscaler executor with fleeting plugins. The Docker Autoscaler wraps the standard Docker executor and delegates autoscaling to fleeting plugins that support AWS, Azure, and GCP.
If you are starting fresh, go with the Docker Autoscaler executor. If you are already running the docker+machine setup described here, start planning your migration now.
Wrapping Up
I ran this Fargate-based GitLab Runner setup in production for a good while. For heavy builds and teams that need isolation between pipelines, it works well and saves money compared to keeping big servers running all the time. The startup latency and lack of caching are the main tradeoffs. For small, fast builds, I would pair it with a cheap always-on Runner and use tags to route jobs.
Check out these related articles:
Effective Cache Management with Maven Projects on GitLab
Pipeline to Build Docker in Docker on GitLab
How to Use Runner Tags the Right Way
Effective Cache Management with GitLab CI — layer caching strategies and Docker volume approaches for Fargate-based runners.
Terraform and Ansible: The Integration That Actually Works — pull vs push models for provisioning and configuring Fargate executors.
Explore more like this

Terraform State Locking with S3 and DynamoDB in 2026
The moment two engineers run terraform apply at the same time without state locking, you have a race condition that can corrupt your entire infrastructure state. Both processes read the...

GitLab CI Environments and Review Apps in 2026
Review apps changed how my team does code review. Instead of reading diffs, reviewers click a link and see the actual change running. The designer can verify spacing on the...

Comments