GitLab Webhooks [Python and Google Chat Example]
![GitLab Webhooks [Python and Google Chat Example]](/wp-content/uploads/sites/5/2022/04/gitlab-webhooks-feature.webp)
Webhooks let GitLab push HTTP requests to your app when something happens. You can use this to get notified or trigger automation without polling an API.
What are GitLab Webhooks?
Webhooks are HTTP callbacks. When an event happens in GitLab, it sends an HTTP POST to a URL you specify. Your application receives the payload and does whatever it needs to do.
Supported Events
GitLab can trigger webhooks for these events:
Tag push events - When you push a new tag to a repository.
Comments - When someone adds a comment.
Confidential comments - When someone comments on a confidential issue.
Issues events - When an issue is created, updated, or closed.
Merge request events - When a merge request is created, updated, or merged.
Pipeline events - When a pipeline status changes.
Deployment events - When a deployment starts, finishes, fails, or gets canceled.
Why Use Webhooks?
You can integrate GitLab with external services based on these events. A few common use cases:
- Trigger a Jenkins build when you release a new tag
- Send notifications to Slack or Google Chat when MRs get merged
- Send SMS via Twilio when pipelines fail
Google Chat Integration
Here’s how you can set up GitLab to send notifications directly to a Google Chat space using incoming webhooks.
GitLab sends the payload to the webhook endpoint, and your receiver forwards it to Google Chat. You can use the native integration without writing code, or build a custom receiver if you need more control over the message format.
Setting Up the Google Chat Webhook
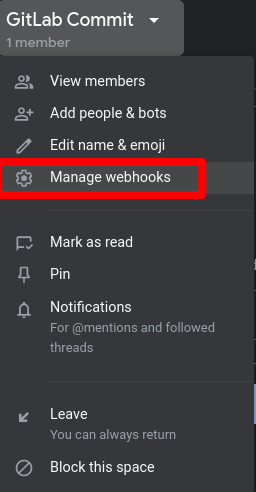
Go to your Chat space and click Manage webhooks in the menu.
GitLab Webhook – Adding Google Chat
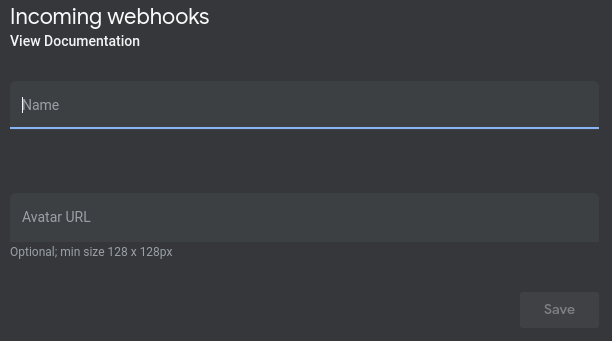
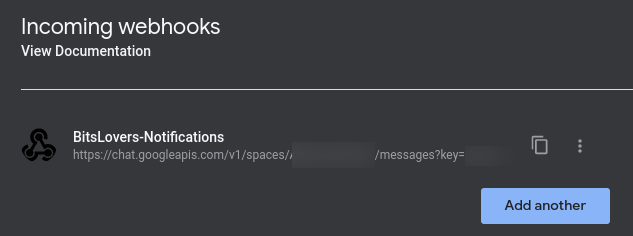
Give the webhook a name and copy the endpoint URL.
GitLab Webhooks with Google Chat – Add
GitLab Webhooks with Google Chat – Endpoint
Adding the Webhook in GitLab
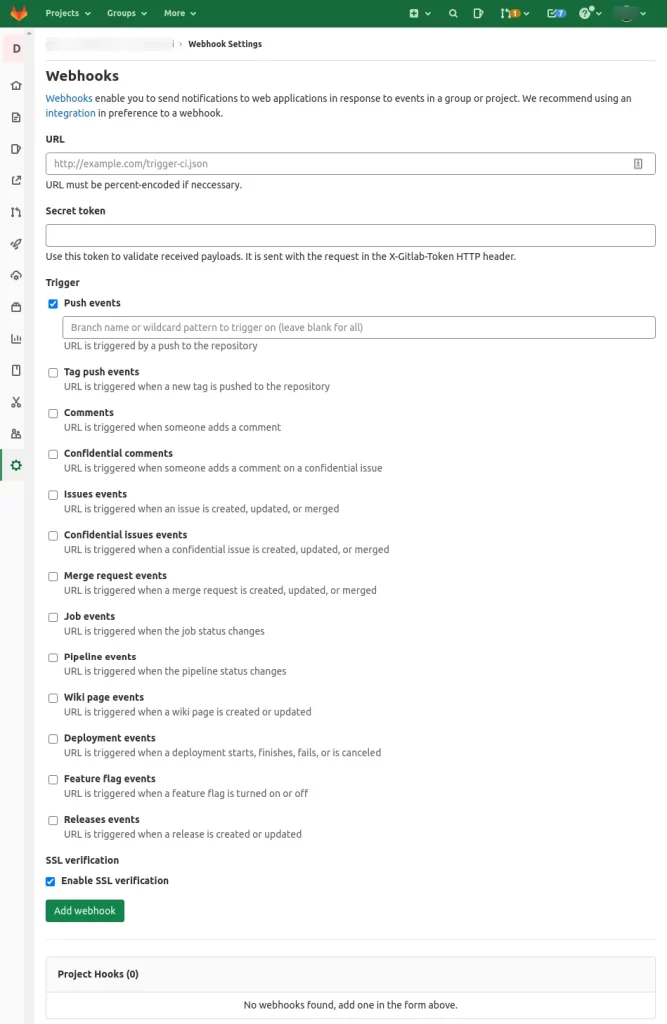
Open your project in GitLab, then go to Settings > Webhooks.
GitLab Webhook – Adding Endpoint
Enter the Google Chat webhook URL in the URL field.
In the trigger section, choose which events should fire the webhook. For push events, you can specify a branch, use a wildcard pattern, or leave blank to catch all branches.
Check the boxes for the events you want to track, then click Add webhook.
You can test it by pushing to your repository and checking if the notification appears in Google Chat.
Custom Messages with Python
The native Google Chat integration doesn’t give you control over the message format. If you want detailed messages, you can build a simple receiver in Python (or any language) that processes the GitLab payload and formats the message yourself.
How It Works
- GitLab sends a POST to your receiver
- Your receiver parses the payload
- Your receiver calls the Google Chat webhook with formatted message
Prerequisites
You need Python 3. Install the required libraries:
pip3 install python-gitlab flask httplib2
The Code
from flask import Flask
from flask import request
from json import dumps
from httplib2 import Http
import json
from gitlab import Gitlab

application = Flask(__name__)

def get_pipeline(project_id, branch):
    gl = Gitlab('https://gitlab.www.bitslovers.com', '')
    gl.auth()
    project = gl.projects.get(project_id)
    pipelines = project.pipelines.list(ref=branch)
    return pipelines[0].web_url

def send(data):
   """Send a formatted message to Google Chat"""
   url = 'https://chat.googleapis.com/v1/spaces/'
   message_headers = {'Content-Type': 'application/json; charset=UTF-8'}

   http_obj = Http()
   status = data['object_attributes']['detailed_status']
   event = data['object_kind']
   isPipeline = event == 'pipeline'

   if status != 'running' and isPipeline:
    project = data['project']['namespace']
    project_id = data['project']['id']
    branch = data['object_attributes']['ref']
    user = data['user']['name']

    print('Calling API')
    pipeline = get_pipeline(project_id, branch)

    text = " *Event:* " + event + "\n *Project:* " + project + "\n *Status:* " + status + "\n *branch:* " + branch + "\n *User:* " + user + "\n " + pipeline
    bot_message = {'text' : text}
    response = http_obj.request(
        uri=url,
        method='POST',
        headers=message_headers,
        body=dumps(bot_message),
    )

@application.route('/', methods=['POST'])
def index():
    if request.method == 'POST':
        content = request.get_json(silent=True)
        send(content)
        return 'OK\n'

if __name__ == "__main__":
    application.run(host='0.0.0.0', debug=True)
To run it:
python3 webhook.py
Configuration Notes
The get_pipeline function calls the GitLab API to get the pipeline URL. GitLab’s webhook payload doesn’t include this URL directly, so you need to fetch it separately if you want it in your notification. This is optional.
Update these values for your environment:
gl = Gitlab('https://gitlab.www.bitslovers.com', '')
Replace with your GitLab URL and a valid token.
url = 'https://chat.googleapis.com/v1/spaces/'
Replace with your actual Google Chat webhook URL.
Local Network Access
If you’re running GitLab on an EC2 instance with Docker, and your Python script listens on a Docker bridge IP (like 172.17.0.1:5000), you might get this error when adding the webhook:
Url is blocked: Requests to the local network are not allowed
GitLab blocks outbound requests to private network addresses by default. To fix this, go to Admin > Settings > Network > Outbound requests and check:
- Allow requests to the local network from webhooks and integrations
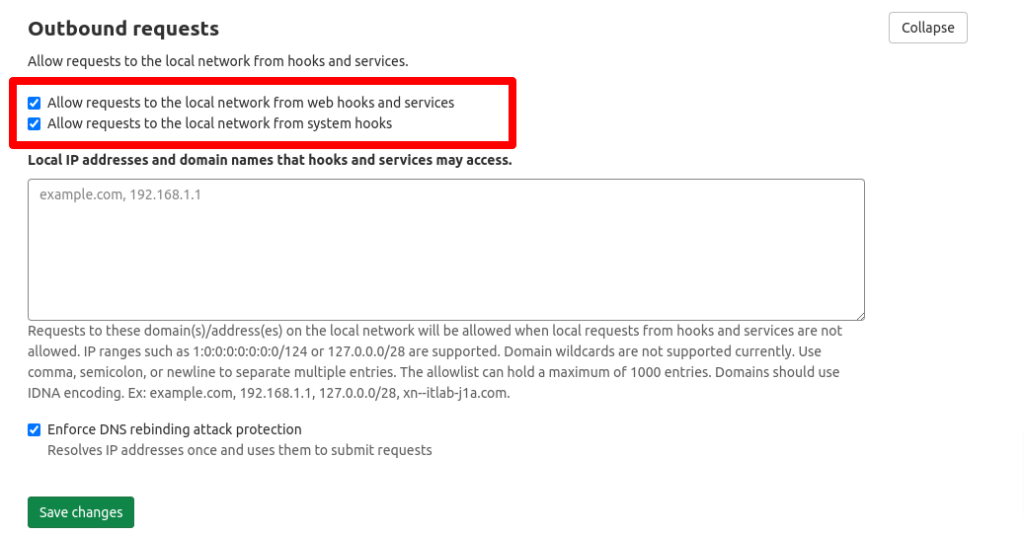
GitLab Webhooks – Using Internal Network
Wrapping Up
Webhooks give you a way to react to events in GitLab without constantly polling the API. The integration options are pretty wide - you can connect to Chat, SMS, CI systems, or build your own custom automation.
For teams doing GitOps, this makes it easy to keep everyone in the loop without manual updates.
Explore more like this

aws-bench: Test AI Agents Against Real AWS Infrastructure
AWS released aws-bench as a research preview on July 24, 2026. It does something most agent demos avoid: it puts an AI agent in front of real AWS resources and...

Terraform State Locking with S3 and DynamoDB in 2026
The moment two engineers run terraform apply at the same time without state locking, you have a race condition that can corrupt your entire infrastructure state. Both processes read the...


Comments