Adding SSH Key on Gitlab – Speed up SSH communication
If you work with GitLab, you probably type your username and password every time you push code. It gets old fast. SSH keys fix that: once set up, GitLab authenticates you automatically over an encrypted channel.
SSH (Secure Shell) is a protocol for encrypted network communication. It gives you three things: an encrypted connection between your machine and the server, mutual authentication, and the ability to run commands remotely. For GitLab specifically, it means you can push and pull without ever entering credentials.
Check for an existing SSH key pair
Before generating a new key, check if you already have one. Open a terminal and run:
Windows Command Prompt:
type %userprofile%\.ssh\id_ed25519.pub
Linux / macOS:
cat ~/.ssh/id_ed25519.pub
If you see a long string starting with ssh-ed25519, you already have a key pair. Copy it to your clipboard and skip ahead to the section on adding it to GitLab.
If the file doesn’t exist, you might also have an older key under a different name: id_rsa.pub (RSA), id_ecdsa.pub (ECDSA), or id_ed25519_sk.pub (hardware security key). DSA keys (id_dsa.pub) are deprecated and should not be used.
Generate a new SSH key pair
GitLab recommends ED25519 keys. They are smaller, faster, and more secure than RSA. Run this command:
ssh-keygen -t ed25519 -C "[email protected]"
If you are on a system that doesn’t support ED25519 (rare these days), RSA is the fallback:
ssh-keygen -t rsa -b 4096 -C "[email protected]"
On Windows, you can also use PuTTYgen if you prefer a GUI tool.
After running the command, you get prompted for a file path. Press Enter to accept the default location. Using the default path means your SSH client will find the key automatically with no extra configuration.
If you already have a key at that path, specify a different one. In that case, you need to configure your ~/.ssh/config file to tell SSH which key to use for which host.
Next, you get prompted for a passphrase. It is optional but strongly recommended. A key without a passphrase means anyone who gets the private file has full access to your GitLab account. Press Enter to skip, or type a passphrase.
Tip: To change the passphrase on an existing key later:
ssh-keygen -p
Now copy your public key. You need it in the next step.
Add the SSH key to your GitLab account
Open GitLab in your browser and do the following:
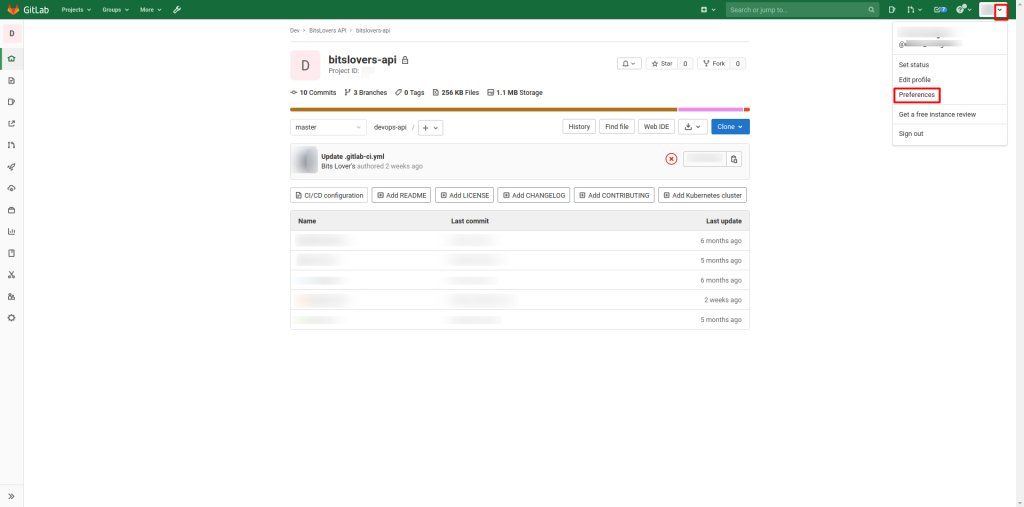
- Click your avatar in the top-right corner.
- Select Edit profile.
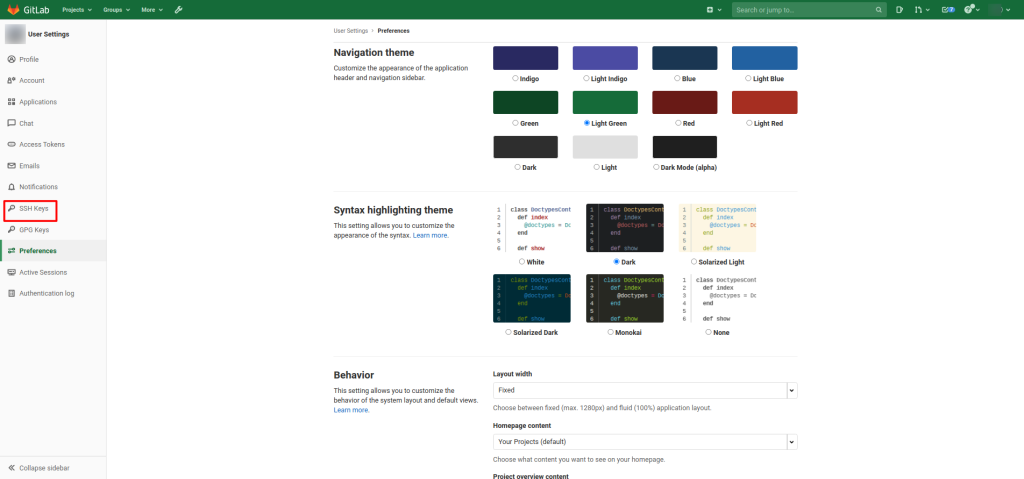
- On the left sidebar, go to Access > SSH keys.
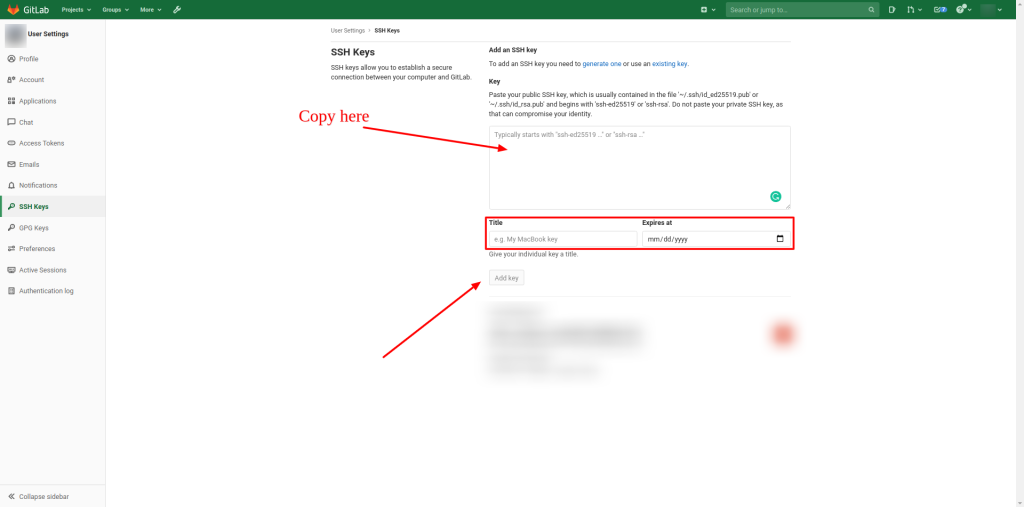
- Click Add new key.
 create SSH Key and add it to gitlab
 GitLab how to add ssh key
Paste your public key into the Key field. Give it a recognizable title like “Work Laptop” or “Home Desktop” so you remember which machine it belongs to.
 gitlab add ssh key to profile
If you copied the key manually, make sure you got the entire thing. It starts with ssh-ed25519 (or ssh-rsa for RSA keys) and ends with your email address.
GitLab now supports setting an expiration date on SSH keys. This is optional but a good practice: if a key gets compromised, it won’t work forever.
Test your setup:
ssh -T [email protected]
Replace gitlab.com with your self-hosted GitLab URL if applicable. You should see something like: Welcome to GitLab, @yourname!
Speed up your SSH connection to GitLab
Every time SSH connects to a server, it performs a handshake. That takes a second or two. If you push and pull frequently throughout the day, those seconds add up.
SSH has a feature called connection multiplexing: it reuses an existing connection for new sessions, so the handshake only happens once. Here is how to set it up.
Add this to your ~/.ssh/config:
Host gitlab.com
  ControlMaster auto
  ControlPath ~/.ssh/sockets/%r@%h-%p
  ControlPersist 600
First, create the socket directory:
mkdir -p ~/.ssh/sockets
Here is what each line does:
Host gitlab.com tells SSH to apply these rules only when connecting to gitlab.com. If you want this for all hosts, replace it with Host *.
ControlMaster auto is the key setting. It tells SSH to reuse an existing connection if one is already open. When you run ssh [email protected] a second time, it piggybacks on the first connection. The second session starts almost instantly because the handshake is already done.
There are two caveats. First, SSH uses the hostname as written to match connections. If the DNS for gitlab.com changes to point at a different server, SSH still uses the old socket. Second, since all sessions share one TCP stream, a large git clone can slow down a concurrent shell session.
ControlPath ~/.ssh/sockets/%r@%h-%p is where SSH creates the control socket file. The %r, %h, and %p tokens expand to the remote user, host, and port. If a connection goes stale (common after waking a laptop from sleep), just delete the socket file and the next SSH call opens a fresh connection:
rm ~/.ssh/sockets/*
ControlPersist 600 keeps the master connection open for 600 seconds (10 minutes) after your last session ends. Without this setting, closing your first SSH session kills every other session sharing that connection. With it, the connection stays alive in the background, so your next git push is fast too. This is especially useful for GitLab, where you push often but each operation is brief.
If you connect to GitLab over a VPN, stale sockets are a common source of connection errors. See our guide on setting up site-to-site VPN connections in the Azure Portal if that applies to your setup.
Conclusion
That is the whole process. Generate an ED25519 key, add the public half to GitLab, and you never type your password again. The SSH multiplexing trick is optional but worth the two minutes it takes to configure, especially if you push code dozens of times a day.
Related articles
How to use the Gitlab CI Variables
Effective Cache Management with Maven Projects on Gitlab.
Pipeline to build Docker in Docker on Gitlab.
How to Autoscaling the Gitlab Runner.
Execute Terraform on Gitlab CI.
Explore more like this

Terraform State Locking with S3 and DynamoDB in 2026
The moment two engineers run terraform apply at the same time without state locking, you have a race condition that can corrupt your entire infrastructure state. Both processes read the...

GitLab CI Environments and Review Apps in 2026
Review apps changed how my team does code review. Instead of reading diffs, reviewers click a link and see the actual change running. The designer can verify spacing on the...


Comments