Protect Passwords in the Cloud [Full Project Review]
![Protect Passwords in the Cloud [Full Project Review]](/wp-content/uploads/sites/5/2022/06/protect-passwords-in-cloud.png)
I want to walk you through a real project I worked on. The ask was straightforward: go through all our applications and yank out any passwords that were hardcoded in shell scripts, Java code, and config files. Then we had to put those passwords somewhere safe.
Sounds simple enough with one or two apps. We had over 50.
Beyond just removing the hardcoded passwords, we also needed to automate everything. With dozens of environments across the company, we couldn’t keep doing things manually. We needed standards so we could spin up a new environment quickly and know it would follow the same pattern. And if we ever had to manage credentials across all those environments, a consistent process would make that less painful.
Here’s what we ended up using to solve this.
How to secure your passwords from your application
Our infrastructure lives entirely in AWS, so it made sense to use AWS Secret Manager for storing usernames, passwords, SSH keys, and certificates. The service replicates across Availability Zones, which handles the high availability requirement we had.
Why Secret Manager?
Secret Manager is a managed service. You hand it your secrets and it handles replication, rotation, and access control. We used it for SSH keys, API credentials, and SSL certificates. Since it’s replicated across AZs, we didn’t have to worry about single points of failure.
How to automate and deploy our Secrets
DevOps gives you plenty of tools for automating cloud infrastructure. You could use CloudFormation or Terraform. We went with Terraform because the team already knew it and the community has a lot of good examples and modules to learn from.
CI/CD for Deployment
After writing the Terraform code, we needed a way to deploy it reliably. We used GitLab CI/CD for this.
If you’re working with a large team, automating deployments with GitLab makes sense. Once the pipeline is defined, it produces the same result no matter who triggers it. New environments follow the same template automatically, which makes them easier to maintain and faster to deploy.
A Chicken and Egg Situation
Here’s the puzzle: we need to protect our passwords. But to put them in Secret Manager, we have to define them somewhere. So we’re back to the same problem, just in a different place. We’re building a pipeline to deploy secrets, and we’ve now got all our passwords centralized.
We need to create and deploy passwords into Secret Manager. But we also need a way to automate that process while keeping the passwords protected during the build.
Our deployment scripts live in GitLab, versioned like everything else. But anyone with repo access could read files containing passwords. How do you protect passwords inside a Git repository?
Encryption
Here’s what we did. We set up the repository and pipeline, then created a separate file with all the passwords. We encrypted that file using OpenSSL before committing it.
We never commit the decrypted file. When we need to add or change credentials, we decrypt the file, make the changes, encrypt it again, and commit only the encrypted version.
Now here’s the obvious question: to encrypt with OpenSSL, you need a private key. Where do you store that?
The aha moment
We hit the same wall everyone hits. At some point, you have to store something. If we put the private key in Git, we’ve defeated the purpose.
Here’s what worked for us: we store the private key itself in Secret Manager. Then we use an IAM role to restrict access so only our GitLab Runner can retrieve it. The pipeline downloads the private key from Secret Manager, then uses it to decrypt the file containing the other secrets before deploying them.
Sounds like a Rube Goldberg machine, but it works.
Alright, let’s stop talking and start doing. Everything is on GitHub if you want to see the actual scripts: https://github.com/bitslovers/aws-secret-manager-gitlab-deploy
Terraform for AWS Secret Manager
The Terraform to deploy Secrets in AWS Secret Manager is straightforward. After you clone the repo, you’ll find a Terraform module that defines the secrets.
resource "aws_secretsmanager_secret" "secrets" {
  for_each                = var.SECRETS_LIST
  name                    = "SM-${each.key}"
  description             = lookup(each.value, "description", null)
  policy                  = var.policy-for-sm
  recovery_window_in_days = 0

  tags = {
    Name        = "SM-${each.key}"
    Env         = "Prod"
    CreatedByTerraform   = true
  }
}

resource "aws_secretsmanager_secret_version" "sm-version" {
  for_each      = { for k, v in var.SECRETS_LIST : k => v }
  secret_id     = "SM-${each.key}"
  secret_string = jsonencode(lookup(each.value, "secret_key_value", {}))
  depends_on    = [aws_secretsmanager_secret.secrets]
}
The Terraform expects a list of secrets (var.SECRETS_LIST), so you can add new ones as objects.
A terraform.tfvars file might look like this:
SECRETS_LIST = {

    db-blog = {
      description = "Blog Credentials"
      secret_key_value = {
        username = "blog"
        password = "blog"
      }
    },

    db-app = {
      description = "App Credentials"
      secret_key_value = {
        username = "app"
        password = "app"
      }
    }
  }
Important: don’t commit terraform.tfvars if it contains actual passwords. The repo has an example file for demonstration purposes only.
If you want to generate random passwords with Terraform, check our article on that.
Create Private Key for Encryption
With Terraform and the secret definitions ready, the next step is encrypting the tfvars file.
Create a Private Key using OpenSSL
To create private-key.pem using OpenSSL:
openssl req -x509 -nodes -newkey rsa:2048 -keyout private-key.pem -out public-key.pem
This generates private-key.pem and public-key.pem. We use the private key only for decryption. The public key encrypts the file.
Create Secret Manager using Command Line
The private key needs protection too. We store it in Secret Manager using the AWS CLI:
aws secretsmanager create-secret --name MyPrivateKey --secret-string file:///path/to/private-key.pem
After running this, you can see the secret in the AWS Console:
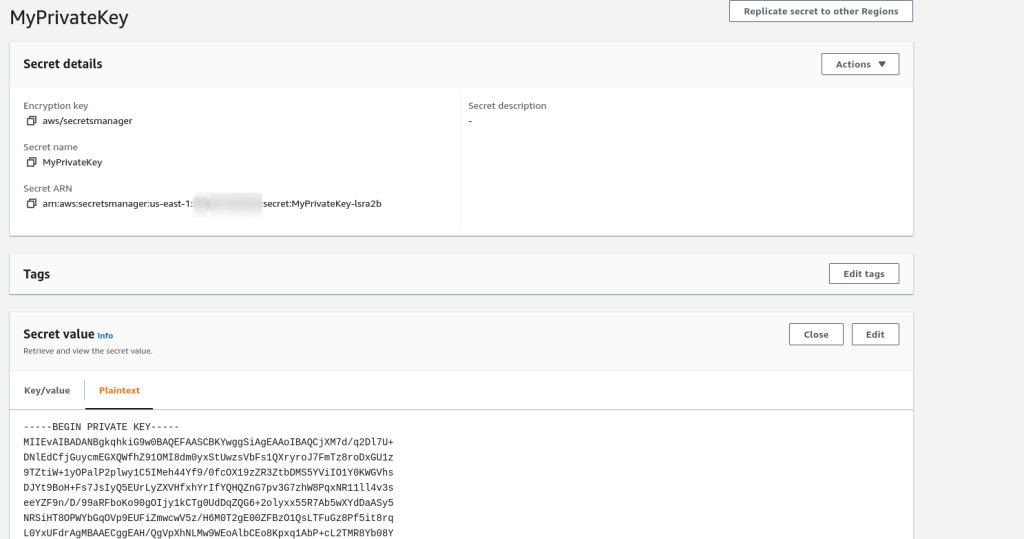 AWS Secret Manager – Private Key
Now the private key is backed up in Secret Manager. No need to keep a local copy.
To add or update secrets, edit terraform.tfvars, encrypt it, and commit the encrypted file.
How to encrypt a file with our public key
openssl smime -encrypt -binary -aes-256-cbc -in terraform.tfvars -out terraform.tfvars.enc -outform DER public-key.pem
After encryption, you can safely delete terraform.tfvars and commit terraform.tfvars.enc. The public key can also be committed since it’s only used for encryption.
How to decrypt using the Private Key
When you need to make changes, check out the repo, retrieve the private key from Secret Manager, and decrypt the file.
Retrieve the private key:
aws secretsmanager get-secret-value --secret-id MyPrivateKey | jq -r .SecretString > private-key.pem
Decrypt:
openssl smime -decrypt -in terraform.tfvars.enc -binary -inform DER -inkey private-key.pem -out terraform.tfvars
Automation using Pipeline on GitLab for Secret Manager
The pipeline triggers these steps in order:
- Build a container with all dependencies for the pipeline
- Retrieve the private key from Secret Manager
- Decrypt terraform.tfvars.enc using the private key
- Run terraform init, plan, apply
The GitLab Runner executes all pipeline jobs, so the Runner’s server needs access to Secret Manager. Lock down access to the MyPrivateKey secret so only the Runner can retrieve it.
Example IAM policy for the Runner role:
{
  "Version" : "2012-10-17",
  "Statement" : [ {
    "Sid" : "EnableAllPermissions",
    "Effect" : "Allow",
    "Principal" : {
      "AWS" : "arn:aws:iam::AWS_ACCOUNT_ID:role/runner-iam_profile"
    },
    "Action" : "secretsmanager:GetSecretValue",
    "Resource" : "arn:aws:secretsmanager:us-east-1:AWS_ACCOUNT_ID:secret:runner-pUxvkd"
  } ]
}
Example of gitlab-ci.yml
Check our article on deploying Terraform from GitLab for more context on the pipeline setup.
Here’s what the full pipeline looks like:
variables:
  AWS_REGION: us-east-1
  AWS_DEFAULT_REGION: us-east-1
  GIT_SSL_NO_VERIFY: "true"
  PHASE: BUILD

stages:
  - build_container
  - plan
  - deploy

build_container:
  image: docker:latest
  stage: build_container
  script:
    - docker build -t build-container .

Plan:
  image:
    name: build-container
    entrypoint: [""]
  stage: plan
  artifacts:
    paths:
    - plan.data
    expire_in: 1 week
  script:
    - aws secretsmanager get-secret-value --secret-id MyPrivateKey | jq -r .SecretString > private-key.pem
    - openssl smime -decrypt -in terraform.tfvars.enc -binary -inform DEM -inkey private-key.pem -out terraform.tfvars
    - terraform init
    - terraform plan -input=false -out=plan.data
  only:
    variables:
      - $PHASE == "BUILD"


Apply:
  image:
    name: build-container
    entrypoint: [""]
  when: manual
  stage: deploy
  script:
    - aws secretsmanager get-secret-value --secret-id MyPrivateKey | jq -r .SecretString > private-key.pem
    - openssl smime -decrypt -in terraform.tfvars.enc -binary -inform DEM -inkey private-key.pem -out terraform.tfvars
    - terraform init
    - terraform apply -auto-approve -input=false plan.data
  only:
    variables:
      - $PHASE == "BUILD"
  environment:
    name: bitsprod


Destroy:
  image:
    name: build-container
    entrypoint: [""]
  stage: deploy
  script:
    - aws secretsmanager get-secret-value --secret-id MyPrivateKey | jq -r .SecretString > private-key.pem
    - openssl smime -decrypt -in terraform.tfvars.enc -binary -inform DEM -inkey private-key.pem -out terraform.tfvars
    - terraform init
    - terraform destroy -auto-approve
  only:
    variables:
      - $PHASE == "DESTROY"
  environment:
    name: bitsprod
    action: stop
The first stage builds a container with all dependencies. Subsequent stages use that container. Check our article on building Docker images with GitLab for details.
Build Docker Container
Example Dockerfile:
FROM amazonlinux:2.0.20200722.0
LABEL MAINTAINER Bits Lovers
ENV TERRAFORM_VERSION 0.14.11
ENV AWSCLI_VERSION 1.19.52
ENV AWS_REGION us-east-1
# Run update and install dependencies
RUN yum update -y && \
    yum install -y sudo jq python3 py-pip unzip git openssl
RUN pip3 install --upgrade pip setuptools awscli==${AWSCLI_VERSION}
ADD https://releases.hashicorp.com/terraform/${TERRAFORM_VERSION}/terraform_${TERRAFORM_VERSION}_linux_amd64.zip /usr/bin/
RUN mv /usr/local/bin/aws /usr/bin/
RUN chmod +x /usr/bin/aws
RUN unzip /usr/bin/terraform_${TERRAFORM_VERSION}_linux_amd64.zip -d /usr/bin && \
    rm -f /usr/bin/terraform_${TERRAFORM_VERSION}_linux_amd64.zip
RUN aws configure set region ${AWS_REGION}
RUN terraform --version && \
    aws --version
This Dockerfile installs OpenSSL, Terraform, AWS CLI, and other dependencies needed for the pipeline.
Final Considerations
One thing worth mentioning: if you’ve used Terraform before, you know it stores state. Whether you’re using an S3 bucket or something else for remote state, remember that Terraform state files can contain sensitive data by default. If your AWS account has many users with broad S3 permissions, you should restrict access to the state file.
The approach I’ve seen work well is using separate AWS accounts for state management, with only a few people having access. If that’s overkill for your situation, congratulations on having a well-segregated permissions model already.
I should mention that encrypting remote state is something people do, but I think it’s risky. If you lose the state file and it’s encrypted, you’re in trouble. That’s just my take.
If this was useful, great. Thanks for reading.
Explore more like this

AWS Lambda MicroVMs: Build a Stateful AI Code Sandbox
AWS Lambda MicroVMs gives application developers direct control of a serverless Firecracker virtual machine. That sentence needs one qualification: this is not a long-running EC2 replacement, and it is not...


AWS Glue Data Quality Anomaly Detection for Catalog Tables
AWS Glue Data Quality gained two important capabilities on July 27, 2026: anomaly detection now works for Catalog-based data quality evaluations, and evaluation results can be written into AWS Glue...

AWS Security Hub MCP App: Investigate Risk from Claude Desktop
AWS released the Security Hub MCP App in public preview on July 27, 2026. It runs as a local Model Context Protocol server, uses the AWS credentials already configured on...

Comments